MEWBIES@: Facebook Twitter G+ YouTube DeviantArt Forum Wall
▄▄▄▄▄▄▄▄▄▄▄▄▄▄▄▄▄▄▄▄▄▄▄▄▄▄▄▄▄▄▄▄▄▄▄▄▄▄▄▄▄▄▄▄▄▄▄▄▄▄▄▄▄▄▄▄▄▄▄▄▄▄▄▄▄▄▄▄▄▄▄▄▄
██ ██
█▌ - CUSTOMIZE YOUR MOTD - LINUX - █▌
█▌ █▌
█ ▐▌
█ When users login to their shell account on a Linux based OS they will be ▐▌
█ greeted with uname, followed by the MOTD (message of the day), then mail ▐▌
█ box status and then the last login information. ▐▌
█ This tutorial will show you how to remove and or change those adding ▐▌
█ informative system information and some fun stuff like weather and a ▐▌
█ daily random quote or a fortune. Step by step; you can do it! :) You'll ▐▌
█ have the best MOTD around. ▐▌
█ P.S. Don't let the length of the tutorial scare you - it will help you as ▐▌
█ I share many working examples and troubleshooting so you don't need to ▐▌
█ spend many hours to have it working for your setup. ▐▌
█ ▐▌
 █ ___________..___________ ▐▌
█ ▐▌
█ DEFAULT MOTD ▐▌
█ NOTES ▐▌
█ REMOVE DEFAULT MOTD ▐▌
█ MODIFY OR REMOVE UNAME ▐▌
█ REMOVE NO MAIL / YOU HAVE NEW MAIL ▐▌
█ REMOVE LAST LOGIN ▐▌
█ ▐▌
█ CUSTOMIZE YOUR MOTD ▐▌
█ 1. TCLSH ▐▌
█ 2. HDDTEMP ▐▌
█ 3. LM-SENSORS ▐▌
█ 4. WEATHER ▐▌
█ 5. EASY FAST ASCII ART ▐▌
█ ▐▌
█ EXPLAIN A BIT ABOUT THE MOTD SCRIPT CODE ▐▌
█ CREATE THE MOTD SCRIPT ▐▌
█ TEXT FORMAT/COLOR ▐▌
█ DEGREE SYMBOL ° PROBLEM ▐▌
█ ▐▌
█ RANDOM FORTUNE OR A QUOTE ON EACH LOGIN ▐▌
█ COWSAY THE FORTUNE ▐▌
█ OTHER MOTD IDEAS ▐▌
█ ▐▌
█ ___________..___________ ▐▌
█ ▐▌
█ DEFAULT MOTD: ▐▌
█ ````````````` ▐▌
█ For Example Debian's default MOTD is: ▐▌
█ Linux yourserver.com 1.2.34-5-678 #1 Wed Nov 4 20:19:07 UTC 2009 i686 ▐▌
█ ▐▌
█ The programs included with the Debian GNU/Linux system are free software; ▐▌
█ the exact distribution terms for each program are described in the ▐▌
█ individual files in /usr/share/doc/*/copyright. ▐▌
█ ▐▌
█ Debian GNU/Linux comes with ABSOLUTELY NO WARRANTY, to the extent ▐▌
█ permitted by applicable law. ▐▌
█ ▐▌
█ You have mail. ▐▌
█ Last login: Sat Apr 24 07:30:23 2010 from 123.456.789.0 ▐▌
█ ▐▌
█ mewbie@mewbies.com:~$ ▐▌
█ ▐▌
█ ┼▬───────────────────────────────── ∙∙ ▬─────────────────────────────────┼ ▐▌
█ ▐▌
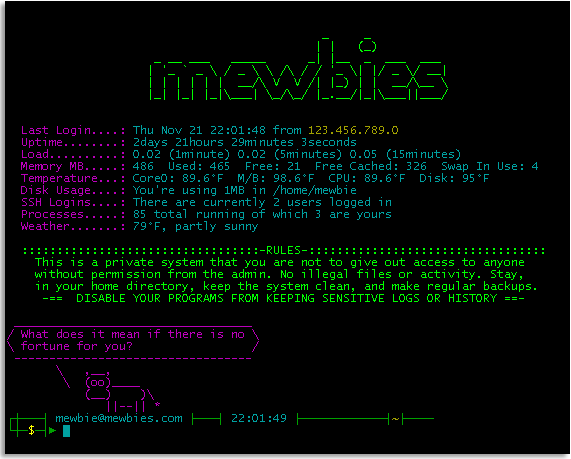
█ Text version of my MOTD: ▐▌
█ _ _ ▐▌
█ | | (_) ▐▌
█ _ __ ___ _____ _| |__ _ ___ ___ ▐▌
█ | '_ ` _ \ / _ \ \ /\ / / '_ \| |/ _ \/ __| ▐▌
█ | | | | | | __/\ V V /| |_) | | __/\__ \ ▐▌
█ |_| |_| |_|\___| \_/\_/ |_.__/|_|\___||___/ ▐▌
█ ▐▌
█ Last Login....: Mon Jun 14 02:59:55 from 123.456.789.0 ▐▌
█ Uptime........: 50days 15hours 51minutes 52seconds ▐▌
█ Load..........: 0.02 (1minute) 0.01 (5minutes) 0.00 (15minutes) ▐▌
█ Memory MB.....: 488 Used: 457 Free: 30 Free Cached: 295 Swap In Use: 160▐▌
█ Temperature...: Core0: 91.4°F M/B: 98.6°F CPU: 89.6°F Disk: 98°F ▐▌
█ Disk Usage....: You're using 2M in /home/mewbie ▐▌
█ SSH Logins....: There are currently 3 users logged in. ▐▌
█ Processes.....: 84 running of which 4 are yours ▐▌
█ Weather.......: 58°F, Cloudy ▐▌
█ ▐▌
█ ::::::::::::::::::::::::::::::::::-RULES-::::::::::::::::::::::::::::::::::▐▌
█ This is a private system that you are not to give out access to anyone ▐▌
█ without permission from the admin. No illegal files or activity. Stay, ▐▌
█ in your home directory, keep the system clean, and make regular backups. ▐▌
█ -== DISABLE YOUR PROGRAMS FROM KEEPING SENSITIVE LOGS OR HISTORY ==- ▐▌
█ ________________________________________ ▐▌
█ / You will be Told about it Tomorrow. Go \ ▐▌
█ \ Home and Prepare Thyself. / ▐▌
█ ---------------------------------------- ▐▌
█ \ ,__, ▐▌
█ \ (oo)____ ▐▌
█ (__) )\ ▐▌
█ ||--|| * ▐▌
█ ┌┼───┤ mewbie@mewbies.com ├───┤ 23:35:27 ├────────────┤~├──── ▐▌
█ └┼─$─┤► ▐▌
█ ▐▌
█ ┼▬───────────────────────────────── ∙∙ ▬─────────────────────────────────┼ ▐▌
█ ▐▌
█ ▐▌
█ NOTES: ▐▌
█ `````` ▐▌
█ 1. Either create a new user, or use an existing user that isn't in the ▐▌
█ admin group for testing purposes: The commands used on the MOTD script ▐▌
█ are executed each time a user(s) logins. If a command isn't allowed for a ▐▌
█ normal user the MOTD will output only errors for that user. All the ▐▌
█ commands we use here are available to all users for my setup; your setup ▐▌
█ might be different. Furthermore having a second login simultaneously you ▐▌
█ can easily login/out to view results as a normal user and not leave root. ▐▌
█ ▐▌
█ 2. You don't need to put everything I have on my MOTD - I just added a ▐▌
█ variety of information to give some ideas. ▐▌
█ ▐▌
█ 3. In our MOTD script if you want to remove something it will be in two ▐▌
█ places; the '# MOTD script' section (that issues the cmds) and the ▐▌
█ '# * Print Results' section that, well as it says prints the results of ▐▌
█ the cmds :). ▐▌
█ ▐▌
█ ___________..___________ ▐▌
█ ▐▌
█ REMOVE DEFAULT MOTD: ▐▌
█ ```````````````````` ▐▌
█ To remove the lines or change the MOTD section which is "The programs ▐▌
█ included ... by applicable law." you need to (commands are in bold): ▐▌
█ su ▐▌
█ pico /etc/motd ▐▌
█ ▐▌
█ Remove everything, as I have done (or alter it to your liking). ▐▌
█ ▐▌
█ Log back in to view the changes. ▐▌
█ ▐▌
█ This change though is only temporary - next time the box reboots the MOTD ▐▌
█ will be restored back to its previous state by the bootmisc.sh, which is ▐▌
█ here /etc/init.d/bootmisc.sh, as it re-writes back to /var/run/motd the ▐▌
█ contents of /etc/motd.tail - etc/motd is actually a symbolic link ▐▌
█ /var/run/motd. ▐▌
█ (bootmisc.sh contains: ▐▌
█ # Update motd ▐▌
█ uname -snrvm > /var/run/motd ▐▌
█ [ -f /etc/motd.tail ] && cat /etc/motd.tail >> /var/run/motd ) ▐▌
█ ▐▌
█ So to make this change permanent, you need to remove everything (or to ▐▌
█ your liking) also from: ▐▌
█ pico /etc/motd.tail ▐▌
█ ▐▌
█ ___________..___________ ▐▌
█ ▐▌
█ MODIFY OR REMOVE UNAME: ▐▌
█ ``````````````````````` ▐▌
█ If you want to modify the output of 'uname' (print system information); ▐▌
█ the first line printed out when you login, similar to: ▐▌
█ Linux yourserver.com 1.2.34-5-678 #1 Wed Nov 4 20:19:07 UTC 2009 i686 ▐▌
█ man uname ▐▌
█ q ▐▌
█ For example: ▐▌
█ uname -orvm ▐▌
█ Output would be similar to: ▐▌
█ 3.2.0-4-486 #1 Debian 3.2.51-1 i686 GNU/Linux ▐▌
█ ▐▌
█ Then edit the options: ▐▌
█ su ▐▌
█ pico /etc/init.d/bootmisc.sh ▐▌
█ Change: ▐▌
█ uname -snrvm > /var/run/motd ▐▌
█ To, for example: ▐▌
█ uname -orvm > /var/run/motd ▐▌
█ ▐▌
█ If you want to remove uname: ▐▌
█ su ▐▌
█ pico /etc/init.d/bootmisc.sh ▐▌
█ Change: ▐▌
█ uname -snrvm > /var/run/motd ▐▌
█ To: ▐▌
█ #uname -snrvm > /var/run/motd ▐▌
█ ▐▌
█ pico +21 /etc/init.d/motd ▐▌
█ Change: ▐▌
█ uname -snrvm > /var/run/motd.dynamic ▐▌
█ To: ▐▌
█ #uname -snrvm > /var/run/motd.dynamic ▐▌
█ ▐▌
█ Then: ▐▌
█ echo "" > /var/run/motd.dynamic ▐▌
█ ▐▌
█ Log back in to view the changes. If the changes aren't showing you'll ▐▌
█ need to reboot. This is the only modification we'll make that might ▐▌
█ require a reboot to view the changes: ▐▌
█ reboot ▐▌
█ ▐▌
█ Next time you login you will only see: ▐▌
█ You have new mail. (or No mail.) ▐▌
█ Last login: Sat Apr 24 07:30:23 2010 from 123.456.789.0 ▐▌
█ ▐▌
█ ___________..___________ ▐▌
█ ▐▌
█ REMOVE NO MAIL / YOU HAVE NEW MAIL: ▐▌
█ ``````````````````````````````````` ▐▌
█ If you remove the status of your mailbox output you'll have to manually ▐▌
█ check it to know if there is mail. Even if another user mails you from the ▐▌
█ shell (mail mewbie@localhost) you won't be alerted. ▐▌
█ pico /etc/pam.d/sshd ▐▌
█ Change: ▐▌
█ # Print the status of the user's mailbox upon successful login. ▐▌
█ session optional pam_mail.so standard noenv # [1] ▐▌
█ To: ▐▌
█ # Print the status of the user's mailbox upon successful login. ▐▌
█ #session optional pam_mail.so standard noenv # [1] ▐▌
█ ▐▌
█ ___________..___________ ▐▌
█ ▐▌
█ REMOVE LAST LOGIN: ▐▌
█ `````````````````` ▐▌
█ I do not recommend removing the 'Last login' statement because if someone ▐▌
█ did gain access to your account you'll see an IP that isn't yours (if they ▐▌
█ didn't cover their tracks that is). So what I have done is removed it from ▐▌
█ the standard MOTD and added it to our MOTD script below so that visually ▐▌
█ it looks better. To remove it (later we'll add it back): ▐▌
█ pico /etc/ssh/sshd_config ▐▌
█ Change: PrintLastLog yes ▐▌
█ To: PrintLastLog no ▐▌
█ ▐▌
█ Restart your ssh server for the changes to take affect: ▐▌
█ /etc/init.d/ssh restart ▐▌
█ ▐▌
█ ___________..___________ ▐▌
█ ▐▌
█ CUSTOMIZE YOUR MOTD: ▐▌
█ ```````````````````` ▐▌
█ PREREQUISITES: ▐▌
█ 1. TCLSH: View if you have tclsh installed: ▐▌
█ dpkg -l | grep tcl ▐▌
█ ▐▌
█ Reply if you do have it installed will be similar to: ▐▌
█ tcl8.5 8.5.3-2 Tcl (the Tool Command Language) v8.5 - run-t ▐▌
█ tcl8.5-dev 8.5.3-2 Tcl (the Tool Command Language) v8.5 - devel ▐▌
█ ▐▌
█ If not: ▐▌
█ su ▐▌
█ aptitude install tcl ▐▌
█ ▐▌
█ ___________..___________ ▐▌
█ ▐▌
█ 2. HDDTEMP: If you want temperature readings for your hard drive, using ▐▌
█ 'hddtemp', your disk must have SMART technology (most do for the past few ▐▌
█ years). ▐▌
█ Do this: ▐▌
█ apt-get install hddtemp ▐▌
█ Select <Yes> to all the questions asked by using your arrow or tab key ▐▌
█ then hitting Enter. You can easily modify these settings later if needed. ▐▌
█ You'll be asked 3 questions: to run as a daemon, to listen on local IP, ▐▌
█ and what port. After it is finished the output will be reply similar to: ▐▌
█ Starting disk temperature monitoring daemon: hddtemp: /dev/sda. ▐▌
█ Take note of the hard drive name in the above output: /dev/sda in my case. ▐▌
█ ▐▌
█ Help file for hddtemp, press q to quit: man hddtemp ▐▌
█ ▐▌
█ It will run as a daemon (run levels 2-5, run on bootup). ▐▌
█ To modify any of these settings: ▐▌
█ dpkg-reconfigure hddtemp ▐▌
█ or ▐▌
█ pico /etc/default/hddtemp ▐▌
█ ▐▌
█ Now test hddtemp cmd: ▐▌
█ hddtemp -v ▐▌
█ Output similar to: hddtemp version 0.3-beta15 ▐▌
█ If you receive 'hddtemp: command not found' run this: ▐▌
█ dpkg-reconfigure hddtemp ▐▌
█ answer Yes to all ▐▌
█ Then try it again: ▐▌
█ hddtemp -v ▐▌
█ ▐▌
█ Now we need to work out the correct cmd for your drive and the output ▐▌
█ that you would like. Once you have it make a note of the cmd for our MOTD ▐▌
█ script. For example output only 35°C. This is how: ▐▌
█ hddtemp /dev/sda ▐▌
█ Or yours might be: hddtemp /dev/hda ▐▌
█ Output will be similar to: ▐▌
█ /dev/hda: WDC WD400BB-22JHC0: 35°C ▐▌
█ ▐▌
█ Replace the 'a' in hda or sda with the drive letter you want hddtemp to ▐▌
█ report on. ▐▌
█ Some examples of hard drive names: ▐▌
█ /dev/hda master device on primary IDE channel ▐▌
█ /dev/hdb slave device on primary IDE channel ▐▌
█ /dev/hdc master device on secondary IDE channel ▐▌
█ /dev/hdd slave device on secondary IDE channel ▐▌
█ /dev/sda first SCSI hard drive ▐▌
█ /dev/sdb second SCSI hard drive ▐▌
█ ▐▌
█ So to shorten the reply to be only '35°C' count the characters from the ▐▌
█ beginning of the reply until where you want it to reply. ▐▌
█ Using my example output: /dev/hda: WDC WD400BB-22JHC0: 35°C ▐▌
█ the cmd to output only the 31st - 35th characters is: ▐▌
█ hddtemp /dev/sda | cut -c 31-35 ▐▌
█ Try the cmd yourself to understand what I mean, replacing disk name 'sda' ▐▌
█ with yours. ▐▌
█ ▐▌
█ To display temperature in Fahrenheit: ▐▌
█ hddtemp /dev/sda -uf | cut -c 31-35 ▐▌
█ Or to shorten the reply to temperature only e.g. 35: ▐▌
█ hddtemp -n /dev/sda ▐▌
█ In Fahrenheit: ▐▌
█ hddtemp -nuf /dev/sda ▐▌
█ ▐▌
█ Make note of your final working command for our MOTD. ▐▌
█ ▐▌
█ ___________..___________ ▐▌
█ ▐▌
█ 3. LM-SENSORS: lm-sensors will output temperature readings, and other ▐▌
█ information, for hardware monitoring chips. We'll use this on our MOTD to ▐▌
█ report the temperature for Core0, Mother Board and CPU. ▐▌
█ apt-get install lm-sensors ▐▌
█ lm-sensors help file, press q to quit: man lm-sensors ▐▌
█ After install is complete: ▐▌
█ sensors-detect ▐▌
█ Hit enter key when prompted YES/No questions to select the default answer ▐▌
█ for all. You can easily modify these by running sensors-detect again if ▐▌
█ needed later. ▐▌
█ If sensors-detect hangs on a sensor; make a note which one, then press ▐▌
█ Ctrl+c to quit sensors-detect. ▐▌
█ Then run sensors-detect again and answer No to the one that it hung on. ▐▌
█ ▐▌
█ At the end you'll have been prompted to add lines to your /etc/modules. ▐▌
█ This is my output, yours will be different: ▐▌
█ To load everything that is needed, add this to /etc/modules: ▐▌
█ #----cut here---- ▐▌
█ # Chip drivers ▐▌
█ w83627hf ▐▌
█ k8temp ▐▌
█ #----cut here---- ▐▌
█ ▐▌
█ So lets add the output: ▐▌
█ pico /etc/modules ▐▌
█ Mine has this: ▐▌
█ loop ▐▌
█ I changed it to, using example above, (add your own output): ▐▌
█ loop ▐▌
█ # Chip drivers ▐▌
█ w83627hf ▐▌
█ k8temp ▐▌
█ ▐▌
█ Now start to it: ▐▌
█ /etc/init.d/module-init-tools ▐▌
█ Output: Loading kernel modules...done. ▐▌
█ ▐▌
█ Just for your information the cmds to start, stop etc. are: ▐▌
█ /etc/init.d/module-init-tools start ▐▌
█ /etc/init.d/module-init-tools stop ▐▌
█ /etc/init.d/module-init-tools restart ▐▌
█ /etc/init.d/module-init-tools force-reload ▐▌
█ By the way it has a run level 'S' - it will run at start up on its own. ▐▌
█ ▐▌
█ Now we need to load the modules that we've added to /etc/modules above, ▐▌
█ changing the module name below to your own: ▐▌
█ modprobe w83627hf ▐▌
█ modprobe k8temp ▐▌
█ And then update the modules (previously known as update-modules): ▐▌
█ depmod -a ▐▌
█ ▐▌
█ After the update is finished, test lm-sensors by running: ▐▌
█ sensors ▐▌
█ ▐▌
█ The output should be similar to: ▐▌
█ k8temp-pci-00c3 ▐▌
█ Adapter: PCI adapter ▐▌
█ Core0 Temp: +29.0°C ▐▌
█ ▐▌
█ w83627thf-isa-0290 ▐▌
█ Adapter: ISA adapter ▐▌
█ VCore: +1.43 V (min = +0.70 V, max = +1.87 V) ▐▌
█ +12V: +11.98 V (min = +1.95 V, max = +6.02 V) ALARM ▐▌
█ +3.3V: +3.36 V (min = +0.00 V, max = +1.58 V) ALARM ▐▌
█ +5V: +4.99 V (min = +1.81 V, max = +3.84 V) ALARM ▐▌
█ -12V: -11.46 V (min = -14.91 V, max = -4.38 V) ▐▌
█ V5SB: +5.05 V (min = +2.85 V, max = +0.43 V) ALARM ▐▌
█ VBat: +3.49 V (min = +3.62 V, max = +0.02 V) ALARM ▐▌
█ fan1: 2721 RPM (min = 8035 RPM, div = 2) ALARM ▐▌
█ CPU Fan: 3054 RPM (min = -1 RPM, div = 2) ALARM ▐▌
█ fan3: 0 RPM (min = 168750 RPM, div = 2) ALARM ▐▌
█ M/B Temp: +36.0°C (high = +5.0°C, hyst = +0.0°C) ALARM sensor = ▐▌
█ CPU Temp: +30.5°C (high = +60.0°C, hyst = +55.0°C) sensor = ▐▌
█ temp3: +65.5°C (high = +60.0°C, hyst = +55.0°C) ALARM sensor = ▐▌
█ cpu0_vid: +0.000 V ▐▌
█ beep_enable:enabled ▐▌
█ ▐▌
█ UPDATE: Newer versions of lm-sensor now do not report the device name; ▐▌
█ only the readings from the chips. You'll need to figure out for your own ▐▌
█ setup what chips temp1, temp2, temp3, etc are HERE. Hopefully yours is ▐▌
█ listed, mine wasn't on last check. Fortunately I shared my output above ▐▌
█ here so I doing guess work for my devices :p . My output is now: ▐▌
█ [snip] ▐▌
█ Core0 Temp: +31.0°C ▐▌
█ [snip] ▐▌
█ temp1: +38.0°C (high = +69.0°C, hyst = +0.0°C) sensor = thermis ▐▌
█ temp2: +32.5°C (high = +60.0°C, hyst = +55.0°C) sensor = thermis ▐▌
█ temp3: +65.5°C (high = +60.0°C, hyst = +55.0°C) ALARM sensor = ▐▌
█ [snip] ▐▌
█ ▐▌
█ For our MOTD we want the output to report only the temperatures for Core0, ▐▌
█ M/B (mother board) and CPU. If your output for sensors has the device ▐▌
█ names like the original above (M/B Temp etc) than this works nice: ▐▌
█ sensors -f | grep Temp ▐▌
█ Output would be: ▐▌
█ Core0 Temp: +31.0°C ▐▌
█ M/B Temp: +36.0°C ▐▌
█ CPU Temp: +30.5°C ▐▌
█ Or in Fahrenheit: sensors -f | grep Temp ▐▌
█ But if sensors reports like mine does without device names (temp1, etc) ▐▌
█ than use this: sensors -f | grep °C or sensors -f | grep °F My output: ▐▌
█ Core0 Temp: +87.8°F ▐▌
█ temp1: +100.4°F (high = +156.2°F, hyst = +32.0°F) sensor = thermis ▐▌
█ temp2: +90.5°F (high = +140.0°F, hyst = +131.0°F) sensor = thermi ▐▌
█ temp3: +149.9°F (high = +140.0°F, hyst = +131.0°F) ALARM sensor = ▐▌
█ ▐▌
█ (Based on my original readings I'm guessing temp1 is M/B and temp2 is CPU.)▐▌
█ ▐▌
█ Now lets remove the '+' from the output using tr -d '+': ▐▌
█ sensors | grep °C | tr -d '+' or in F: sensors -f | grep °F | tr -d '+' ▐▌
█ ▐▌
█ Make note of your final working command. Code in our MOTD script will ▐▌
█ remove everything else but the actual temperatures e.g. 87.8°F ▐▌
█ ▐▌
█ ___________..___________ ▐▌
█ ▐▌
█ 4. WEATHER: ▐▌
█ If you would like the Weather report on your MOTD like I have above, ▐▌
█ you'll need to install curl. To view if you have it installed already: ▐▌
█ dpkg -l | grep curl ▐▌
█ If you do output will be similar to: ▐▌
█ curl 7.26.0-1+wheezy5 command line tool for transferring data with Ux ▐▌
█ libcurl3:i386 7.26.0-1+wheezy5 easy-to-use client-side URL transfer lib ▐▌
█ ▐▌
█ If you don't have either: ▐▌
█ aptitude install curl libcurl3 ▐▌
█ ▐▌
█ Next you need to find the correct 'location code' for the area you want ▐▌
█ the weather to report on. Go
█ ___________..___________ ▐▌
█ ▐▌
█ DEFAULT MOTD ▐▌
█ NOTES ▐▌
█ REMOVE DEFAULT MOTD ▐▌
█ MODIFY OR REMOVE UNAME ▐▌
█ REMOVE NO MAIL / YOU HAVE NEW MAIL ▐▌
█ REMOVE LAST LOGIN ▐▌
█ ▐▌
█ CUSTOMIZE YOUR MOTD ▐▌
█ 1. TCLSH ▐▌
█ 2. HDDTEMP ▐▌
█ 3. LM-SENSORS ▐▌
█ 4. WEATHER ▐▌
█ 5. EASY FAST ASCII ART ▐▌
█ ▐▌
█ EXPLAIN A BIT ABOUT THE MOTD SCRIPT CODE ▐▌
█ CREATE THE MOTD SCRIPT ▐▌
█ TEXT FORMAT/COLOR ▐▌
█ DEGREE SYMBOL ° PROBLEM ▐▌
█ ▐▌
█ RANDOM FORTUNE OR A QUOTE ON EACH LOGIN ▐▌
█ COWSAY THE FORTUNE ▐▌
█ OTHER MOTD IDEAS ▐▌
█ ▐▌
█ ___________..___________ ▐▌
█ ▐▌
█ DEFAULT MOTD: ▐▌
█ ````````````` ▐▌
█ For Example Debian's default MOTD is: ▐▌
█ Linux yourserver.com 1.2.34-5-678 #1 Wed Nov 4 20:19:07 UTC 2009 i686 ▐▌
█ ▐▌
█ The programs included with the Debian GNU/Linux system are free software; ▐▌
█ the exact distribution terms for each program are described in the ▐▌
█ individual files in /usr/share/doc/*/copyright. ▐▌
█ ▐▌
█ Debian GNU/Linux comes with ABSOLUTELY NO WARRANTY, to the extent ▐▌
█ permitted by applicable law. ▐▌
█ ▐▌
█ You have mail. ▐▌
█ Last login: Sat Apr 24 07:30:23 2010 from 123.456.789.0 ▐▌
█ ▐▌
█ mewbie@mewbies.com:~$ ▐▌
█ ▐▌
█ ┼▬───────────────────────────────── ∙∙ ▬─────────────────────────────────┼ ▐▌
█ ▐▌
█ Text version of my MOTD: ▐▌
█ _ _ ▐▌
█ | | (_) ▐▌
█ _ __ ___ _____ _| |__ _ ___ ___ ▐▌
█ | '_ ` _ \ / _ \ \ /\ / / '_ \| |/ _ \/ __| ▐▌
█ | | | | | | __/\ V V /| |_) | | __/\__ \ ▐▌
█ |_| |_| |_|\___| \_/\_/ |_.__/|_|\___||___/ ▐▌
█ ▐▌
█ Last Login....: Mon Jun 14 02:59:55 from 123.456.789.0 ▐▌
█ Uptime........: 50days 15hours 51minutes 52seconds ▐▌
█ Load..........: 0.02 (1minute) 0.01 (5minutes) 0.00 (15minutes) ▐▌
█ Memory MB.....: 488 Used: 457 Free: 30 Free Cached: 295 Swap In Use: 160▐▌
█ Temperature...: Core0: 91.4°F M/B: 98.6°F CPU: 89.6°F Disk: 98°F ▐▌
█ Disk Usage....: You're using 2M in /home/mewbie ▐▌
█ SSH Logins....: There are currently 3 users logged in. ▐▌
█ Processes.....: 84 running of which 4 are yours ▐▌
█ Weather.......: 58°F, Cloudy ▐▌
█ ▐▌
█ ::::::::::::::::::::::::::::::::::-RULES-::::::::::::::::::::::::::::::::::▐▌
█ This is a private system that you are not to give out access to anyone ▐▌
█ without permission from the admin. No illegal files or activity. Stay, ▐▌
█ in your home directory, keep the system clean, and make regular backups. ▐▌
█ -== DISABLE YOUR PROGRAMS FROM KEEPING SENSITIVE LOGS OR HISTORY ==- ▐▌
█ ________________________________________ ▐▌
█ / You will be Told about it Tomorrow. Go \ ▐▌
█ \ Home and Prepare Thyself. / ▐▌
█ ---------------------------------------- ▐▌
█ \ ,__, ▐▌
█ \ (oo)____ ▐▌
█ (__) )\ ▐▌
█ ||--|| * ▐▌
█ ┌┼───┤ mewbie@mewbies.com ├───┤ 23:35:27 ├────────────┤~├──── ▐▌
█ └┼─$─┤► ▐▌
█ ▐▌
█ ┼▬───────────────────────────────── ∙∙ ▬─────────────────────────────────┼ ▐▌
█ ▐▌
█ ▐▌
█ NOTES: ▐▌
█ `````` ▐▌
█ 1. Either create a new user, or use an existing user that isn't in the ▐▌
█ admin group for testing purposes: The commands used on the MOTD script ▐▌
█ are executed each time a user(s) logins. If a command isn't allowed for a ▐▌
█ normal user the MOTD will output only errors for that user. All the ▐▌
█ commands we use here are available to all users for my setup; your setup ▐▌
█ might be different. Furthermore having a second login simultaneously you ▐▌
█ can easily login/out to view results as a normal user and not leave root. ▐▌
█ ▐▌
█ 2. You don't need to put everything I have on my MOTD - I just added a ▐▌
█ variety of information to give some ideas. ▐▌
█ ▐▌
█ 3. In our MOTD script if you want to remove something it will be in two ▐▌
█ places; the '# MOTD script' section (that issues the cmds) and the ▐▌
█ '# * Print Results' section that, well as it says prints the results of ▐▌
█ the cmds :). ▐▌
█ ▐▌
█ ___________..___________ ▐▌
█ ▐▌
█ REMOVE DEFAULT MOTD: ▐▌
█ ```````````````````` ▐▌
█ To remove the lines or change the MOTD section which is "The programs ▐▌
█ included ... by applicable law." you need to (commands are in bold): ▐▌
█ su ▐▌
█ pico /etc/motd ▐▌
█ ▐▌
█ Remove everything, as I have done (or alter it to your liking). ▐▌
█ ▐▌
█ Log back in to view the changes. ▐▌
█ ▐▌
█ This change though is only temporary - next time the box reboots the MOTD ▐▌
█ will be restored back to its previous state by the bootmisc.sh, which is ▐▌
█ here /etc/init.d/bootmisc.sh, as it re-writes back to /var/run/motd the ▐▌
█ contents of /etc/motd.tail - etc/motd is actually a symbolic link ▐▌
█ /var/run/motd. ▐▌
█ (bootmisc.sh contains: ▐▌
█ # Update motd ▐▌
█ uname -snrvm > /var/run/motd ▐▌
█ [ -f /etc/motd.tail ] && cat /etc/motd.tail >> /var/run/motd ) ▐▌
█ ▐▌
█ So to make this change permanent, you need to remove everything (or to ▐▌
█ your liking) also from: ▐▌
█ pico /etc/motd.tail ▐▌
█ ▐▌
█ ___________..___________ ▐▌
█ ▐▌
█ MODIFY OR REMOVE UNAME: ▐▌
█ ``````````````````````` ▐▌
█ If you want to modify the output of 'uname' (print system information); ▐▌
█ the first line printed out when you login, similar to: ▐▌
█ Linux yourserver.com 1.2.34-5-678 #1 Wed Nov 4 20:19:07 UTC 2009 i686 ▐▌
█ man uname ▐▌
█ q ▐▌
█ For example: ▐▌
█ uname -orvm ▐▌
█ Output would be similar to: ▐▌
█ 3.2.0-4-486 #1 Debian 3.2.51-1 i686 GNU/Linux ▐▌
█ ▐▌
█ Then edit the options: ▐▌
█ su ▐▌
█ pico /etc/init.d/bootmisc.sh ▐▌
█ Change: ▐▌
█ uname -snrvm > /var/run/motd ▐▌
█ To, for example: ▐▌
█ uname -orvm > /var/run/motd ▐▌
█ ▐▌
█ If you want to remove uname: ▐▌
█ su ▐▌
█ pico /etc/init.d/bootmisc.sh ▐▌
█ Change: ▐▌
█ uname -snrvm > /var/run/motd ▐▌
█ To: ▐▌
█ #uname -snrvm > /var/run/motd ▐▌
█ ▐▌
█ pico +21 /etc/init.d/motd ▐▌
█ Change: ▐▌
█ uname -snrvm > /var/run/motd.dynamic ▐▌
█ To: ▐▌
█ #uname -snrvm > /var/run/motd.dynamic ▐▌
█ ▐▌
█ Then: ▐▌
█ echo "" > /var/run/motd.dynamic ▐▌
█ ▐▌
█ Log back in to view the changes. If the changes aren't showing you'll ▐▌
█ need to reboot. This is the only modification we'll make that might ▐▌
█ require a reboot to view the changes: ▐▌
█ reboot ▐▌
█ ▐▌
█ Next time you login you will only see: ▐▌
█ You have new mail. (or No mail.) ▐▌
█ Last login: Sat Apr 24 07:30:23 2010 from 123.456.789.0 ▐▌
█ ▐▌
█ ___________..___________ ▐▌
█ ▐▌
█ REMOVE NO MAIL / YOU HAVE NEW MAIL: ▐▌
█ ``````````````````````````````````` ▐▌
█ If you remove the status of your mailbox output you'll have to manually ▐▌
█ check it to know if there is mail. Even if another user mails you from the ▐▌
█ shell (mail mewbie@localhost) you won't be alerted. ▐▌
█ pico /etc/pam.d/sshd ▐▌
█ Change: ▐▌
█ # Print the status of the user's mailbox upon successful login. ▐▌
█ session optional pam_mail.so standard noenv # [1] ▐▌
█ To: ▐▌
█ # Print the status of the user's mailbox upon successful login. ▐▌
█ #session optional pam_mail.so standard noenv # [1] ▐▌
█ ▐▌
█ ___________..___________ ▐▌
█ ▐▌
█ REMOVE LAST LOGIN: ▐▌
█ `````````````````` ▐▌
█ I do not recommend removing the 'Last login' statement because if someone ▐▌
█ did gain access to your account you'll see an IP that isn't yours (if they ▐▌
█ didn't cover their tracks that is). So what I have done is removed it from ▐▌
█ the standard MOTD and added it to our MOTD script below so that visually ▐▌
█ it looks better. To remove it (later we'll add it back): ▐▌
█ pico /etc/ssh/sshd_config ▐▌
█ Change: PrintLastLog yes ▐▌
█ To: PrintLastLog no ▐▌
█ ▐▌
█ Restart your ssh server for the changes to take affect: ▐▌
█ /etc/init.d/ssh restart ▐▌
█ ▐▌
█ ___________..___________ ▐▌
█ ▐▌
█ CUSTOMIZE YOUR MOTD: ▐▌
█ ```````````````````` ▐▌
█ PREREQUISITES: ▐▌
█ 1. TCLSH: View if you have tclsh installed: ▐▌
█ dpkg -l | grep tcl ▐▌
█ ▐▌
█ Reply if you do have it installed will be similar to: ▐▌
█ tcl8.5 8.5.3-2 Tcl (the Tool Command Language) v8.5 - run-t ▐▌
█ tcl8.5-dev 8.5.3-2 Tcl (the Tool Command Language) v8.5 - devel ▐▌
█ ▐▌
█ If not: ▐▌
█ su ▐▌
█ aptitude install tcl ▐▌
█ ▐▌
█ ___________..___________ ▐▌
█ ▐▌
█ 2. HDDTEMP: If you want temperature readings for your hard drive, using ▐▌
█ 'hddtemp', your disk must have SMART technology (most do for the past few ▐▌
█ years). ▐▌
█ Do this: ▐▌
█ apt-get install hddtemp ▐▌
█ Select <Yes> to all the questions asked by using your arrow or tab key ▐▌
█ then hitting Enter. You can easily modify these settings later if needed. ▐▌
█ You'll be asked 3 questions: to run as a daemon, to listen on local IP, ▐▌
█ and what port. After it is finished the output will be reply similar to: ▐▌
█ Starting disk temperature monitoring daemon: hddtemp: /dev/sda. ▐▌
█ Take note of the hard drive name in the above output: /dev/sda in my case. ▐▌
█ ▐▌
█ Help file for hddtemp, press q to quit: man hddtemp ▐▌
█ ▐▌
█ It will run as a daemon (run levels 2-5, run on bootup). ▐▌
█ To modify any of these settings: ▐▌
█ dpkg-reconfigure hddtemp ▐▌
█ or ▐▌
█ pico /etc/default/hddtemp ▐▌
█ ▐▌
█ Now test hddtemp cmd: ▐▌
█ hddtemp -v ▐▌
█ Output similar to: hddtemp version 0.3-beta15 ▐▌
█ If you receive 'hddtemp: command not found' run this: ▐▌
█ dpkg-reconfigure hddtemp ▐▌
█ answer Yes to all ▐▌
█ Then try it again: ▐▌
█ hddtemp -v ▐▌
█ ▐▌
█ Now we need to work out the correct cmd for your drive and the output ▐▌
█ that you would like. Once you have it make a note of the cmd for our MOTD ▐▌
█ script. For example output only 35°C. This is how: ▐▌
█ hddtemp /dev/sda ▐▌
█ Or yours might be: hddtemp /dev/hda ▐▌
█ Output will be similar to: ▐▌
█ /dev/hda: WDC WD400BB-22JHC0: 35°C ▐▌
█ ▐▌
█ Replace the 'a' in hda or sda with the drive letter you want hddtemp to ▐▌
█ report on. ▐▌
█ Some examples of hard drive names: ▐▌
█ /dev/hda master device on primary IDE channel ▐▌
█ /dev/hdb slave device on primary IDE channel ▐▌
█ /dev/hdc master device on secondary IDE channel ▐▌
█ /dev/hdd slave device on secondary IDE channel ▐▌
█ /dev/sda first SCSI hard drive ▐▌
█ /dev/sdb second SCSI hard drive ▐▌
█ ▐▌
█ So to shorten the reply to be only '35°C' count the characters from the ▐▌
█ beginning of the reply until where you want it to reply. ▐▌
█ Using my example output: /dev/hda: WDC WD400BB-22JHC0: 35°C ▐▌
█ the cmd to output only the 31st - 35th characters is: ▐▌
█ hddtemp /dev/sda | cut -c 31-35 ▐▌
█ Try the cmd yourself to understand what I mean, replacing disk name 'sda' ▐▌
█ with yours. ▐▌
█ ▐▌
█ To display temperature in Fahrenheit: ▐▌
█ hddtemp /dev/sda -uf | cut -c 31-35 ▐▌
█ Or to shorten the reply to temperature only e.g. 35: ▐▌
█ hddtemp -n /dev/sda ▐▌
█ In Fahrenheit: ▐▌
█ hddtemp -nuf /dev/sda ▐▌
█ ▐▌
█ Make note of your final working command for our MOTD. ▐▌
█ ▐▌
█ ___________..___________ ▐▌
█ ▐▌
█ 3. LM-SENSORS: lm-sensors will output temperature readings, and other ▐▌
█ information, for hardware monitoring chips. We'll use this on our MOTD to ▐▌
█ report the temperature for Core0, Mother Board and CPU. ▐▌
█ apt-get install lm-sensors ▐▌
█ lm-sensors help file, press q to quit: man lm-sensors ▐▌
█ After install is complete: ▐▌
█ sensors-detect ▐▌
█ Hit enter key when prompted YES/No questions to select the default answer ▐▌
█ for all. You can easily modify these by running sensors-detect again if ▐▌
█ needed later. ▐▌
█ If sensors-detect hangs on a sensor; make a note which one, then press ▐▌
█ Ctrl+c to quit sensors-detect. ▐▌
█ Then run sensors-detect again and answer No to the one that it hung on. ▐▌
█ ▐▌
█ At the end you'll have been prompted to add lines to your /etc/modules. ▐▌
█ This is my output, yours will be different: ▐▌
█ To load everything that is needed, add this to /etc/modules: ▐▌
█ #----cut here---- ▐▌
█ # Chip drivers ▐▌
█ w83627hf ▐▌
█ k8temp ▐▌
█ #----cut here---- ▐▌
█ ▐▌
█ So lets add the output: ▐▌
█ pico /etc/modules ▐▌
█ Mine has this: ▐▌
█ loop ▐▌
█ I changed it to, using example above, (add your own output): ▐▌
█ loop ▐▌
█ # Chip drivers ▐▌
█ w83627hf ▐▌
█ k8temp ▐▌
█ ▐▌
█ Now start to it: ▐▌
█ /etc/init.d/module-init-tools ▐▌
█ Output: Loading kernel modules...done. ▐▌
█ ▐▌
█ Just for your information the cmds to start, stop etc. are: ▐▌
█ /etc/init.d/module-init-tools start ▐▌
█ /etc/init.d/module-init-tools stop ▐▌
█ /etc/init.d/module-init-tools restart ▐▌
█ /etc/init.d/module-init-tools force-reload ▐▌
█ By the way it has a run level 'S' - it will run at start up on its own. ▐▌
█ ▐▌
█ Now we need to load the modules that we've added to /etc/modules above, ▐▌
█ changing the module name below to your own: ▐▌
█ modprobe w83627hf ▐▌
█ modprobe k8temp ▐▌
█ And then update the modules (previously known as update-modules): ▐▌
█ depmod -a ▐▌
█ ▐▌
█ After the update is finished, test lm-sensors by running: ▐▌
█ sensors ▐▌
█ ▐▌
█ The output should be similar to: ▐▌
█ k8temp-pci-00c3 ▐▌
█ Adapter: PCI adapter ▐▌
█ Core0 Temp: +29.0°C ▐▌
█ ▐▌
█ w83627thf-isa-0290 ▐▌
█ Adapter: ISA adapter ▐▌
█ VCore: +1.43 V (min = +0.70 V, max = +1.87 V) ▐▌
█ +12V: +11.98 V (min = +1.95 V, max = +6.02 V) ALARM ▐▌
█ +3.3V: +3.36 V (min = +0.00 V, max = +1.58 V) ALARM ▐▌
█ +5V: +4.99 V (min = +1.81 V, max = +3.84 V) ALARM ▐▌
█ -12V: -11.46 V (min = -14.91 V, max = -4.38 V) ▐▌
█ V5SB: +5.05 V (min = +2.85 V, max = +0.43 V) ALARM ▐▌
█ VBat: +3.49 V (min = +3.62 V, max = +0.02 V) ALARM ▐▌
█ fan1: 2721 RPM (min = 8035 RPM, div = 2) ALARM ▐▌
█ CPU Fan: 3054 RPM (min = -1 RPM, div = 2) ALARM ▐▌
█ fan3: 0 RPM (min = 168750 RPM, div = 2) ALARM ▐▌
█ M/B Temp: +36.0°C (high = +5.0°C, hyst = +0.0°C) ALARM sensor = ▐▌
█ CPU Temp: +30.5°C (high = +60.0°C, hyst = +55.0°C) sensor = ▐▌
█ temp3: +65.5°C (high = +60.0°C, hyst = +55.0°C) ALARM sensor = ▐▌
█ cpu0_vid: +0.000 V ▐▌
█ beep_enable:enabled ▐▌
█ ▐▌
█ UPDATE: Newer versions of lm-sensor now do not report the device name; ▐▌
█ only the readings from the chips. You'll need to figure out for your own ▐▌
█ setup what chips temp1, temp2, temp3, etc are HERE. Hopefully yours is ▐▌
█ listed, mine wasn't on last check. Fortunately I shared my output above ▐▌
█ here so I doing guess work for my devices :p . My output is now: ▐▌
█ [snip] ▐▌
█ Core0 Temp: +31.0°C ▐▌
█ [snip] ▐▌
█ temp1: +38.0°C (high = +69.0°C, hyst = +0.0°C) sensor = thermis ▐▌
█ temp2: +32.5°C (high = +60.0°C, hyst = +55.0°C) sensor = thermis ▐▌
█ temp3: +65.5°C (high = +60.0°C, hyst = +55.0°C) ALARM sensor = ▐▌
█ [snip] ▐▌
█ ▐▌
█ For our MOTD we want the output to report only the temperatures for Core0, ▐▌
█ M/B (mother board) and CPU. If your output for sensors has the device ▐▌
█ names like the original above (M/B Temp etc) than this works nice: ▐▌
█ sensors -f | grep Temp ▐▌
█ Output would be: ▐▌
█ Core0 Temp: +31.0°C ▐▌
█ M/B Temp: +36.0°C ▐▌
█ CPU Temp: +30.5°C ▐▌
█ Or in Fahrenheit: sensors -f | grep Temp ▐▌
█ But if sensors reports like mine does without device names (temp1, etc) ▐▌
█ than use this: sensors -f | grep °C or sensors -f | grep °F My output: ▐▌
█ Core0 Temp: +87.8°F ▐▌
█ temp1: +100.4°F (high = +156.2°F, hyst = +32.0°F) sensor = thermis ▐▌
█ temp2: +90.5°F (high = +140.0°F, hyst = +131.0°F) sensor = thermi ▐▌
█ temp3: +149.9°F (high = +140.0°F, hyst = +131.0°F) ALARM sensor = ▐▌
█ ▐▌
█ (Based on my original readings I'm guessing temp1 is M/B and temp2 is CPU.)▐▌
█ ▐▌
█ Now lets remove the '+' from the output using tr -d '+': ▐▌
█ sensors | grep °C | tr -d '+' or in F: sensors -f | grep °F | tr -d '+' ▐▌
█ ▐▌
█ Make note of your final working command. Code in our MOTD script will ▐▌
█ remove everything else but the actual temperatures e.g. 87.8°F ▐▌
█ ▐▌
█ ___________..___________ ▐▌
█ ▐▌
█ 4. WEATHER: ▐▌
█ If you would like the Weather report on your MOTD like I have above, ▐▌
█ you'll need to install curl. To view if you have it installed already: ▐▌
█ dpkg -l | grep curl ▐▌
█ If you do output will be similar to: ▐▌
█ curl 7.26.0-1+wheezy5 command line tool for transferring data with Ux ▐▌
█ libcurl3:i386 7.26.0-1+wheezy5 easy-to-use client-side URL transfer lib ▐▌
█ ▐▌
█ If you don't have either: ▐▌
█ aptitude install curl libcurl3 ▐▌
█ ▐▌
█ Next you need to find the correct 'location code' for the area you want ▐▌
█ the weather to report on. Go HERE. UPDATE 2009 2011: ▐▌
█ accuweather.com has killed that URL, making it difficult to find location ▐▌
█ location codes. Not to worry :D mewbies never give up - I tested this ▐▌
█ method with over twenty cities and it works. I'm sorry if it ends up not ▐▌
█ not working for your city :( Best solution would then be find a different ▐▌
█ weather script or site to use for this. ▐▌
█ This is how to find accuweather.com location codes: ▐▌
█ United States use your zip code. ▐▌
█ Non US (and United States to be sure they have the weather for X zip code) ▐▌
█ go HERE, fill in the location etc, finish the three steps; you do not need ▐▌
█ to sign up. At the end you'll be given a 'Web Page Code' and 'MySpace Code'▐▌
█ for your location. View the last part of either code for the location code.▐▌
█ ▐▌
█ Examples; Munich, Germany results: ▐▌
█ [snip]?partner=accuweather&zipcode=EUR|DE|GM002|MUNICH|' >Weather Radar</a>▐▌
█ Mexico City, Mexico results: ▐▌
█ [snip] ?partner=accuweather&zipcode=NAM|MX|MX009|MEXICO CITY|' [snip] ▐▌
█ The location code for Munich, Germany would be: EUR|DE|GM002|MUNICH ▐▌
█ For Mexico City, Mexico: NAM|MX|MX009|MEXICO CITY ▐▌
█ For New York, NY it would be: 10001 ▐▌
█ ▐▌
█ To turn the location codes into a RSS URL add the code at the end of this ▐▌
█ URL: ▐▌
█ http://rss.accuweather.com/rss/liveweather_rss.asp?metric=0&locCode=+code ▐▌
█ http://rss.accuweather.com/rss/liveweather_rss.asp?metric=1&locCode=EUR|DE|GM002|MUNICH
█ City names with more than one word replace spaces with a dash or %20 or ▐▌
█ remove the space: ▐▌
█ For example: ▐▌
█ http://rss.accuweather.com/rss/liveweather_rss.asp?metric=0&locCode=NAM|MX|MX009|MEXICO-CITY
█ http://rss.accuweather.com/rss/liveweather_rss.asp?metric=0&locCode=NAM|MX|MX009|MEXICO%20CITY
█ http://rss.accuweather.com/rss/liveweather_rss.asp?metric=0&locCode=NAM|MX|MX009|MEXICOCITY
█ ▐▌
█ New York, change metric=0 to metric=1 for Celsius: ▐▌
█ http://rss.accuweather.com/rss/liveweather_rss.asp?metric=1&locCode=10001 ▐▌
█ ▐▌
█ Now to create a script to gather the weather data in a format that you ▐▌
█ want, with thanks to the codes HERE by fflarex & fukawi2, do this: ▐▌
█ Find the location of your sh: ▐▌
█ which sh ▐▌
█ Output will be the location of your sh, for example my output is: ▐▌
█ /bin/sh ▐▌
█ Or your output might be: ▐▌
█ /usr/bin/sh ▐▌
█ ▐▌
█ Then paste in the script below changing three things: ▐▌
█ 1. '/bin/sh' change this to the location of your sh if it's not /bin/sh ▐▌
█ 2. Output in Celsius change 0 to 1 here: METRIC=0 # 0 for F, 1 for C ▐▌
█ 3. Fill in your location code here: LOCCOD="" ▐▌
█ For example: LOCCOD="NAM|MX|MX009|MEXICO-CITY" ▐▌
█ ▐▌
█ pico /usr/share/weather.sh ▐▌
#!/bin/sh
METRIC=0 # 0 for F, 1 for C
# Fill in form to find your weather code here:
# http://netweather.accuweather.com/signup-page2.asp
# If code has a space remove it or replace it with %20 or a dash; -
LOCCOD="" #Example: NAM|MX|MX009|MEXICO-CITY
if [ -z $1 ] && [ -x $LOCCOD ] ; then
echo
echo "USAGE: $0 [locationcode]"
echo
exit 0;
elif [ ! -z $1 ] ; then
LOCCOD=$1
fi
curl -s http://rss.accuweather.com/rss/liveweather_rss.asp\?metric\=${METRIC}\&locCode\=$LOCCOD \
| sed -n '/Currently:/ s/.*: \(.*\): \([0-9]*\)\([CF]\).*/\2°\3, \1/p'
█ Set perms on your weather.sh: ▐▌
█ chmod 744 weather.sh ▐▌
█ Then test it: ▐▌
█ /usr/share/./weather.sh ▐▌
█ Output example: ▐▌
█ 77partly cloudy ▐▌
█ We'll dress up the output on our MOTD. ▐▌
█ If you want to change the language of the output e.g. Nublado instead of ▐▌
█ Cloudy view the post #62 here by 'broka'. ▐▌
█ ▐▌
█ ___________..___________ ▐▌
█ ▐▌
█ 5. EASY FAST ASCII ART: ▐▌
█ To make an ASCII art design like I have done above for 'mewbies' either: ▐▌
█ Visit ruletheweb.co.uk, type in what you want, copy, paste and add a ▐▌
█ margin on the left. I used the font doom. Looks better if you don't ▐▌
█ surpass 80 characters per line. ▐▌
█ Or: ▐▌
█ Install FIGlet and make just like on ruletheweb but with more choices and ▐▌
█ in your own terminal. ▐▌
█ ▐▌
█ At this point you should now have your code for hddtemp, lm-sensors, ▐▌
█ weather and an ASCII art. ▐▌
█ ▐▌
█ ___________..___________ ▐▌
█ ▐▌
█ EXPLAIN A BIT ABOUT THE MOTD SCRIPT CODE: ▐▌
█ If you know the how to use the code in the MOTD script below, skip this. ▐▌
█ For those that it is foreign I need to explain so that you can adjust it ▐▌
█ for your own output. ▐▌
█ ▐▌
█ We need to alter the output of the lm-sensors cmd you made a note ▐▌
█ of, for example my cmd is: sensors -f | grep °F | tr -d '+' ▐▌
█ My output is: ▐▌
█ Core0 Temp: 87.8°F ▐▌
█ temp1: 100.4°F (high = 156.2°F, hyst = 32.0°F) sensor = thermis ▐▌
█ temp2: 90.5°F (high = 140.0°F, hyst = 131.0°F) sensor = thermi ▐▌
█ temp3: 149.9°F (high = 140.0°F, hyst = 131.0°F) ALARM sensor = ▐▌
█ ▐▌
█ (Based on my original readings I'm guessing temp1 is M/B and temp2 is CPU.)▐▌
█ ▐▌
█ I only want the output: 87.8°F & 100.4°F & 90.5°F ▐▌
█ This is done by using 'lindex' in the MOTD script. ▐▌
█ You first need to count the place of the complete word (block of ▐▌
█ characters without a space) that you want, then subtract 1 from the place. ▐▌
█ Do not count spaces. '=' would be one word. ▐▌
█ For example 87.8°F is the 3rd word - 1 = 2. The reason we subtract 1 is ▐▌
█ that lindex starts counting at 0 (zero) 0,1,2,3... To lindex 87.8°F is in ▐▌
█ place 2. For example the 16th word is '(high' - 1 = 15 is 90.5°F ▐▌
█ Confused? This visual might help: ▐▌
█ Core0 Temp: 87.8°F ▐▌
█ 0 1 2 To lindex 87.8°F is the 2nd word. ▐▌
█ ▐▌
█ Why am I torturing you like this? You need to enter in the MOTD script ▐▌
█ below your sensors cmd and the lindex numbers cooresponding to the output ▐▌
█ of the temperatures you want. ▐▌
█ For mine it is: sensors -f | grep °F | tr -d '+' and 2, 4 and 15th word: ▐▌
█ set temperature [exec -- sensors -f | grep °F | tr -d '+'] ▐▌
█ set tem(0) [lindex $temperature 2] ▐▌
█ set tem(m) [lindex $temperature 4] ▐▌
█ set tem(c) [lindex $temperature 15] ▐▌
█ ▐▌
█ 'tem(0)' can be any name() you like as long as you use the same name() in ▐▌
█ the output section. ▐▌
█ [lindex $temperature 2] is the code that will output the place 2 word (3rd ▐▌
█ word in the output). ▐▌
█ Then in our output section will use tem(0), tem(m) etc with descriptions ▐▌
█ for the output. ▐▌
█ ▐▌
█ If that seems more confusing, don't worry about it, just use the script ▐▌
█ then you'll have a better understanding from the output it produces. ▐▌
█ ▐▌
█ ___________..___________ ▐▌
█ ▐▌
█ CREATE THE MOTD SCRIPT: ▐▌
█ ``````````````````````` ▐▌
█ Copy and paste in the script below, changing the code in red, to suit your ▐▌
█ own cmds: the notes you made earlier, for: ▐▌
█ ▐▌
█ 1. Your correct disk name for hddtemp along with the count of the ▐▌
█ characters to output out on this line: ▐▌
█ set hddtemp [lindex [exec -- /usr/bin/hddtemp /dev/sda -uf | cut -c "31-35"] 0]
█ ▐▌
█ 2. Your correct lm-sensors cmd and count as we just did above. ▐▌
█ ▐▌
█ 3. The correct location of your weather.sh if different than stated. ▐▌
█ ▐▌
█ 4. Your own ASCII art to replace mewbies art. ▐▌
█ ▐▌
█ 5. And the location of 'env': ▐▌
█ which env ▐▌
█ My output is: /usr/bin/env ▐▌
█ If yours is different change the first line of the script to your path ▐▌
█ ▐▌
█ Okay okay, so lets do this; download the MOTD script from HERE, or: ▐▌
█ wget http://mewbies.com/motd/MOTD.Script.Linux.v.03-MWB/mwbmotd3.zip ▐▌
█ unzip mwbmotd3.zip -d ~/mwbmotd3 && cd mwbmotd3 ▐▌
█ su ▐▌
█ cp motd.tcl /etc/motd.tcl ▐▌
█ pico /etc/motd.tcl ▐▌
█ NOTE: the motd.tcl in the zip file includes all color codes as shown in ▐▌
█ the screenshot (begining of article). The code below does not include ▐▌
█ all the color codes; so that it is easier to read the important parts. ▐▌
█ After we have this working, we'll get to the color coddes. ▐▌
█ ▐▌
█ Edit only what's in red if it doesn't match yours: ▐▌
#!/usr/bin/env tclsh
# MOTD script original? / mod mewbies.com v.03 2013 Sep 01
# * Variables
set var(user) $env(USER)
set var(path) $env(PWD)
set var(home) $env(HOME)
# * Check if we're somewhere in /home
#if {![string match -nocase "/home*" $var(path)]} {
if {![string match -nocase "/home*" $var(path)] && ![string match -nocase "/usr/home*" $var(path)] } {
return 0
}
# * Calculate last login
set lastlog [exec -- lastlog -u $var(user)]
set ll(1) [lindex $lastlog 7]
set ll(2) [lindex $lastlog 8]
set ll(3) [lindex $lastlog 9]
set ll(4) [lindex $lastlog 10]
set ll(5) [lindex $lastlog 6]
# * Calculate current system uptime
set uptime [exec -- /usr/bin/cut -d. -f1 /proc/uptime]
set up(days) [expr {$uptime/60/60/24}]
set up(hours) [expr {$uptime/60/60%24}]
set up(mins) [expr {$uptime/60%60}]
set up(secs) [expr {$uptime%60}]
# * Calculate usage of home directory
set usage [lindex [exec -- /usr/bin/du -ms $var(home)] 0]
# * Calculate SSH logins:
set logins [exec -- w -s]
set log(c) [lindex $logins 5]
# * Calculate processes
set psa [expr {[lindex [exec -- ps -A h | wc -l] 0]-000}]
set psu [expr {[lindex [exec -- ps U $var(user) h | wc -l] 0]-002}]
set verb are
if [expr $psu < 2] {
if [expr $psu = 0] {
set psu none
} else {
set verb is
}
}
# * Calculate current system load
set loadavg [exec -- /bin/cat /proc/loadavg]
set sysload(1) [lindex $loadavg 0]
set sysload(5) [lindex $loadavg 1]
set sysload(15) [lindex $loadavg 2]
# * Calculate Memory
set memory [exec -- free -m]
set mem(t) [lindex $memory 7]
set mem(u) [lindex $memory 8]
set mem(f) [lindex $memory 9]
set mem(c) [lindex $memory 16]
set mem(s) [lindex $memory 19]
# * Calculate disk temperature from hddtemp
set hddtemp [lindex [exec -- /usr/bin/hddtemp /dev/sda -uf | cut -c "31-35"] 0]
# * Calculate temperature from lm-sensors
set temperature [exec -- sensors -f | grep °F | tr -d '+']
set tem(0) [lindex $temperature 2]
set tem(m) [lindex $temperature 4]
set tem(c) [lindex $temperature 15]
# * Display weather
set weather [exec -- /usr/share/./weather.sh]
set wthr(t) [lindex $weather 0]
set wthr(d) [lindex $weather 1]
set wthr(e) [lindex $weather 2]
# * ASCII head
set head {
_ _
| | (_)
_ __ ___ _____ _| |__ _ ___ ___
| '_ ` _ \ / _ \ \ /\ / / '_ \| |/ _ \/ __|
| | | | | | __/\ V V /| |_) | | __/\__ \
|_| |_| |_|\___| \_/\_/ |_.__/|_|\___||___/
}
# * Print Output
puts "\033\[01;32m$head\033\[0m"
puts " Last Login....: $ll(1) $ll(2) $ll(3) $ll(4) from $ll(5)"
puts " Uptime........: $up(days)days $up(hours)hours $up(mins)minutes $up(secs)seconds"
puts " Load..........: $sysload(1) (1minute) $sysload(5) (5minutes) $sysload(15) (15minutes)"
puts " Memory MB.....: $mem(t) Used: $mem(u) Free: $mem(f) Free Cached: $mem(c) Swap In Use: $mem(s)"
puts " Temperature...: Core0: $tem(0) M/B: $tem(m) CPU: $tem(c) Disk: ${hddtemp}"
puts " Disk Usage....: You're using ${usage}MB in $var(home)"
puts " SSH Logins....: There are currently $log(c) users logged in."
puts " Processes.....: $psa total running of which $psu $verb yours"
puts " Weather.......: $wthr(t) $wthr(d) $wthr(e)\n"
puts "\033\[01;32m ::::::::::::::::::::::::::::::::::-RULES-::::::::::::::::::::::::::::::::::"
puts " This is a private system that you are not to give out access to anyone"
puts " without permission from the admin. No illegal files or activity. Stay,"
puts " in your home directory, keep the system clean, and make regular backups."
puts " -== DISABLE YOUR PROGRAMS FROM KEEPING SENSITIVE LOGS OR HISTORY ==-\033\[0m\n"
if {[file exists /etc/changelog]&&[file readable /etc/changelog]} {
puts " . .. More or less important system informations:\n"
set fp [open /etc/changelog]
while {-1!=[gets $fp line]} {
puts " ..) $line"
}
close $fp
puts ""
}
█ ▐▌
█ 2. Set permissions on the file: ▐▌
█ chmod 755 /etc/motd.tcl ▐▌
█ ▐▌
█ 3. Then add your new motd.tcl to the user's profile: ▐▌
█ pico /etc/profile ▐▌
█ Add this line at the end of profile: ▐▌
█ /etc/motd.tcl ▐▌
█ ▐▌
█ 4. Logout and back in to view the changes, or exit root then: ▐▌
█ /etc/./motd.tcl ▐▌
█ ▐▌
█ IF it did error out take note of which program caused it and search for it ▐▌
█ and/or run the cmd manually including the path. For example the error: ▐▌
█ couldn't execute "/usr/sbin/du": no such file or directory ▐▌
█ while executing ▐▌
█ "exec -- /usr/sbin/du -ms $var(home)" ▐▌
█ [snip] ▐▌
█ ▐▌
█ Error states 'no such file', so it couldn't execute 'du'. Try it yourself ▐▌
█ (add './' with full path to test it): ▐▌
█ /usr/sbin/./du -ms ▐▌
█ Yes error, so then: ▐▌
█ which du ▐▌
█ Awww, wrong location, it should be: ▐▌
█ /usr/bin/./du -ms ▐▌
█ Now it works, edit motd.tcl accordingly. ▐▌
█ ▐▌
█ Tada! Done. You should now have almost the best MOTD around :p The cute ▐▌
█ cow with a fortune is coming up; then you'll have the best :D. ▐▌
█ ▐▌
█ Color codes next if you want to change the colors. This is the same code ▐▌
█ above but with the color codes added, like in my MOTD screenshot: ▐▌
# * Print Output
puts "\033\[01;32m$head\033\[0m"
puts " \033\[35mLast Login....:\033\[0m \033\[36m$ll(1) $ll(2) $ll(3) $ll(4) from\033\[0m \033\[33m$ll(5)\033\[0m"
puts " \033\[35mUptime........:\033\[0m \033\[36m$up(days)days $up(hours)hours $up(mins)minutes $up(secs)seconds\033\[0m"
puts " \033\[35mLoad..........:\033\[0m \033\[36m$sysload(1) (1minute) $sysload(5) (5minutes) $sysload(15) (15minutes)\033\[0m"
puts " \033\[35mMemory MB.....:\033\[0m \033\[36m$mem(t) Used: $mem(u) Free: $mem(f) Free Cached: $mem(c) Swap In Use: $mem(s)\033\[0m"
puts " \033\[35mTemperature...:\033\[0m \033\[36mCore0: $tem(0) M/B: $tem(m) CPU: $tem(c) Disk: ${hddtemp}\033\[0m"
puts " \033\[35mDisk Usage....:\033\[0m \033\[36mYou're using ${usage}MB in $var(home)\033\[0m"
puts " \033\[35mSSH Logins....:\033\[0m \033\[36mThere are currently $log(c) users logged in\033\[0m"
puts " \033\[35mProcesses.....:\033\[0m \033\[36m$psa total running of which $psu $verb yours\033\[0m"
puts " \033\[35mWeather.......:\033\[0m \033\[36m$wthr(t) $wthr(d) $wthr(e)\n\033\[0m"
puts "\033\[01;32m ::::::::::::::::::::::::::::::::::-RULES-::::::::::::::::::::::::::::::::::"
puts " This is a private system that you are not to give out access to anyone"
puts " without permission from the admin. No illegal files or activity. Stay,"
puts " in your home directory, keep the system clean, and make regular backups."
puts " -== DISABLE YOUR PROGRAMS FROM KEEPING SENSITIVE LOGS OR HISTORY ==-\033\[0m\n"
█ ▐▌
█ ___________..___________ ▐▌
█ ▐▌
█ TEXT FORMAT/COLOR NOTES: ▐▌
█ The mewbies ASCII and the 'Statement' is in light green as stated with ▐▌
█ this line for the ASCII: puts "\033\[01;32m$head\033\[0m" ▐▌
█ \033\[ starts code, 01 is light, 32 is green, m is format, $head is the ▐▌
█ mewbie's ASCII, \033\[0m turns off the text formatting. ▐▌
█ ▐▌
█ .=-=-=-=-=-=-=-=-=-=-=-=-=-=-=-=-=-=-=-=-=-=-=-=-=-=. ▐▌
█ | CONSOLE COLOR & FORMAT CODES | ▐▌
█ | | ▐▌
█ | COLOR TEXT BACKGROUND COLOR TEXT | ▐▌
█ | Black 30 40 Dark Gray 1;30 | ▐▌
█ | Red 31 41 Light Red 1;31 | ▐▌
█ | Green 32 42 Light Green 1;32 | ▐▌
█ | Yellow 33 43 Light Yellow 1;33 | ▐▌
█ | Blue 34 44 Light Blue 1;34 | ▐▌
█ | Magenta 35 45 Light Magenta 1;35 | ▐▌
█ | Cyan 36 46 Light Cyan 1;36 | ▐▌
█ | Light Gray 37 47 White 1;37 | ▐▌
█ | | ▐▌
█ | FORMAT FORMAT | ▐▌
█ | reset 0 underscore on, | ▐▌
█ | bold 1 default foreground color 38 | ▐▌
█ | half-bright 2 underscore off, | ▐▌
█ | underline 4 default foreground color 39 | ▐▌
█ | blink 5 default background color 49 | ▐▌
█ | inverse 7 | ▐▌
█ | conceal 8 | ▐▌
█ | normal 22 man console_codes | ▐▌
█ | underline off 24 | ▐▌
█ | blink off 25 | ▐▌
█ | inverse off 27 mewbies.com | ▐▌
█ | | ▐▌
█ | | ▐▌
█ "=-=-=-=-=-=-=-=-=-=-=-=-=-=-=-=-=-=-=-=-=-=-=-=-=-=" ▐▌
█ ▐▌
█ ├─────────────────────── CONSOLE COLOR CODES ───────────────────────┤ ▐▌
█ ▐▌
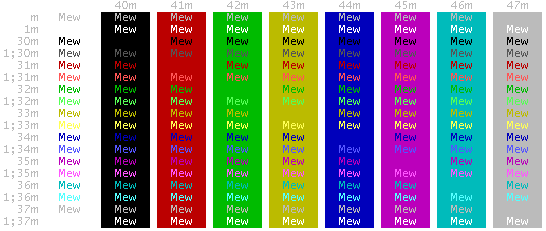 █ ▐▌
█ HERE are the Console Codes against black. ▐▌
█ Place your cursor over the image above to view it against black. ▐▌
█ I created a color script to refer to; output is similar to the black page: ▐▌
█ ▐▌
█ HERE are the Console Codes against black. ▐▌
█ Place your cursor over the image above to view it against black. ▐▌
█ I created a color script to refer to; output is similar to the black page: ▐▌
wget http://mewbies.com/geek_fun_files/color_scripts/Color.Script.To.Demonstrate.Console.Codes.Linux-MWB/mwbcsdc1.zip
unzip mwbcsdc1.zip -d ~/color_scripts && cd color_scripts && chmod 755 mewbies_colors.sh
./mewbies_colors.sh
█ View HERE for more color scripts to demonstrate your console's color ▐▌
█ capabilities. ▐▌
█ ▐▌
█ For a visual understanding enter this in your shell: ▐▌
█ echo -e "\033[08mI'm concealed\033[0m" ▐▌
█ echo -e "\033[32mI'm green\033[0m" ▐▌
█ echo -e "\033[01mI'm brighter-bold\033[0m" ▐▌
█ echo -e "\033[01;32mI'm light green\033[0m" ▐▌
█ echo -e "\033[01;32;45mI'm light green on a magenta background\033[0m" ▐▌
█ echo -e "\033[01;04;32;45mI'm light underlined green on a magenta background\033[0m"
█ echo -e "\033[01;04;32;45;5mI'm light underlined green on a magenta background, blinking\033[0m"
█ echo -e "\033[07;05;04;01;32;45mI'm inversed; underlined blinking magenta on a light green background\033[0m"
█ At this point you might want to enter: ▐▌
█ clear ▐▌
█ ▐▌
█ Example Background: 1;7;40 ▐▌
█ Since the attribute 1 is used on the text to lighten (bolder) color you ▐▌
█ need to use the inverse with it if you want to use it on the background ▐▌
█ color. Some examples of using 1 - lightener with 7 - inverse: ▐▌
█ echo -e "\033[30;47mI'm black on a light gray background\033[0m" ▐▌
█ But I want to be black on dark gray background. ▐▌
█ So we need to use 1 and 7 so that the background becomes dark gray by ▐▌
█ by stating the opposite - text black 30 and background black 40: ▐▌
█ echo -e "\033[1;7;30;40mI'm black on a dark gray background\033[0m" ▐▌
█ Where as to be black on white background we state text light gray (1 will ▐▌
█ change that to white and 7 will inverse it to be the background not the ▐▌
█ text) on a black background: ▐▌
█ echo -e "\033[1;7;37;40mI'm black on a white background\033[0m" ▐▌
█ Once you get your head around that, try this: ▐▌
█ echo -e "\033[1;7;30;37mI'm black on a white background too\033[0m" ▐▌
█ Change the order of the 30 & 37: ▐▌
█ echo -e "\033[1;7;37;30mI'm black on a dark gray background\\033[0m" ▐▌
█ ▐▌
█ If the formatted text isn't showing properly it is most likely because the ▐▌
█ SSH client you are using doesn't have colors enabled. To enable them for ▐▌
█ example in - ▐▌
█ SecureCRT: Options/Session/Terminal/Emulation/ check the box 'ANSI Color'. ▐▌
█ Terminal has VT100 by default which will work fine. ▐▌
█ PuTTy: Will have colors on by default (Window/Colours) but not blinking ▐▌
█ text. To turn it on Terminal/check the box 'Enable blinking text'. ▐▌
█ ▐▌
█ MOTD COLOR HELPER TOOLS: ▐▌
█ If you are also a Windows user I've found a great freeware, tiny, portable ▐▌
█ program 'MOTD Maker' HERE to colorize and format text easily. ▐▌
█ ___________..___________ ▐▌
█ ▐▌
█ DEGREE SYMBOL ° PROBLEM: ▐▌
█ ```````````````````````` ▐▌
█ If your degree symbol ° doesn't show correctly, such as '°' read HERE how ▐▌
█ to fix this. ▐▌
█ ▐▌
█ ___________..___________ ▐▌
█ ▐▌
█ RANDOM FORTUNE OR A QUOTE ON EACH LOGIN: ▐▌
█ ```````````````````````````````````````` ▐▌
█ You could have a random fortune or a quote printed out to users each time ▐▌
█ a user logs in. Here is one from fortune: ▐▌
█ Good day for overcoming obstacles Try a steeplechase. ▐▌
█ ▐▌
█ su ▐▌
█ apt-get install fortune ▐▌
█ ▐▌
█ Then to add fortune's path to the bottom of profile: ▐▌
█ pico /etc/profile ▐▌
█ ▐▌
█ Add this line: ▐▌
█ /usr/games/fortune ▐▌
█ ▐▌
█ exit ▐▌
█ ▐▌
█ Now each time a user logs in it will execute fortune, giving them a random ▐▌
█ quote. ▐▌
█ To view fortune's options: ▐▌
█ man fortune ▐▌
█ ▐▌
█ To leave the man window: ▐▌
█ q ▐▌
█ ▐▌
█ To customize Fortune more visit my Fortune tutorial HERE under GEEK FUN. ▐▌
█ ▐▌
█ ___________..___________ ▐▌
█ ▐▌
█ COWSAY THE FORTUNE: ▐▌
█ ``````````````````` ▐▌
█ You could be sillier and have one of cowsay's creatures state the quote ▐▌
█ / fortune (if you installed fortune above): ▐▌
█ su ▐▌
█ apt-get install cowsay ▐▌
█ pico /etc/profile ▐▌
█ Instead of adding this line to the bottom of the profile file: ▐▌
█ /usr/games/fortune ▐▌
█ Add this line for example: ▐▌
█ /usr/games/fortune | cowsay -f small ▐▌
█ ▐▌
█ The output of that would be: ▐▌
█ ________________________________________ ▐▌
█ / Good day for overcoming obstacles. Try \ ▐▌
█ \ a steeplechase. / ▐▌
█ ---------------------------------------- ▐▌
█ \ ,__, ▐▌
█ \ (oo)____ ▐▌
█ (__) )\ ▐▌
█ ||--|| * ▐▌
█ Or to have cowsay in color, magenta put this line instead, try in your ▐▌
█ shell too: ▐▌
█ echo -e "\e[00;35m$(fortune | cowsay -f small)\e[00m" ▐▌
█ ▐▌
█ If you received the error: ▐▌
█ cowsay: Could not find small cowfile! ▐▌
█ Either use a different cow (creature) or fix it by going HERE. ▐▌
█ ▐▌
█ To find out more including variables for cow's tongue, eyes, position, ▐▌
█ etc.: ▐▌
█ man cowsay ▐▌
█ You can view the output before adding the line by running it: ▐▌
█ fortune | cowthink -f www ▐▌
█ fortune | cowsay -f bud-frogs ▐▌
█ fortune | cowsay -f skeleton ▐▌
█ etc... ▐▌
█ ▐▌
█ To customize cowsay more visit my Cowsay tutorial HERE under GEEK FUN. ▐▌
█ ▐▌
█ ___________..___________ ▐▌
█ ▐▌
█ OTHER MOTD IDEAS: ▐▌
█ ````````````````` ▐▌
█ 1. Just add these lines to your motd.tcl if you for example you're the ▐▌
█ only one logging in- as these cmds aren't available to regular users- MOTD ▐▌
█ will only produce errors if a regular user logins with these on the ▐▌
█ motd.tcl. ▐▌
█ ▐▌
█ To have on your MOTD report your week's total times you have logged in: ▐▌
█ # * Calculate SSH logins: ▐▌
█ set userwktotal [lindex [exec -- grep opened /var/log/auth.log | awk /$var(user)/ | wc -l] 0]
█ puts " SSH Logins....: There are currently $log(c) users. You have logged in a total of ${userwktotal} times this week"
█ ▐▌
█ To report the week's total SSH login failed attempts: ▐▌
█ set failures [lindex [exec -- grep sshd /var/log/auth.log | awk /failure/ | wc -l] 0]
█ puts " SSH Failed....: There have been ${failures} failed attempts this week to possibly break-in"
█ ▐▌
█ Depending on how often your logs are rotated will be if the report is ▐▌
█ weekly or other. To view when your logs are rotated: ▐▌
█ cat /etc/logrotate.conf ▐▌
█ Mine has: ▐▌
█ # rotate log files weekly ▐▌
█ weekly ▐▌
█ ▐▌
█ One way around these type of admin only cmds for all users to have on ▐▌
█ their MOTD is to create a bash file with those cmds with the output placed ▐▌
█ in a text file, with the correct permissions set, in a users shared ▐▌
█ directory, then cron the bash fail to run every x minutes and then add to ▐▌
█ the motd.tcl code to cat the text file -not execute the actual cmd. ▐▌
█ For example: ▐▌
█ grep sshd /var/log/auth.log | awk /failure/ | wc -l > failure_count.txt ▐▌
█ cat failure_count.txt ▐▌
█ the '>' will over write the file each time ▐▌
█ if it was '>>' it would append the output to the file. ▐▌
█ ▐▌
█ I don't really fancy this method as it just means another process running ▐▌
█ every x minutes and that it's not really up to the minute information if ▐▌
█ set for longer periods. ▐▌
█ ▐▌
█ 2. Just like we added the fortune and cowsay to /etc/profile you could add ▐▌
█ for example your weather script to /etc/profile like this: ▐▌
█ /usr/share/./weather.sh ▐▌
█ ▐▌
█ 3. If you wanted each user to have their own weather (their own location ▐▌
█ code) reported on their MOTD and not the location code you have on the ▐▌
█ main one you could do it like this: ▐▌
█ In each users home directory there must be a weather.sh with their own ▐▌
█ desired location code, chmod 744. Then on the motd.tcl, this line: ▐▌
█ set weather [exec -- /usr/share/./weather.sh] ▐▌
█ Change to: ▐▌
█ set weather [exec -- /home/$var(user)/./weather.sh] ▐▌
█ ▐▌
█ 4. Use Linux_Logo to display system information and your OS's logo. ▐▌
█ ▐▌
█ 5. If you want your MOTD to stay on top of your terminal window: ▐▌
█ clear; /bin/echo -e '\033[30;70r' ; /etc/./motd.tcl ▐▌
█ Turn it off: /bin/echo -e '\033[0;0r' ▐▌
█ Adjust '30' for how many rows (lines) the MOTD is, '70' is work space. ▐▌
█ ▐▌
█ If you know of any other fun or useful variables to add to MOTD please ▐▌
█ post then at mewbies forum :) ▐▌
█ ▐▌
█ //---------------------------------------------------------------------- ▐▌
█ ▐▌
█ If you find mistakes, have suggestions, and or questions please post at ▐▌
█ mewbies forum HERE - thank you. ▐▌
█ ▐▌
█ Last update on 29 Mar '14 ▐▌
█ ▐▌
█▌ █▌
█▌ - mewbies.com - █▌
█▌ █▌
██▄▄▄▄▄▄▄▄▄▄▄▄▄▄▄▄▄▄▄▄▄▄▄▄▄▄▄▄▄▄▄▄▄▄▄▄▄▄▄▄▄▄▄▄▄▄▄▄▄▄▄▄▄▄▄▄▄▄▄▄▄▄▄▄▄▄▄▄▄██