While you might be the type "I have nothing to hide" that might be because you don't realize what is being tracked and sent from your iOS device. In the wrong hands this information could easily be used against you and your loved ones. Furthermore this constant tracking of your life slows down the loading of apps and best part is you pay for it on your data usage plan.
ADS & SPYWARE NOTE
iCLOUD NOTES
FIREWALL
PMP - PROTECT MY PRIVACY
HOW TO VIEW YOUR DEVICE'S UDID
SET ANY LOCATION AS YOUR LOCATION
GEOTAGGING & EDITING EXIF DATA
PROTECT YOUR DEVICE FROM SNOOPERS AND THIEVES
PROTECT YOUR PHONE NUMBER USING DISPOSABLE US NUMBERS
ADS & SPYWARE NOTE:
```````````````````
So far for all the apps that I have tried, I have been successful at blocking their spyware and ads using a combination of a Firewall, PMP, and ad blockers. Furthermore if I recall correctly almost every app I tried from iTunes store tries to call out; spyware, of some sort. Developers use it to collect usage data about the soft, you, your phone number, adress, contacts, UDID and etc. I don't like it or want it. Note that certain apps do need to call out like Weather, etc. So if you are using a firewall just temporarily block the IPs that you aren't certain are needed for the app to function correctly; tap Deny & Session. Doing so you will notice a reduction in your data usage.
ICLOUD SHARING NOTE:
````````````````````
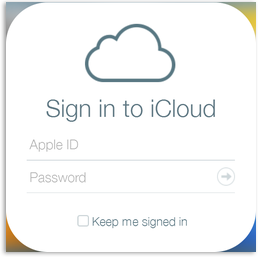
Note for new iOS users: Being a brand new iOS user I had no idea iCloud sharing is part and parcel of the device. Once you click on iCloud (system Settings > iCloud) you are presented with a prompt to agree or disagree to the terms.
If you agree, as per Apple's terms, immediately your data and location data is synced to this iCloud; as you can see before you tap Agree almost everything is enabled. I was surprised to discover from the allocated 5GB that 2.5GB had already been used right after tapping Agree (even though I disabled it in iTunes). I know on my connection that 2.5GB would take a loooooong time to upload so it seems that it already did it before I had even agreed at some point.
Side Note: "iCloudHacker: Arduino code to brute force 4-digit iCloud PINs and bypass Apple's theft protection".
FIREWALL:
`````````
Even if you have a limited budget of what to spend on Apps a Firewall should be at the very top of your list and best before you start installing any other apps, especially from iTunes. If you have already installed many apps then you need this even more:
Firewall iP7 $4.49 on Cydia, or Firewall iP (for iOS6) by Yllier, "Intercepts outgoing connections and lets you decide what to do". It can also be used to block ads. Instructions are here. Once you run it you will be surprised how many apps are spying on you and reporting home. While it is on the higher cost for an App; it really is worth every penny.
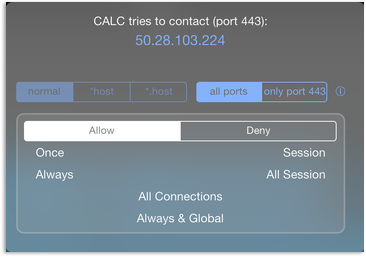
Wish List (small matters):
UI to run in landscape mode (the alerts do and they are very attractive).
Default alert has Allow selected; I wish default had Deny selected and or an option to configure which to be a user's default once it pops up.
PMP - PROTECT MY PRIVACY:
`````````````````````````
PMP developed at the University of California San Diego, free on Cydia, "lets you protect the personal information ... It provides a layer of security between apps and the operating system, thereby giving the control back to the user."

Though it is in violation of Apple's Privacy Policy for any iOS Apps to collect certain data on users, such as their, names, address book, your clipboard, UDID (Unique Device Identifier; 40 character long ID for your device), in a study, carried out at UCSD, they found that over 48% of all the apps tested from iTunes store are in clear violation of this policy.
PMP is an ongoing collaboration that you can take part in by allowing PMP to collect data of your app's behavior when PMP is triggered and what your choice of action is (calls out to pmp.ucsd.edu). "Note that providing your data is voluntary and you can decide whether or not you want to contribute your data inside the app."
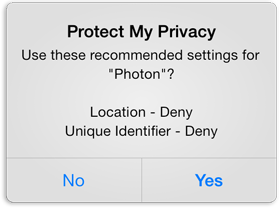
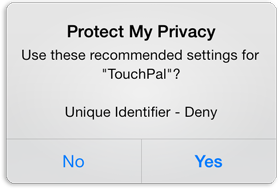
When you launch an app if it attempts to access certain information PMP will be triggered to prompt you to allow, deny or provide fake information, such as a randomly generated UDID. They also provide auto mode to decide for you based on the average choices of users; if that particular app is in their database.
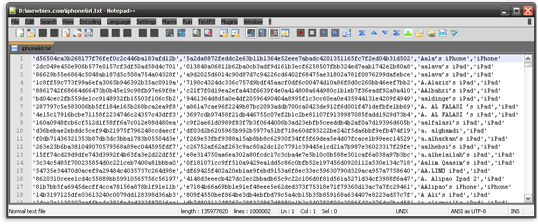
Your UDID is tied to your name, address and telephone number. In 2012 hacking group Anonymous took a database of over twelve million UDIDs (from a FBI agent's laptop or bluetoad.com depending on what you believe). AntiSec (subset of Anonymous) then released statement and an edited (removing most personal details) list of one million and one of those UDIDs, here. Screenshot of a few lines of the decrypted file for those curious but don't want to download it:
NOTES:
1. After installing don't launch PMP first; finish in Cydia by respringing, then continue.
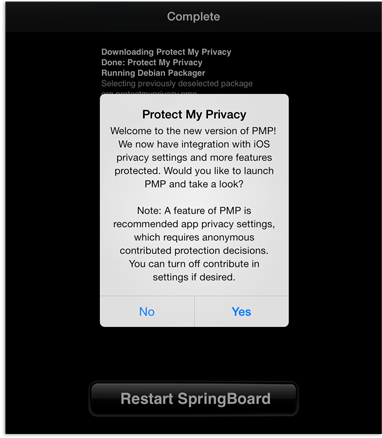
2. PMP doesn't support Apple's stock apps at this time unfortunately.
3. It doesn't rotate to landscape mode.
4. Calls out to ni-in-f1*.1e100.net, gsp10-ssl.apple.com, pmp.ucsd.edu (contribute data and help file), and your ISP.
5. I would recommend after installing to sit down, be ready to SSH in to your device, and launch each one of your apps to deal with the prompts so it doesn't happen when you need to use x app in a rush. I say this because a number of times launching an app once the PMP prompt came up my device completely froze and could only reboot in console.
HOW TO VIEW YOUR DEVICE'S UDID:
```````````````````````````````
To view your Unique Device Identifier:
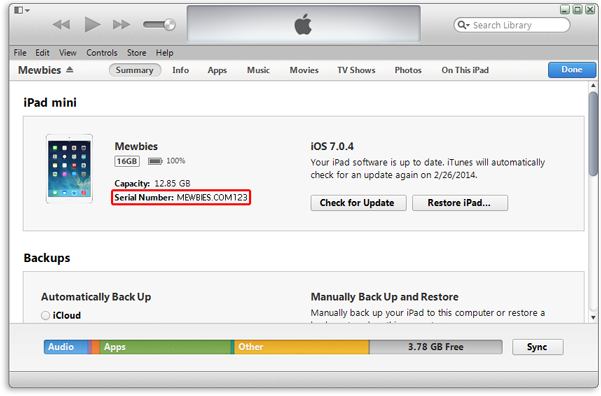
Connect your device to your PC > Launch iTunes > select your device > Summary > click on your Serial Number then your UDID will be revealed. (If you want to copy it to your clipboard use your keys Ctrl+C or Edit > 'Copy Identifier (UDID)' it will then be copied to your clipboard.)
SET ANY LOCATION AS YOUR LOCATION:
``````````````````````````````````
akLocationX by Alick Hillon Cydia, free, will enable you to enter Latitude and Longitude for your location. System Settings > akLocationX > Enable then input your desired latitude and longitude.
To find the latitude and longitude of a location:

1. Go to Google Maps and enter in the search bar the location you want and click the magnify glass icon to search.
2. The location you searched for will now have a red marker on the map.
Right click the red marker and select 'What's here?' from the pop-up menu.
3. Doing so will now have a green marker on the map. Click the green arrow marker to display the latitude and longitude (in that order) of the location. Use the first listed coordinates.
For example the St. Basil's Cathedral is 55.752598 37.623077
Enter your results into akLocationX without the comma ','.
You can test this for example by logging into your iCloud account, on a browser, then click Find My iPhone.
Caution: If you do lose your device and want to find it using 'Find My iPhone' with akLocationX enabled it will not show accurate location, of course.
GEOTAGGING & EDITING EXIF DATA:
```````````````````````````````
Geotagging inserts your GPS coordinates into the EXIF (Exchangeable Image File Format) data of photos and videos (and other forms) you take with your device if your Settings > Privacy > Location Services > Camera is enabled.
To prevent GPS EXIF data on your photos; disable it.
ON MAC, LINUX AND WINDOWS TO VIEW AND EDIT METADATA:
(On your device after.)
To view the EXIF data of a photo, edit it or remove it; in Linux, Mac and Win can use XnView or XnViewMP, (free, opensource, portable) "multi-format graphics viewer with batch conversion and image processing capabilities".
XNVIEW HOW TO FOR WINDOWS:
TO VIEW EXIF DATA:
XnView browser interface if there is EXIF data in an image it will have a little EXIF tag below it and a GPS tag if there are GPS coordinates.
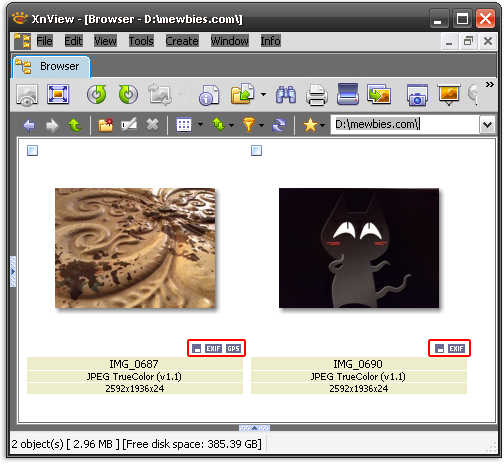
Right click on a photo and select properties to view all EXIF data.
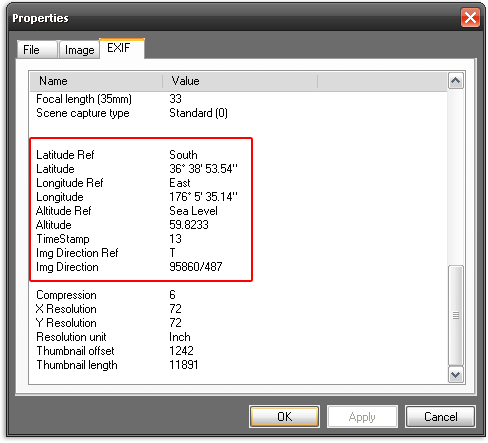
Right click on a photo and select 'Open GPS location in GeoHack' which will launch your default browser to http://toolserver.org showing the GPS location.
TO EDIT EXIF DATA & GPS COORDINATES:
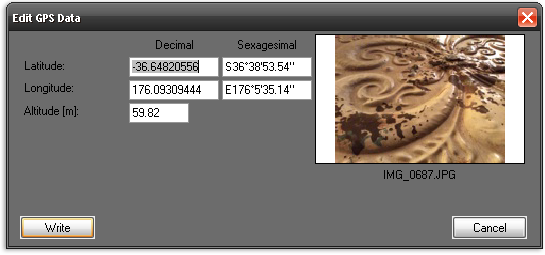
To edit the GPS coordinates in XnView first download ExifTool (Windows Executable for Win users), unzip the file, rename 'exiftool(-k).exe' to 'exiftool.exe' and place it in your XnView AddOn directory: ...\XnView\AddOn\exiftool.exe.
Then in XnView Edit > Metadata > Edit GPS data
TO REMOVE SELECTED METADATA:
To remove selected Metadata:
XnView > Edit > Metadata > Clean > select items you want removed.
For a quick online solution to view and or remove EXIF data (5MBlimit per image) you can do that here.
ON iOS DEVICE TO VIEW AND EDIT METADATA:
The best that I found:
TO VIEW ONLY EXIF DATA:
Photo Info by Yandong Wang, free on Cydia, "Photo Info is an enhancement for iOS's builtin Photo app. Allows user to view the info of photo within the Photo app, such as EXIF, GPS and more. "No options to configure. No icons added to home screen."
After installing your stock Photo app will now have a 'Info' menu that will contain the information and other options such as launching Maps app and placing a pin on location (tap on More). After using this tweak I wonder why it isn't standard in Photo app. Unfortunately it doesn't have an option to edit or remove EXIF data.
TO EDIT EXIF DATA:
Exif Edit Free by Don't Care Production, free on iTunes, "Exif Edit provides a user friendly way to edit jpeg metadata. And support read only for other image format like png, tiff and so on". Free version editing - "Some basic metadata, Some exif metadata, GPS metadata, Some TIFF metadata". Full version is $1.99.
Very easy to use, does the job. Open an image, slide across the metadata you want to edit or remove.

NOTES:
1. Doesn't rotate to landscape mode.
The worse that I found:
I'm only mentioning this as I wasted so much of my time with its false (?) claims, so to your save your time - EXIF Tool by aZeR DiLLs, free on iTunes (full version $0.99 In-App), "Exif Tool for iOS allows you to easily edit, remove or add metadata (including GeoTagging) information to the Photos in the Photo Library or imported Photos in the Exif Tool App folder." "Free version allows you to work with only 3 photos on your Photo Library or Exif Tool App folder & will not allow you to use the Bulk feature. Please upgrade to unlock all features."
Probably has ads (I blocked all call outs). While this might be a great app for the full version, the free version truly was useless as it would not save any edits and was difficult to use (free version); details below.
TO USE FREE VERSION:
To actually use it you must take literally what the free version states above (it does not mean you can only work with 3 photos at a time). If there are more than three images in either location it won't work; you'll have the prompt to upgrade to full.
So if we want to use the free version we need to transfer photos over to its 'Exif Tool App' folder first (unless you have three or less photos in your Photo Library). To view the Exif Tool directory tap on 'Switch', bottom menu (tap again to view Photo Library).
Be sure to set save edited images to Photo Library (under Settings) so you don't exceed your three limit.
To transfer images to Exif's directory without leaving your device I think the easiest method is to use iFile by Carsten Heinelt (free version with basic features); copy your image(s) to EXIF Tool's /var/mobile/Applications/xxx-xx-xxx/Documents directory. To easily know which directory (xxx-xx-xxx) is EXIF Tool installed in; use AppLinks by Sagitt on Cydia free (creates shortcuts to all apps from iTunes).
Once you have edited your image use iFile to delete the images and copy more over so that you don't exceed the three limit.
NOTES:
1. Doesn't rotate to landscape mode.
2. By the way if browsing EXIF Tool's directory and you have found it has taken screenshots (snapshots) of your images open in it, this is iOS doing when an app goes to the background - multi tasking bar:
(/var/mobile/Applications/xxx/Library/Caches/Snapshots/my.push.ExifTool/Main)
PROTECT YOUR DEVICE FROM SNOOPERS AND THIEVES:
``````````````````````````````````````````````
iCaughtU by Itay, free, on Cydia. If the wrong password is entered to unlock the device it silently snaps a photo, saves it to your Photo Library (if enabled) and e-mails the photo with location (a Google map URL) to your Gmail or Hotmail account (required). Reboot is required after installing. Furthermore turning the device off is disabled when locked.
Configure your e-mail system Settings > iCaughtU > Email. Then further down tap on 'Mail Details' to enter your mail settings. Then below that tap 'Send Test Email' to test that your settings are correct.
If you have enabled 'Show Alert?' and an incorrect password is entered there will be a pop-up message stating "Important Message Please return this device to his owner":
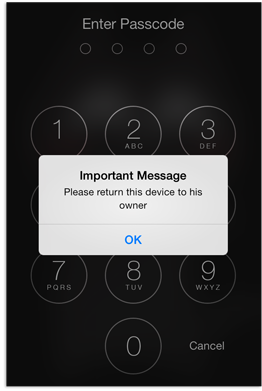
Test it by pressing on the power button and entering the wrong the pass.
Your Gmail will receive a letter with an image and text similar to:
"Someone tried to unlock your device.
Address: 1 Jerk Lane, etc...
Device located: http://maps.google.com/?q=xxxxxxxx(iCaughtU)
If you liked iCaughtU, please consider acquiring iCaughtU Pro and support my work."
iCaughtU Pro is $2.50, with many more features and well worth it. FAQ is here.
PROTECT YOUR PHONE NUMBER USING DISPOSABLE US NUMBERS:
``````````````````````````````````````````````````````
RingMeMaybe by yourVirtualSIM, free on iTunes. "Use RingMeMaybe to generate disposable US phone numbers for any occasion you need: - Protect your privacy on classified ads, dating platforms by sharing a disposable number. Be reached anywhere in the world with a US local phone number!"
You can not call out with it; it is only for receiving calls, using VoIP (must be connected to the Internet). The app is free but the service isn't. It comes with free 20 credits to generate 2 phone numbers. Package of 100 credits $8.99, 40 $3.99, 20 $1.99, and 10 credits $0.99. 10 credits are needed per number; $0.99 - $0.89. A number once generated is valid for one week. If you want to extend the same number it is another 10 credits per week. There is also voice mail; will have a loop icon next to missed calls.
NOTES:
- Upon launching it will call out to multiple IPs; you can safely block most except *.ringmemaybe.com.
- You'll need to register either with an email (anonymous email services are accepted, such as here.) or connect with your Facebook.
- Before you tap the Done button be sure to read the Terms of Services and Privacy Policy.
- User can leave a voice message. Once the number has expired the voice message is removed too.
- This is what RingMeMaybe looks like on my iPad mini (doesn't rotate to landscape mode or utilize entire screen):
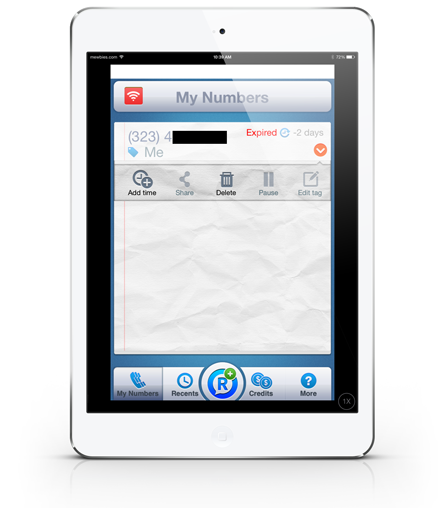
How to use RingMeMaybe on an iPad mini (does not have a telephone feature):
To generate a disposable number I connected my iPad through a friend's handphone's Wi-Fi as it requires a telephone number to authenticate the service (if not you will have the error "A server with the specified hostname could not be found"). After that I connected back to my PC's Wi-Fi and it worked perfect. I registered it with the city Chicago (I'm not in the US) and the telephone number it supplied was a Los Angeles area code; it doesn't generate numbers in your local area as Burner does below.
I'm curious how long until the disposable number is recycled and reused? I did enquire (Feb 8 '14) on their blog but until now the status of my question is still "comment is awaiting moderation"; they never replied.
Burner by Ad Hoc Labs, free app but not the service (Android here). "Burner helps keep your personal phone number more private and secure, and now includes one free number for 7 days (for a limited time). Make calls and send texts from Burner phone numbers you control. Get as many numbers as you'd like, and burn any number, any time." I haven't tried this yet.
Some of the main differences between Burner and RingMeMaybe:
- Burner has the features of a full phone number- in and out going calls, SMS but no MMS.
- Burner charges by the minute and texts; more expensive.
- Burner is only for US and Canada.
- Burner you can acquire multiple telephone numbers from your preferred area code(s).
Google Voice is another option (doesn't generate random numbers), for US only, that is able to route your different numbers to just one number, and many other features. More details here. "Users outside of the U.S. can use Call Phone in Gmail to make international calls at our affordable rates."
If you find mistakes, have suggestions, and or questions please post at mewbies forum HERE - thank you.
Last update on 28 Feb '14