
| SHARE: |
▄▄▄▄▄▄▄▄▄▄▄▄▄▄▄▄▄▄▄▄▄▄▄▄▄▄▄▄▄▄▄▄▄▄▄▄▄▄▄▄▄▄▄▄▄▄▄▄▄▄▄▄▄▄▄▄▄▄▄▄▄▄▄▄▄▄▄▄▄▄▄▄▄
██ ██
█▌ - FILE SERVER SCRIPTS- UPLOAD/DOWNLOAD ON THE WEB - █▌
█▌ █▌
█ ▐▌
█ This tutorial will cover four different scripts that vary greatly in their ▐▌
█ ability for users via the web to upload/download files. ▐▌
█ ▐▌
█ ___________..___________ ▐▌
█ ▐▌
█ EXTPLORER ▐▌
█ ROGIOBIZ PHP FILE MANAGER ▐▌
█ PHPFILEMANAGER ▐▌
█ XUPLOAD ▐▌
█ ▐▌
█ ___________..___________ ▐▌
█ ▐▌
█ ▐▌
█ 1) EXTPLORER: ▐▌
█ ````````````` ▐▌
█ eXtplorer is my favorite one! It even puts all retail file server scripts, ▐▌
█ that I have seen, to shame. It's very easy to install, supports multiple ▐▌
█ upload with the ability to transfer/upload from another URL, right click ▐▌
█ menus with ability to compress and decompress certain file types, add ▐▌
█ users with different perms and their own home paths, multilingual, etc etc.▐▌
█ There is a screen shot HERE. He has a forum HERE and FAQ. Check HERE for ▐▌
█ the latest version - it is still being supported and updated. ▐▌
█ Cons: Just like all - it doesn't support directory upload/download...one ▐▌
█ day someone will figure out a way to get that to work :p . ▐▌
█ ▐▌
█ PREREQUISITES: ▐▌
█ Web server, such as Apache ▐▌
█ PHP 4+ ▐▌
█ BZip2 Enabled (directions below to enable this) ▐▌
█ ZLib enabled (directions below to enable this) ▐▌
█ ▐▌
█ Supported Browsers: ▐▌
█ Internet Explorer 6.0 + ▐▌
█ Firefox 1.5 + ▐▌
█ Safari 2 + ▐▌
█ Konqueror (KDE 3.5) ▐▌
█ Opera 9+ ▐▌
█ And in 2.1 beta 6 Google Chrome/Iron 1+ ▐▌
█ ▐▌
█ WINDOWS APACHE INSTALLATION: ▐▌
█ Read the included README.txt, it covers everything. This is how I did it: ▐▌
█ 1. Create a new directory for eXtplorer in your web server path, any name ▐▌
█ you like, I made extp. ▐▌
█ ▐▌
█ 2. Unzip the contents of eXtplorer_2.0.1.zip into your new directory. ▐▌
█ ▐▌
█ 3. You'll now find 'scripts.tar.gz' with the extracted contents. Extract ▐▌
█ scripts.tar.gz as well, into the same directory so that the contents are ▐▌
█ in /scripts/ (not /scripts/scripts/). WinZip and WinRar both can extract ▐▌
█ from .tar.gz files. If you end up with a .tar file, extract it again. ▐▌
█ ▐▌
█ 4. For the example above the URL will be http://yoursite.com/extp/ ▐▌
█ Now you need to change your password. Login with the default name and ▐▌
█ password: admin ▐▌
█ You'll then be prompted 'Change you Password!' Click OK. Remember to use a ▐▌
█ strong password. ▐▌
█ You'll now be in the Administration window. If you would like to add users,▐▌
█ change their home path, etc click on the Users tab, then click Add. Once ▐▌
█ you are finished just close the Administration window. (To open it again ▐▌
█ it's in the middle, to the left of the red logout button.) Done :) ▐▌
█ ▐▌
█ See 'TROUBLE SHOOTING' below if you have problems decompressing files. ▐▌
█ ▐▌
█ LINUX APACHE INSTALLATION: ▐▌
█ This is how I did it, change the paths to your own. Login in to your ▐▌
█ shell, issues the cmds in bold: ▐▌
█ wget http://nchc.dl.sourceforge.net/project/extplorer/extplorer/eXtplorer%202.0.1/eXtplorer_2.0.1.zip
█ su ▐▌
█ mkdir /var/www/extp (extp - any name you like) ▐▌
█ cp eXtplorer_2.0.1.zip /var/www/extp/ && cd /var/www/extp/ ▐▌
█ unzip eXtplorer_2.0.1.zip ▐▌
█ tar xvzf scripts.tar.gz ▐▌
█ chmod 666 config/.htusers.php ▐▌
█ Clean up; remove the zip: ▐▌
█ rm eXtplorer_2.0.1.zip ▐▌
█ exit ▐▌
█ ▐▌
█ For the example above the URL will be http://yoursite.com/extp/ ▐▌
█ Now you need to change your password. Login with the default name and ▐▌
█ password: admin ▐▌
█ You'll then be prompted 'Change you Password!' Click OK. Remember to use a ▐▌
█ strong password. ▐▌
█ You'll now be in the Administration window. If you would like to add users,▐▌
█ change their home path, etc click on the Users tab, then click Add. Once ▐▌
█ you are finished just close the Administration window. (To open it again ▐▌
█ it's in the middle, to the left of the red logout button.) Done :) ▐▌
█ ▐▌
█ ___________..___________ ▐▌
█ ▐▌
█ 2) ROGIOBIZ PHP FILE MANAGER: ▐▌
█ ````````````````````````````` ▐▌
█ RogioBiz_PHP_file_manager is a great script to allow users to upload and ▐▌
█ download. It's very easy to setup, allows users to delete and rename; so ▐▌
█ only use this for only trusted users and with a password set to gain ▐▌
█ access to it. ▐▌
█ Update: Site is down last check so HERE is a copy to download. ▐▌
█ Cons: Can't upload/download directories or multiple files, no support, no ▐▌
█ progress bar. ▐▌
█ ▐▌
█ PREREQUISITES: ▐▌
█ Web server, such as Apache ▐▌
█ PHP 4.3+ ▐▌
█ ▐▌
█ SECURITY STEPS FOR ALL OSes: ▐▌
█ After setting up "Restrict access to the application directory ▐▌
█ (e.g. via .htaccess)." ▐▌
█ ▐▌
█ WINDOWS APACHE INSTALLATION: ▐▌
█ Read the included readme.txt, it covers everything. This is what I did for ▐▌
█ RogioBiz_PHP_file_manager_V1.2.zip: ▐▌
█ 1. Create a directory in your Apache web server path. For example my new ▐▌
█ directory is 'files' is here: D:\xampp\htdocs\files\ . ▐▌
█ ▐▌
█ 2. Unzip the contents to your newly created folder. Your URL as example ▐▌
█ above will now be: http://your.url/files/file_manager.php ▐▌
█ ▐▌
█ 3. Edit in WordPad the file config.php which will be here: ▐▌
█ D:\xampp\htdocs\files\rbfminc\config.php to where you want the initial ▐▌
█ folder your users will have access to and set your pass. ▐▌
█ It has this: ▐▌
█ $initial_folder = "/"; //initial folder ▐▌
█ $only_below = 0; // 0=you can brows all server; 1=you can brows only the ▐▌
█ $initial_folder and below ▐▌
█ ▐▌
█ //Login info {Please change the initial username and password} ▐▌
█ $username = 'admin'; ▐▌
█ $password = 'admin'; ▐▌
█ ▐▌
█ I changed it to access another drive, same directory as my FTP server: ▐▌
█ $initial_folder = "F:/wallpaper/large/files"; //initial folder ▐▌
█ $only_below = 1; // 0=you can brows all server; 1=you can brows only the ▐▌
█ $initial_folder and below ▐▌
█ ▐▌
█ //Login info {Please change the initial username and password} ▐▌
█ $username = 'whatever'; ▐▌
█ $password = 'strong_password'; ▐▌
█ ▐▌
█ 4. This is not needed, can skip; I changed the name of 'file_manager.php' ▐▌
█ to 'flowers.php' just in case that name becomes a black-listed name in my ▐▌
█ friends firewall. Then I edited 'session.php' to reflect that change: ▐▌
█ Has this: ▐▌
█ session_name("file_manager_session"); ▐▌
█ and this part ▐▌
█ header("Location: file_manager.php"); ▐▌
█ ▐▌
█ I changed it to: ▐▌
█ session_name("flowers_session"); ▐▌
█ and this part ▐▌
█ header("Location: flowers.php"); ▐▌
█ ▐▌
█ 5. Restart your web server. ▐▌
█ ▐▌
█ Done :) ▐▌
█ ▐▌
█ LINUX APACHE INSTALLATION: ▐▌
█ Read the included readme.txt, it covers everything. This is what I did for ▐▌
█ RogioBiz_PHP_file_manager_V1.2.zip: ▐▌
█ 1. wget http://www.scriptingblog.com/download/RogioBiz_PHP_file_manager_V1.2.zip
█ su ▐▌
█ ▐▌
█ 2. Decide the name of the directory you want to use for the file manager ▐▌
█ on your webserver. For this example I'll create the directory for it named ▐▌
█ 'files' while unzipping the contents to it: ▐▌
█ unzip RogioBiz_PHP_file_manager_V1.2.zip -d /var/www/files ▐▌
█ ▐▌
█ The URL as example above will now be: ▐▌
█ http://yoursite.com/files/file_manager.php ▐▌
█ ▐▌
█ 3. Edit config.php which will be here to where you want the initial folder ▐▌
█ your users will have access to and set your pass. ▐▌
█ pico /var/www/files/rbfminc/config.php ▐▌
█ It has this: ▐▌
█ $initial_folder = "/"; //initial folder ▐▌
█ $only_below = 0; // 0=you can brows all server; 1=you can brows only the ▐▌
█ $initial_folder and below ▐▌
█ ▐▌
█ //Login info {Please change the initial username and password} ▐▌
█ $username = 'admin'; ▐▌
█ $password = 'admin'; ▐▌
█ ▐▌
█ I changed it to: ▐▌
█ $initial_folder = "/var/www/wallpaper/large/files"; //initial folder ▐▌
█ $only_below = 1; // 0=you can brows all server; 1=you can brows only the ▐▌
█ $initial_folder and below ▐▌
█ ▐▌
█ //Login info {Please change the initial username and password} ▐▌
█ $username = 'whatever'; ▐▌
█ $password = 'strong_password'; ▐▌
█ ▐▌
█ 4. This is not needed, can skip; I changed the name of 'file_manager.php' ▐▌
█ to 'flowers.php' just in case that name becomes a black-listed name in my ▐▌
█ friend's firewall. Then I edited 'session.php' to reflect that change: ▐▌
█ pico /var/www/files/rbfminc/session.php ▐▌
█ Has this: ▐▌
█ session_name("file_manager_session"); ▐▌
█ and this part ▐▌
█ header("Location: file_manager.php"); ▐▌
█ ▐▌
█ I changed it to: ▐▌
█ session_name("flowers_session"); ▐▌
█ and this part ▐▌
█ header("Location: flowers.php"); ▐▌
█ ▐▌
█ 5. set perms: ▐▌
█ chmod 777 /var/www/files ▐▌
█ ▐▌
█ 6.restart webserver: ▐▌
█ /etc/init.d/apache2 restart ▐▌
█ ▐▌
█ Done :) ▐▌
█ ▐▌
█ ___________..___________ ▐▌
█ ▐▌
█ 3) PHP FILE MANAGER: ▐▌
█ ```````````````````` ▐▌
█ phpFileManager is a fantastic script. It is much more than just a file ▐▌
█ server, that supports multiple file uploads, it also allows you to execute ▐▌
█ shell commands, view server information, compress files, etc. So again this▐▌
█ is to be used only for trusted users, password protected and those that ▐▌
█ understand not to simply push buttons and send cmds :p. There is a screen ▐▌
█ shot HERE. Forums HERE and HERE. ▐▌
█ Cons: Can't upload/download directories. ▐▌
█ ▐▌
█ PREREQUISITES: ▐▌
█ Web server, such as Apache ▐▌
█ BZip2 Enabled (directions below to enable this) ▐▌
█ ZLib enabled (directions below to enable this) ▐▌
█ ▐▌
█ INSTALLATION: ▐▌
█ It's so easy to install: Upload it to your webserver, done, really :) . ▐▌
█ ▐▌
█ WINDOWS TROUBLE SHOOTING: ▐▌
█ Depending what package you used to install your web server and PHP you'll ▐▌
█ need to do a few things for the decompressing of files to work or you will ▐▌
█ receive an error similar to: ▐▌
█ 'Fatal error: Call to undefined function: zip_open()'. ▐▌
█ I use XAMPP so I'll use it as my example, just change your paths for ▐▌
█ installation. ▐▌
█ ▐▌
█ 1. Check if you have the required dlls: ▐▌
█ You'll need php_bz2.dll and php_zip.dll. Mine are located here: ▐▌
█ \xampp\php\ext\php_bz2.dll & php_zip.dll ▐▌
█ If you do not have those files, download them from PHP site HERE 'Windows ▐▌
█ Binaries PHP 5.2.13 zip package'. Unzip it, then copy over the files that ▐▌
█ you need from the package \php-5.2.13-Win32\ext\ to your existing ▐▌
█ \php\ext\ or it could be \php\dlls\ ▐▌
█ ▐▌
█ 2. Enable the dlls: ▐▌
█ In php.ini you need to uncomment, remove ';' on these lines: ▐▌
█ ;extension=php_bz2.dll ▐▌
█ ;extension=php_zip.dll ▐▌
█ ▐▌
█ So that they are like this: ▐▌
█ extension=php_bz2.dll ▐▌
█ extension=php_zip.dll ▐▌
█ ▐▌
█ If you don't have those lines add them. ▐▌
█ ▐▌
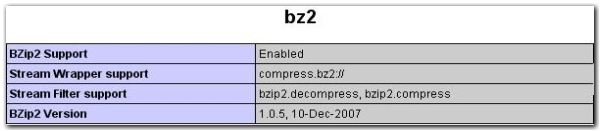
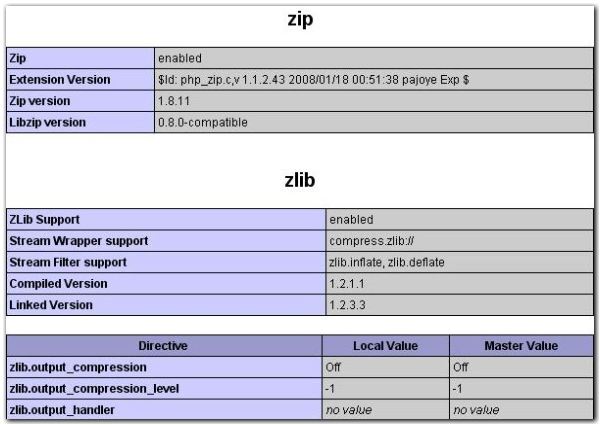
█ 3. Restart your web server and view phpinfo() if those are enabled, or ▐▌
█ just test it. If you don't how to view phpinfo() see HERE. ▐▌
█ If enabled on phpinfo() you'll see: ▐▌
█ BZip2 Support Enabled ▐▌
█ ZLib Support enabled ▐▌
 █ ▐▌
█ NOTE: ▐▌
█ Since this script has the potential to be quite dangerous you might ▐▌
█ consider tightening security on it by allowing only certain IPs to load ▐▌
█ the page by adding some lines to your apache2.conf, for example: ▐▌
█ su ▐▌
█ pico /etc/apache2/apache2.conf ▐▌
█ ▐▌
█ Paste in the the lines below replacing '123.456.78.90' & '234.567.89.01' ▐▌
█ with the IPs you want to allow to access this file, and replace ▐▌
█ 'phpfilemanager.php' with the name you gave your file: ▐▌
█ # protected files ▐▌
█ <Files phpfilemanager.php> ▐▌
█ Order Deny,Allow ▐▌
█ Deny from all ▐▌
█ Allow from 123.456.78.90 ▐▌
█ Allow from 234.567.89.01 ▐▌
█ </Files> ▐▌
█ ▐▌
█ Restart apache and exit root: ▐▌
█ /etc/init.d/apache2 restart ▐▌
█ exit ▐▌
█ ▐▌
█ ___________..___________ ▐▌
█ ▐▌
█ 4) XUPLOAD: ▐▌
█ ``````````` ▐▌
█ XUpload is a good simple script to allow your users to upload only. It has ▐▌
█ a progress page to show the upload information and has a support forum ▐▌
█ HERE. There is a Demo HERE for the free version. ▐▌
█ Cons: Can't upload directories, free version-can't upload multiple files, ▐▌
█ progress bar is a pop-up window, not as easy to install, the non-free ▐▌
█ version is expensive - they should consider non-commercial users. ▐▌
█ ▐▌
█ PREREQUISITES: ▐▌
█ Web server, such as Apache ▐▌
█ Perl ▐▌
█ ▐▌
█ LINUX APACHE INSTALLATION: ▐▌
█ (I didn't install this on my Window's Apache) ▐▌
█ Read the enclosed doc here cgi-bin/INSTALL ...good luck. This is what I ▐▌
█ did: ▐▌
█ ▐▌
█ INSTALL XUPLOAD: ▐▌
█ wget http://www.sibsoft.net/downloads/xupload_2_7.zip ▐▌
█ su ▐▌
█ unzip xupload_2_7.zip -d /usr/lib ▐▌
█ (don't need cgi-bin in unzip path as it exist in the zip and in the ▐▌
█ existing path) ▐▌
█ mv /usr/lib/upload_form.html /var/www/upload_form.html ▐▌
█ or if you want to change the name of that file in case firewalls ban ▐▌
█ it: ▐▌
█ mv /usr/lib/upload_form.html /var/www/wallpaper.html ▐▌
█ then clean up: rm /usr/lib/upload_form.html ▐▌
█ cp /usr/lib/post.php /var/www/post.php ▐▌
█ ▐▌
█ Clean up not needed directories from the zip: ▐▌
█ rm /usr/lib/cgi-bin/temp ▐▌
█ rm /usr/lib/cgi-bin/uploads ▐▌
█ ▐▌
█ Make new directories with perms: ▐▌
█ mkdir -m 777 /var/www/cgi-bin/temp ▐▌
█ mkdir -m 777 /var/www/cgi-bin/uploads ▐▌
█ ▐▌
█ Perms: ▐▌
█ chmod 755 /var/www/cgi-bin ▐▌
█ chmod 755 /usr/lib/cgi-bin ▐▌
█ chmod 755 /usr/lib/cgi-bin/*.cgi ▐▌
█ ▐▌
█ Edit XUploadConfig.pm for your own server details & needs: ▐▌
█ pico /usr/lib/cgi-bin/XUploadConfig.pm ▐▌
█ These sections have this: ▐▌
█ url_post => 'http://site.com/post.php', ▐▌
█ ▐▌
█ redirect_link => '', ▐▌
█ ▐▌
█ temp_files_lifetime => 86400, ▐▌
█ ▐▌
█ ▐▌
█ I changed, as per this example for my needs (upload_form.html is ▐▌
█ wallpaper.html), to: ▐▌
█ url_post => '', ▐▌
█ ▐▌
█ redirect_link => 'http://mysite.com/wallpaper.html', ▐▌
█ ▐▌
█ temp_files_lifetime => 2000000, ▐▌
█ ▐▌
█ ▐▌
█ Can skip this part; Edit upload_form.html: ▐▌
█ pico /var/www/wallpaper.html ▐▌
█ Has this: ▐▌
█ <Title>XUpload</Title> ▐▌
█ ▐▌
█ Changed to: ▐▌
█ <Title>Wallpaper</Title> ▐▌
█ ▐▌
█ exit ▐▌
█ Done :) Now test by going to http://yoursite.com/wallpaper.html (or ▐▌
█ whatever you named that file to) or http://yoursite.com/cgi-bin/upload.cgi ▐▌
█ ▐▌
█ NOTES: ▐▌
█ The files that have been uploaded will be here: /var/www/cgi-bin/uploads/ ▐▌
█ To be able to view/download the files via web you'll need to add some ▐▌
█ settings in your Apache to allow browsing in that directory. ▐▌
█ For an example I'll add this with an alias so users don't see cgi-bin in ▐▌
█ the URL. The Alias below 'xfiles' can be anything. Users will type that to ▐▌
█ reach that directory: ▐▌
█ su ▐▌
█ pico /etc/apache2/apache2.conf ▐▌
█ Add this under the Alias section: ▐▌
█ Alias /xfiles /var/www/cgi-bin/uploads ▐▌
█ <Directory /var/www/cgi-bin/uploads/> ▐▌
█ Options Indexes ▐▌
█ Order allow,deny ▐▌
█ Allow from all ▐▌
█ </Directory> ▐▌
█ ▐▌
█ /etc/init.d/apache2 reload ▐▌
█ exit ▐▌
█ Now test that by going to: http://yoursite.com/xfiles ▐▌
█ ▐▌
█ Add that link to upload_form.html (or whatever you have named it) just ▐▌
█ before </BODY> at the end of the file. I've added with the same style they ▐▌
█ use: ▐▌
█ pico /var/www/wallpaper.html ▐▌
█ <p> ▐▌
█ <a href="http://yoursite.com/xfiles" "TARGET="_blank" style="font: 12px ▐▌
█ Arial; color: #a3a3a3;text-decoration:none;"><b>Files are HERE</b></a> ▐▌
█ ▐▌
█ exit ▐▌
█ ▐▌
█ Idea- Add that as a frame, that refreshes to the bottom of the xupload ▐▌
█ page so users don't need to have another window open to see the files. ▐▌
█ ▐▌
█ //---------------------------------------------------------------------- ▐▌
█ ▐▌
█ If you find mistakes, have suggestions, and or questions please post at ▐▌
█ mewbies forum HERE - thank you. ▐▌
█ ▐▌
█ Last update on 19 Jun '13 ▐▌
█ ▐▌
█▌ █▌
█▌ - mewbies.com - █▌
█▌ █▌
██▄▄▄▄▄▄▄▄▄▄▄▄▄▄▄▄▄▄▄▄▄▄▄▄▄▄▄▄▄▄▄▄▄▄▄▄▄▄▄▄▄▄▄▄▄▄▄▄▄▄▄▄▄▄▄▄▄▄▄▄▄▄▄▄▄▄▄▄▄██
█ ▐▌
█ NOTE: ▐▌
█ Since this script has the potential to be quite dangerous you might ▐▌
█ consider tightening security on it by allowing only certain IPs to load ▐▌
█ the page by adding some lines to your apache2.conf, for example: ▐▌
█ su ▐▌
█ pico /etc/apache2/apache2.conf ▐▌
█ ▐▌
█ Paste in the the lines below replacing '123.456.78.90' & '234.567.89.01' ▐▌
█ with the IPs you want to allow to access this file, and replace ▐▌
█ 'phpfilemanager.php' with the name you gave your file: ▐▌
█ # protected files ▐▌
█ <Files phpfilemanager.php> ▐▌
█ Order Deny,Allow ▐▌
█ Deny from all ▐▌
█ Allow from 123.456.78.90 ▐▌
█ Allow from 234.567.89.01 ▐▌
█ </Files> ▐▌
█ ▐▌
█ Restart apache and exit root: ▐▌
█ /etc/init.d/apache2 restart ▐▌
█ exit ▐▌
█ ▐▌
█ ___________..___________ ▐▌
█ ▐▌
█ 4) XUPLOAD: ▐▌
█ ``````````` ▐▌
█ XUpload is a good simple script to allow your users to upload only. It has ▐▌
█ a progress page to show the upload information and has a support forum ▐▌
█ HERE. There is a Demo HERE for the free version. ▐▌
█ Cons: Can't upload directories, free version-can't upload multiple files, ▐▌
█ progress bar is a pop-up window, not as easy to install, the non-free ▐▌
█ version is expensive - they should consider non-commercial users. ▐▌
█ ▐▌
█ PREREQUISITES: ▐▌
█ Web server, such as Apache ▐▌
█ Perl ▐▌
█ ▐▌
█ LINUX APACHE INSTALLATION: ▐▌
█ (I didn't install this on my Window's Apache) ▐▌
█ Read the enclosed doc here cgi-bin/INSTALL ...good luck. This is what I ▐▌
█ did: ▐▌
█ ▐▌
█ INSTALL XUPLOAD: ▐▌
█ wget http://www.sibsoft.net/downloads/xupload_2_7.zip ▐▌
█ su ▐▌
█ unzip xupload_2_7.zip -d /usr/lib ▐▌
█ (don't need cgi-bin in unzip path as it exist in the zip and in the ▐▌
█ existing path) ▐▌
█ mv /usr/lib/upload_form.html /var/www/upload_form.html ▐▌
█ or if you want to change the name of that file in case firewalls ban ▐▌
█ it: ▐▌
█ mv /usr/lib/upload_form.html /var/www/wallpaper.html ▐▌
█ then clean up: rm /usr/lib/upload_form.html ▐▌
█ cp /usr/lib/post.php /var/www/post.php ▐▌
█ ▐▌
█ Clean up not needed directories from the zip: ▐▌
█ rm /usr/lib/cgi-bin/temp ▐▌
█ rm /usr/lib/cgi-bin/uploads ▐▌
█ ▐▌
█ Make new directories with perms: ▐▌
█ mkdir -m 777 /var/www/cgi-bin/temp ▐▌
█ mkdir -m 777 /var/www/cgi-bin/uploads ▐▌
█ ▐▌
█ Perms: ▐▌
█ chmod 755 /var/www/cgi-bin ▐▌
█ chmod 755 /usr/lib/cgi-bin ▐▌
█ chmod 755 /usr/lib/cgi-bin/*.cgi ▐▌
█ ▐▌
█ Edit XUploadConfig.pm for your own server details & needs: ▐▌
█ pico /usr/lib/cgi-bin/XUploadConfig.pm ▐▌
█ These sections have this: ▐▌
█ url_post => 'http://site.com/post.php', ▐▌
█ ▐▌
█ redirect_link => '', ▐▌
█ ▐▌
█ temp_files_lifetime => 86400, ▐▌
█ ▐▌
█ ▐▌
█ I changed, as per this example for my needs (upload_form.html is ▐▌
█ wallpaper.html), to: ▐▌
█ url_post => '', ▐▌
█ ▐▌
█ redirect_link => 'http://mysite.com/wallpaper.html', ▐▌
█ ▐▌
█ temp_files_lifetime => 2000000, ▐▌
█ ▐▌
█ ▐▌
█ Can skip this part; Edit upload_form.html: ▐▌
█ pico /var/www/wallpaper.html ▐▌
█ Has this: ▐▌
█ <Title>XUpload</Title> ▐▌
█ ▐▌
█ Changed to: ▐▌
█ <Title>Wallpaper</Title> ▐▌
█ ▐▌
█ exit ▐▌
█ Done :) Now test by going to http://yoursite.com/wallpaper.html (or ▐▌
█ whatever you named that file to) or http://yoursite.com/cgi-bin/upload.cgi ▐▌
█ ▐▌
█ NOTES: ▐▌
█ The files that have been uploaded will be here: /var/www/cgi-bin/uploads/ ▐▌
█ To be able to view/download the files via web you'll need to add some ▐▌
█ settings in your Apache to allow browsing in that directory. ▐▌
█ For an example I'll add this with an alias so users don't see cgi-bin in ▐▌
█ the URL. The Alias below 'xfiles' can be anything. Users will type that to ▐▌
█ reach that directory: ▐▌
█ su ▐▌
█ pico /etc/apache2/apache2.conf ▐▌
█ Add this under the Alias section: ▐▌
█ Alias /xfiles /var/www/cgi-bin/uploads ▐▌
█ <Directory /var/www/cgi-bin/uploads/> ▐▌
█ Options Indexes ▐▌
█ Order allow,deny ▐▌
█ Allow from all ▐▌
█ </Directory> ▐▌
█ ▐▌
█ /etc/init.d/apache2 reload ▐▌
█ exit ▐▌
█ Now test that by going to: http://yoursite.com/xfiles ▐▌
█ ▐▌
█ Add that link to upload_form.html (or whatever you have named it) just ▐▌
█ before </BODY> at the end of the file. I've added with the same style they ▐▌
█ use: ▐▌
█ pico /var/www/wallpaper.html ▐▌
█ <p> ▐▌
█ <a href="http://yoursite.com/xfiles" "TARGET="_blank" style="font: 12px ▐▌
█ Arial; color: #a3a3a3;text-decoration:none;"><b>Files are HERE</b></a> ▐▌
█ ▐▌
█ exit ▐▌
█ ▐▌
█ Idea- Add that as a frame, that refreshes to the bottom of the xupload ▐▌
█ page so users don't need to have another window open to see the files. ▐▌
█ ▐▌
█ //---------------------------------------------------------------------- ▐▌
█ ▐▌
█ If you find mistakes, have suggestions, and or questions please post at ▐▌
█ mewbies forum HERE - thank you. ▐▌
█ ▐▌
█ Last update on 19 Jun '13 ▐▌
█ ▐▌
█▌ █▌
█▌ - mewbies.com - █▌
█▌ █▌
██▄▄▄▄▄▄▄▄▄▄▄▄▄▄▄▄▄▄▄▄▄▄▄▄▄▄▄▄▄▄▄▄▄▄▄▄▄▄▄▄▄▄▄▄▄▄▄▄▄▄▄▄▄▄▄▄▄▄▄▄▄▄▄▄▄▄▄▄▄██