MEWBIES@: Facebook Twitter G+ YouTube DeviantArt Forum Wall
▄▄▄▄▄▄▄▄▄▄▄▄▄▄▄▄▄▄▄▄▄▄▄▄▄▄▄▄▄▄▄▄▄▄▄▄▄▄▄▄▄▄▄▄▄▄▄▄▄▄▄▄▄▄▄▄▄▄▄▄▄▄▄▄▄▄▄▄▄▄▄▄▄
██ ██
█▌ - HOW TO INSTALL MAC OS X SNOW LEOPARD ON WINDOWS USING VMWARE - █▌
█▌ COMPLETE █▌
█ ▐▌
█ This tutorial is for informational purposes only. ▐▌
█ If you like OS X Snow Leopard - buy a Mac! :D ▐▌
 █ ▐▌
█ I adore my VMware and there is plenty of information out there how to do ▐▌
█ this. The reason I'm writing a tutorial for it as I had to use information ▐▌
█ collected from so many different sites and plenty of trial and error to ▐▌
█ get it to work smoothly for myself. ▐▌
█ The tutorial is long as I cover everything I did so that instead of taking ▐▌
█ you many frustrating hours/days you should have this up and running in an ▐▌
█ hour flat after your prerequisites are done. Hope this works well for your ▐▌
█ testings. I did this on Windows XP SP3. ▐▌
█ ▐▌
█ Thank you mostly to these post at ihackintosh.com HERE and redmodpie.com ▐▌
█ HERE for their information. ▐▌
█ Other guides & tips HERE, HERE & HERE & plenty more... ▐▌
█ ▐▌
█ For the same tutorial but without images, click HERE. ▐▌
█ ▐▌
█ //---------------------------------------------------------------------- ▐▌
█ ▐▌
█ PREREQUISITES & PREPARATION: ▐▌
█ ```````````````````````````` ▐▌
█ Do not install any of the Mac softwares until you prompted in the tutorial ▐▌
█ to do so. ▐▌
█ ▐▌
█ 1. An Intel based processor that supports 'Virtual Hardware & Software' ▐▌
█ and if it does, it must be enabled. ▐▌
█ If yours doesn't or isn't enabled you will get this error during install: ▐▌
█ mac OS X is not supported with software virtualization. To run Mac OS X ▐▌
█ you need a host on which VMware Workstation supports hardware ▐▌
█ virtualization. ▐▌
█ To enable it, boot-up into your bios and look for the Virtual setting and ▐▌
█ enable it. ▐▌
█ I so happen to have one of the few models that doesn't support ▐▌
█ virtualization, so I had to get a new one :/ ▐▌
█ If you do not see Virtual settings, chances are that it doesn't support ▐▌
█ it. Search the manufacturer's website to be certain. ▐▌
█ ▐▌
█ 2. You'll need the pre-made boot-up files by snowy HERE. ▐▌
█ (enclosed is darwin.iso from VMWare workstation demo & the VMware ▐▌
█ configuration files) ▐▌
█ SHA-160: BE3C942A766520E0A2498BCDA1B601F8EB75A8CF ▐▌
█ MD5: 83f0565f4fd09fe0ff15be61f703517f ▐▌
█ ▐▌
█ Unzip the 'Snowy_Vmware_files.zip' files to the location you want your ▐▌
█ Virtual Machine installed to; as it needs the enclosed 'darwin.iso' each ▐▌
█ time you boot up your Mac, for example: ▐▌
█ C:\Documents and Settings\User\My Documents\My Virtual Machines\Snowy_VM ▐▌
█ ▐▌
█ 3. Mac OSX Snow Leopard 10.6 or 10.6.3 - I've tried both and in two ▐▌
█ formats; retail DVD & .ISO - they all worked for me. Tho the retail DVD 2 ▐▌
█ refused to install-it's just other software/junk, it's not needed. ▐▌
█ ▐▌
█ 4. And of course VMware Workstation. Their site is HERE, they offer a 30 ▐▌
█ day trial. I used version 7.0.0 build-203739. ▐▌
█ ▐▌
█ 5. For your sound to work download ▐▌
█ 'EnsoniqAudioPCI_1.0.2_for_SnowLeopard.mpkg.tar.gz' HERE, click on the ▐▌
█ 'SnowLeopard' directory icon. ▐▌
█ ▐▌
█ 6. Size after install is approximately 13 gigs but you need to allocate ▐▌
█ 43 gigs. ▐▌
█ ▐▌
█ 7. Optional - If you want to do the updates for Mac, start downloading ▐▌
█ *these now, they aren't small. ▐▌
█ *For some people the Combo 3 update works fine. For others they had to do ▐▌
█ each update one at a time. ▐▌
█ Both worked for me, so download the 'Combo 3 Update' first. ▐▌
█ List of updates can be found HERE. ▐▌
█ Mac OS X v10.6.3 Update (Combo 3 Update) 784MB Page HERE, Download HERE. ▐▌
█ ▐▌
█ Here are the links for individual updates if the Combo .3 Update didn't ▐▌
█ work for you: ▐▌
█ -Mac OS X v10.6.1 Update 73MB Page HERE, Download HERE. ▐▌
█ -Mac OS X v10.6.1 Update 73MB Page HERE, Download HERE. ▐▌
█ -Mac OS X v10.6.2 Update 473MB Page HERE, Download HERE. ▐▌
█ -Mac OS X v10.6.3 Update 719MB Page HERE, Download HERE. ▐▌
█ ▐▌
█ 8. Optional- if you do not want to use your retail Mac DVD but convert ▐▌
█ your .dmg to an .iso here are many options that I have tried each: ▐▌
█ ▐▌
█ DMG2ISO: worked great for me on 10.6 but NOT on 10.6.3. Freeware, tiny, ▐▌
█ portable, command line only, found HERE. ▐▌
█ For those not use to using a cmd (command) line, this is how: ▐▌
█ Place dmg2iso files in the same directory as the .dmg you want to convert. ▐▌
█ Press Start button/ select Run/type in: cmd /Press OK. ▐▌
█ Change to the drive your mac.dmg is located on, for example if it's on ▐▌
█ drive F, type in: ▐▌
█ f: ▐▌
█ Then change to the directory containing your mac.dmg, type in, for ▐▌
█ example: ▐▌
█ cd F:\stuff ▐▌
█ Then type in, for example (change file names to the name of your .dmg ▐▌
█ file): ▐▌
█ dmg2iso mymac.dmg mymac.iso ▐▌
█ ▐▌
█ UltraISO: found HERE, they offer a 30 day trial. ▐▌
█ To convert: File/Open- your .dmg, select Tools/Convert/ ▐▌
█ ▐▌
█ PowerISO: found HERE, though the trial will only allow you to convert up ▐▌
█ to 300MB :/. Tools/Convert/ browse to your dmg file, check ISO, browse to ▐▌
█ where to save it, press OK. ▐▌
█ ▐▌
█ AnyToISO: found HERE, though the trial will only allow you to convert CD ▐▌
█ images, not DVD :/ ▐▌
█ ▐▌
█ Others that failed are: ▐▌
█ MagicISO on loading the .dmg, messagebox stated "Can't find the file or ▐▌
█ file isn't CD image file!" ▐▌
█ DMG2IMG worked great, but Alcohol 120% doesn't mount .img files. ▐▌
█ ▐▌
█ 9. Optional - Alcohol 120% - To 'mount' the .iso that you have converted ▐▌
█ if you don't want to use your retail Mac DVD. ▐▌
█ Their site is HERE, 15 day trial. If you are going to use this software to ▐▌
█ mount, be sure you select Yes during the install for the 'Virtual Drive'. ▐▌
█ To mount: File/Open/ the iso, then drag and drop it to bottom of screen ▐▌
█ onto your virtual ROM drive. Mounting a .dmg will not work (using Alcohol ▐▌
█ and/or UltraISO at least). ▐▌
█ ▐▌
█ BTW you can mount in UltraISO also. I tried it, looked good, but did not ▐▌
█ work; VMware gave the error 'Operating system not found'. ▐▌
█ ▐▌
█ //---------------------------------------------------------------------- ▐▌
█ ▐▌
█ BOOT-UP INTO MAC INSTALLER: ▐▌
█ `````````````````````````` ▐▌
█ 1. Presuming the you have completed the steps above (see #2 above); ▐▌
█ Insert your Mac OSX DVD or mount your .iso image. ▐▌
█ ▐▌
█ 2. Launch VMWARE Workstation. 'Home' tab select 'Open Exiting VM or Team' ▐▌
█ and load the 'Mac OS X Server 10.6 (experimental).vmx' file (from the ▐▌
█ Snowy_Vmware_files.zip). You'll now have a new tab in VMware named after ▐▌
█ the file you opened. ▐▌
█ ▐▌
█ I adore my VMware and there is plenty of information out there how to do ▐▌
█ this. The reason I'm writing a tutorial for it as I had to use information ▐▌
█ collected from so many different sites and plenty of trial and error to ▐▌
█ get it to work smoothly for myself. ▐▌
█ The tutorial is long as I cover everything I did so that instead of taking ▐▌
█ you many frustrating hours/days you should have this up and running in an ▐▌
█ hour flat after your prerequisites are done. Hope this works well for your ▐▌
█ testings. I did this on Windows XP SP3. ▐▌
█ ▐▌
█ Thank you mostly to these post at ihackintosh.com HERE and redmodpie.com ▐▌
█ HERE for their information. ▐▌
█ Other guides & tips HERE, HERE & HERE & plenty more... ▐▌
█ ▐▌
█ For the same tutorial but without images, click HERE. ▐▌
█ ▐▌
█ //---------------------------------------------------------------------- ▐▌
█ ▐▌
█ PREREQUISITES & PREPARATION: ▐▌
█ ```````````````````````````` ▐▌
█ Do not install any of the Mac softwares until you prompted in the tutorial ▐▌
█ to do so. ▐▌
█ ▐▌
█ 1. An Intel based processor that supports 'Virtual Hardware & Software' ▐▌
█ and if it does, it must be enabled. ▐▌
█ If yours doesn't or isn't enabled you will get this error during install: ▐▌
█ mac OS X is not supported with software virtualization. To run Mac OS X ▐▌
█ you need a host on which VMware Workstation supports hardware ▐▌
█ virtualization. ▐▌
█ To enable it, boot-up into your bios and look for the Virtual setting and ▐▌
█ enable it. ▐▌
█ I so happen to have one of the few models that doesn't support ▐▌
█ virtualization, so I had to get a new one :/ ▐▌
█ If you do not see Virtual settings, chances are that it doesn't support ▐▌
█ it. Search the manufacturer's website to be certain. ▐▌
█ ▐▌
█ 2. You'll need the pre-made boot-up files by snowy HERE. ▐▌
█ (enclosed is darwin.iso from VMWare workstation demo & the VMware ▐▌
█ configuration files) ▐▌
█ SHA-160: BE3C942A766520E0A2498BCDA1B601F8EB75A8CF ▐▌
█ MD5: 83f0565f4fd09fe0ff15be61f703517f ▐▌
█ ▐▌
█ Unzip the 'Snowy_Vmware_files.zip' files to the location you want your ▐▌
█ Virtual Machine installed to; as it needs the enclosed 'darwin.iso' each ▐▌
█ time you boot up your Mac, for example: ▐▌
█ C:\Documents and Settings\User\My Documents\My Virtual Machines\Snowy_VM ▐▌
█ ▐▌
█ 3. Mac OSX Snow Leopard 10.6 or 10.6.3 - I've tried both and in two ▐▌
█ formats; retail DVD & .ISO - they all worked for me. Tho the retail DVD 2 ▐▌
█ refused to install-it's just other software/junk, it's not needed. ▐▌
█ ▐▌
█ 4. And of course VMware Workstation. Their site is HERE, they offer a 30 ▐▌
█ day trial. I used version 7.0.0 build-203739. ▐▌
█ ▐▌
█ 5. For your sound to work download ▐▌
█ 'EnsoniqAudioPCI_1.0.2_for_SnowLeopard.mpkg.tar.gz' HERE, click on the ▐▌
█ 'SnowLeopard' directory icon. ▐▌
█ ▐▌
█ 6. Size after install is approximately 13 gigs but you need to allocate ▐▌
█ 43 gigs. ▐▌
█ ▐▌
█ 7. Optional - If you want to do the updates for Mac, start downloading ▐▌
█ *these now, they aren't small. ▐▌
█ *For some people the Combo 3 update works fine. For others they had to do ▐▌
█ each update one at a time. ▐▌
█ Both worked for me, so download the 'Combo 3 Update' first. ▐▌
█ List of updates can be found HERE. ▐▌
█ Mac OS X v10.6.3 Update (Combo 3 Update) 784MB Page HERE, Download HERE. ▐▌
█ ▐▌
█ Here are the links for individual updates if the Combo .3 Update didn't ▐▌
█ work for you: ▐▌
█ -Mac OS X v10.6.1 Update 73MB Page HERE, Download HERE. ▐▌
█ -Mac OS X v10.6.1 Update 73MB Page HERE, Download HERE. ▐▌
█ -Mac OS X v10.6.2 Update 473MB Page HERE, Download HERE. ▐▌
█ -Mac OS X v10.6.3 Update 719MB Page HERE, Download HERE. ▐▌
█ ▐▌
█ 8. Optional- if you do not want to use your retail Mac DVD but convert ▐▌
█ your .dmg to an .iso here are many options that I have tried each: ▐▌
█ ▐▌
█ DMG2ISO: worked great for me on 10.6 but NOT on 10.6.3. Freeware, tiny, ▐▌
█ portable, command line only, found HERE. ▐▌
█ For those not use to using a cmd (command) line, this is how: ▐▌
█ Place dmg2iso files in the same directory as the .dmg you want to convert. ▐▌
█ Press Start button/ select Run/type in: cmd /Press OK. ▐▌
█ Change to the drive your mac.dmg is located on, for example if it's on ▐▌
█ drive F, type in: ▐▌
█ f: ▐▌
█ Then change to the directory containing your mac.dmg, type in, for ▐▌
█ example: ▐▌
█ cd F:\stuff ▐▌
█ Then type in, for example (change file names to the name of your .dmg ▐▌
█ file): ▐▌
█ dmg2iso mymac.dmg mymac.iso ▐▌
█ ▐▌
█ UltraISO: found HERE, they offer a 30 day trial. ▐▌
█ To convert: File/Open- your .dmg, select Tools/Convert/ ▐▌
█ ▐▌
█ PowerISO: found HERE, though the trial will only allow you to convert up ▐▌
█ to 300MB :/. Tools/Convert/ browse to your dmg file, check ISO, browse to ▐▌
█ where to save it, press OK. ▐▌
█ ▐▌
█ AnyToISO: found HERE, though the trial will only allow you to convert CD ▐▌
█ images, not DVD :/ ▐▌
█ ▐▌
█ Others that failed are: ▐▌
█ MagicISO on loading the .dmg, messagebox stated "Can't find the file or ▐▌
█ file isn't CD image file!" ▐▌
█ DMG2IMG worked great, but Alcohol 120% doesn't mount .img files. ▐▌
█ ▐▌
█ 9. Optional - Alcohol 120% - To 'mount' the .iso that you have converted ▐▌
█ if you don't want to use your retail Mac DVD. ▐▌
█ Their site is HERE, 15 day trial. If you are going to use this software to ▐▌
█ mount, be sure you select Yes during the install for the 'Virtual Drive'. ▐▌
█ To mount: File/Open/ the iso, then drag and drop it to bottom of screen ▐▌
█ onto your virtual ROM drive. Mounting a .dmg will not work (using Alcohol ▐▌
█ and/or UltraISO at least). ▐▌
█ ▐▌
█ BTW you can mount in UltraISO also. I tried it, looked good, but did not ▐▌
█ work; VMware gave the error 'Operating system not found'. ▐▌
█ ▐▌
█ //---------------------------------------------------------------------- ▐▌
█ ▐▌
█ BOOT-UP INTO MAC INSTALLER: ▐▌
█ `````````````````````````` ▐▌
█ 1. Presuming the you have completed the steps above (see #2 above); ▐▌
█ Insert your Mac OSX DVD or mount your .iso image. ▐▌
█ ▐▌
█ 2. Launch VMWARE Workstation. 'Home' tab select 'Open Exiting VM or Team' ▐▌
█ and load the 'Mac OS X Server 10.6 (experimental).vmx' file (from the ▐▌
█ Snowy_Vmware_files.zip). You'll now have a new tab in VMware named after ▐▌
█ the file you opened. ▐▌

 █ ▐▌
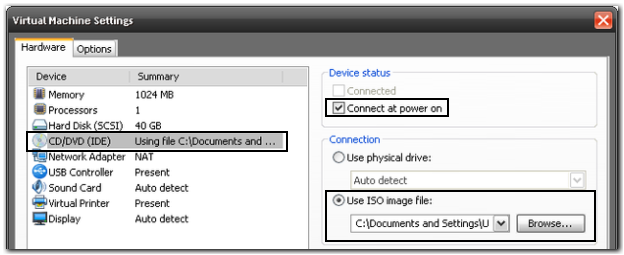
█ 3. On the left pane select 'Edit virtual machine settings'. ▐▌
█ ▐▌
█ 3. On the left pane select 'Edit virtual machine settings'. ▐▌
 █ ▐▌
█ 4. Select 'CD/DVD (IDE)'. ▐▌
█ Select, on the right-side, 'Use ISO image file' and browse to your ▐▌
█ 'darwin_snow.iso' (from Snowy_Vmware_files.zip). Press OK. ▐▌
█ ▐▌
█ 4. Select 'CD/DVD (IDE)'. ▐▌
█ Select, on the right-side, 'Use ISO image file' and browse to your ▐▌
█ 'darwin_snow.iso' (from Snowy_Vmware_files.zip). Press OK. ▐▌
 █ ▐▌
█ 5. Select on the left pane 'Power on this virtual machine' and then ▐▌
█ ▐▌
█ 5. Select on the left pane 'Power on this virtual machine' and then ▐▌
 █ repeatedly press quickly the F8 key until you are prompted with the boot ▐▌
█ menu selection. ▐▌
█ repeatedly press quickly the F8 key until you are prompted with the boot ▐▌
█ menu selection. ▐▌
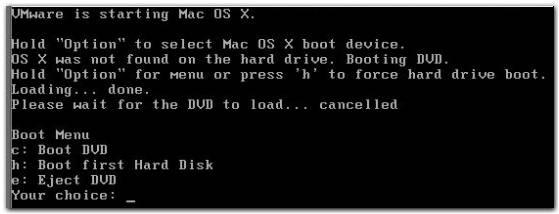 █ If you get a Messagebox stating error, or no peer to connect to, reboot ▐▌
█ your Windows box then repeat this step 5. ▐▌
█ ▐▌
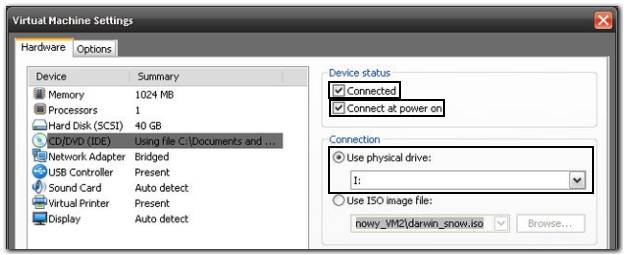
█ 6. You now need to replace the boot CD (darwin_snow.iso) with your Mac DVD ▐▌
█ or your .iso image file: ▐▌
█ On VMware's bottom right bar, right-click on the CD icon and select ▐▌
█ Settings. ▐▌
█ If you get a Messagebox stating error, or no peer to connect to, reboot ▐▌
█ your Windows box then repeat this step 5. ▐▌
█ ▐▌
█ 6. You now need to replace the boot CD (darwin_snow.iso) with your Mac DVD ▐▌
█ or your .iso image file: ▐▌
█ On VMware's bottom right bar, right-click on the CD icon and select ▐▌
█ Settings. ▐▌
 █ Change the options from 'Use ISO image file' to 'Use physical drive', then ▐▌
█ select the drive you have your DVD or .iso image mounted to. ▐▌
█ Above that setting 'Device status' check both 'Connected' & 'Connect at ▐▌
█ power on'. ▐▌
█ Press OK. ▐▌
█ Change the options from 'Use ISO image file' to 'Use physical drive', then ▐▌
█ select the drive you have your DVD or .iso image mounted to. ▐▌
█ Above that setting 'Device status' check both 'Connected' & 'Connect at ▐▌
█ power on'. ▐▌
█ Press OK. ▐▌
 █ ▐▌
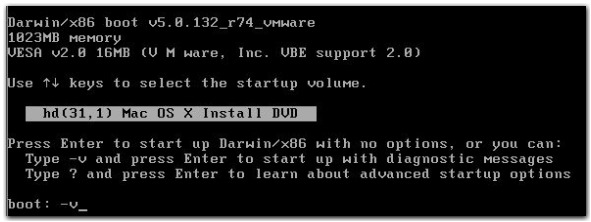
█ 7. Back to your Mac boot screen, press key (on your keyboard) 'c' to ▐▌
█ select 'Boot DVD'. ▐▌
█ Again press the F8 key for the advance options. ▐▌
█ Type -v at the boot prompt then hit enter for booting with verbose mode. ▐▌
█ ▐▌
█ 7. Back to your Mac boot screen, press key (on your keyboard) 'c' to ▐▌
█ select 'Boot DVD'. ▐▌
█ Again press the F8 key for the advance options. ▐▌
█ Type -v at the boot prompt then hit enter for booting with verbose mode. ▐▌
 █ ▐▌
█ 8. You'll now see a long log scroll on the screen. ▐▌
█ ▐▌
█ 8. You'll now see a long log scroll on the screen. ▐▌
 █ After about .5-3 minutes you'll should see the Mac installer screen (all ▐▌
█ gray with the Apple logo) ▐▌
█ After about .5-3 minutes you'll should see the Mac installer screen (all ▐▌
█ gray with the Apple logo) ▐▌
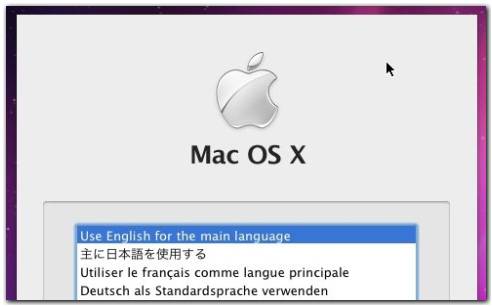
 █ then a Messagebox prompting you to select a language :) ▐▌
 █ ▐▌
█ If at any point this hangs forever (it did for me); ▐▌
█ Right click on VMware's Mac tab, select Shut down guest. ▐▌
█ Redo step 3. on wards until you get the Select Language screen. ▐▌
█ ▐▌
█ //---------------------------------------------------------------------- ▐▌
█ ▐▌
█ INSTALL MAC: ▐▌
█ ```````````` ▐▌
█ 1. Install steps (for those that have never installed their own Mac ▐▌
█ before): ▐▌
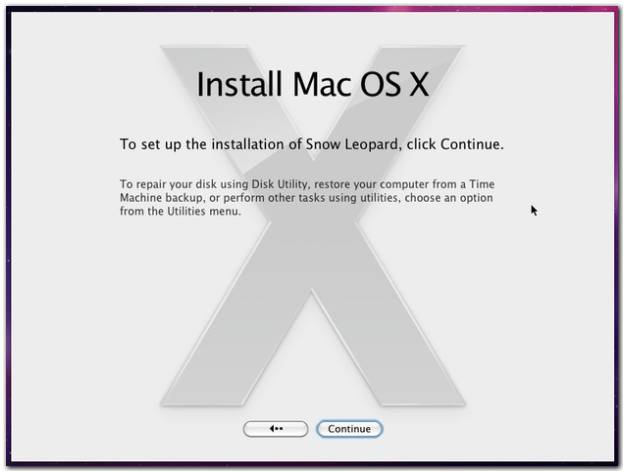
█ -Select a language then press the Arrow to Continue ▐▌
█ -The main screen will come up stating 'Install Mac OS X'. ▐▌
█ ▐▌
█ If at any point this hangs forever (it did for me); ▐▌
█ Right click on VMware's Mac tab, select Shut down guest. ▐▌
█ Redo step 3. on wards until you get the Select Language screen. ▐▌
█ ▐▌
█ //---------------------------------------------------------------------- ▐▌
█ ▐▌
█ INSTALL MAC: ▐▌
█ ```````````` ▐▌
█ 1. Install steps (for those that have never installed their own Mac ▐▌
█ before): ▐▌
█ -Select a language then press the Arrow to Continue ▐▌
█ -The main screen will come up stating 'Install Mac OS X'. ▐▌
 █ Along the top of the screen is its menu bar: ▐▌
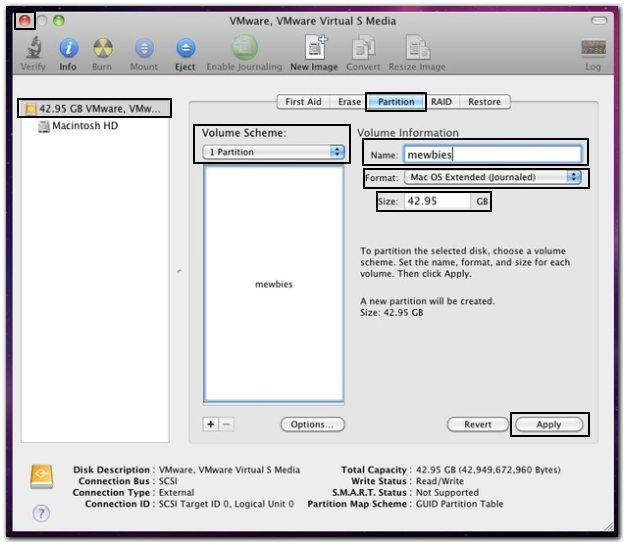
█ -Select Utilities/Disk Utility ▐▌
█ Along the top of the screen is its menu bar: ▐▌
█ -Select Utilities/Disk Utility ▐▌
 █ -In Disk Utility, choose your '42.95 GB VMware,...' hard drive from the ▐▌
█ left-top of the list. ▐▌
█ -In the main area, click the 'Partition' tab ▐▌
█ -In 'Volume Scheme' scroll window select '1 Partition' ▐▌
█ -Give the partition a name ▐▌
█ -Make sure 'Format' is set to 'Mac OS Extended (Journaled)' ▐▌
█ -Make sure 'Size' is set to '42.95' GB ▐▌
█ -Click Apply, next Messagebox click Partition ▐▌
█ -In Disk Utility, choose your '42.95 GB VMware,...' hard drive from the ▐▌
█ left-top of the list. ▐▌
█ -In the main area, click the 'Partition' tab ▐▌
█ -In 'Volume Scheme' scroll window select '1 Partition' ▐▌
█ -Give the partition a name ▐▌
█ -Make sure 'Format' is set to 'Mac OS Extended (Journaled)' ▐▌
█ -Make sure 'Size' is set to '42.95' GB ▐▌
█ -Click Apply, next Messagebox click Partition ▐▌
 █ -Once the process is done, click the red circle X button (top left) to ▐▌
█ close Disk Utility and relaunch the installer. ▐▌
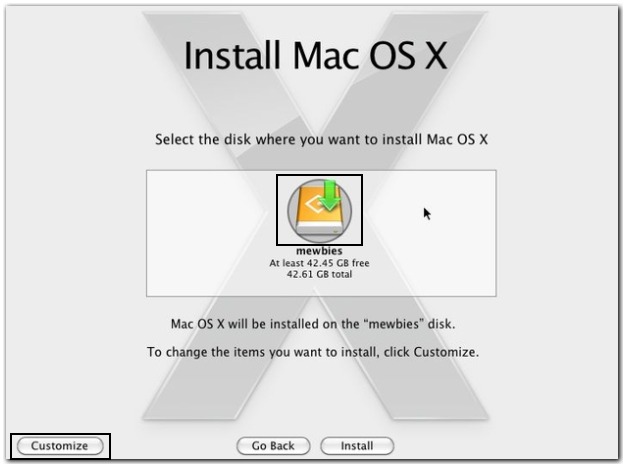
█ -At the main installer screen, click 'Continue' ▐▌
█ -Agreement comes up, click 'Agree' ▐▌
█ -Click once on your newly formatted virtual HD- Hard drive image in the ▐▌
█ middle ▐▌
█ -Click 'Customize'. ▐▌
█ -Once the process is done, click the red circle X button (top left) to ▐▌
█ close Disk Utility and relaunch the installer. ▐▌
█ -At the main installer screen, click 'Continue' ▐▌
█ -Agreement comes up, click 'Agree' ▐▌
█ -Click once on your newly formatted virtual HD- Hard drive image in the ▐▌
█ middle ▐▌
█ -Click 'Customize'. ▐▌
 █ Then expand the 'Printer Support' tree and de-select the printer drivers. ▐▌
█ Also de-select the 'Language Translations' for trouble free installation. ▐▌
█ Click OK. ▐▌
█ Then expand the 'Printer Support' tree and de-select the printer drivers. ▐▌
█ Also de-select the 'Language Translations' for trouble free installation. ▐▌
█ Click OK. ▐▌
 █ -Tip- Once you Click Install do not use your computer until it is ▐▌
█ finished; Click Install. It will then state about 20 minutes. ▐▌
█ -Wait for the installation to complete* ▐▌
█ ▐▌
█ *IF THE INSTALLER HANGS/DIES ON YOU: ▐▌
█ -Tip- Once you Click Install do not use your computer until it is ▐▌
█ finished; Click Install. It will then state about 20 minutes. ▐▌
█ -Wait for the installation to complete* ▐▌
█ ▐▌
█ *IF THE INSTALLER HANGS/DIES ON YOU: ▐▌
 █ In my case the install died 3 times (probably because I was using my ▐▌
█ computer while it installed). This is what to do if this happens- ▐▌
█ otherwise ignore: ▐▌
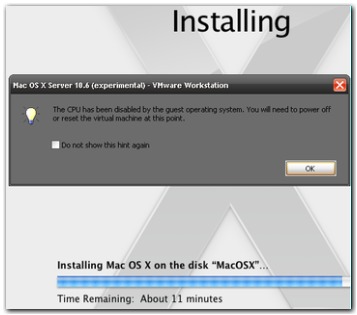
█ -When the installer stated 11 minutes remaining a Messagebox appeared ▐▌
█ stating 'The CPU has been disabled by the guest operating system. You will▐▌
█ need to power off or reset the virtual machine at this point.' ▐▌
█ -Press OK. ▐▌
█ -Select the 'Mac OS X' tab in VMware and select 'Shutdown Guest' if its ▐▌
█ still hanging. ▐▌
█ -Redo the steps 3-5 above in 'BOOT-UP INTO MAC INSTALLER' (to use ▐▌
█ darwin.iso to boot up into, then switch to the Mac DVD/image file). ▐▌
█ -Once I hit the F8 key it went straight to the gray Apple logo, then ▐▌
█ prompted me to select language. ▐▌
█ ▐▌
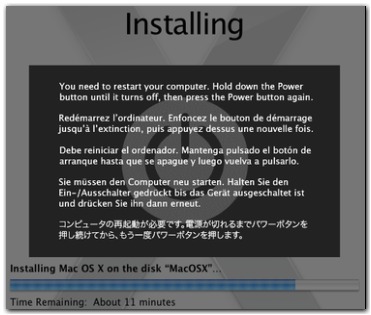
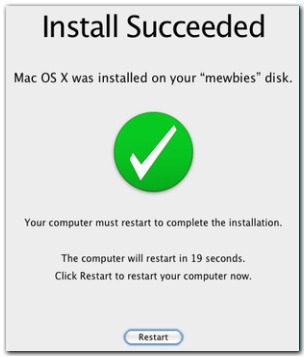
█ 2. After the install has completed press Restart, or let it auto Restart ▐▌
█ in 20 seconds. ▐▌
█ In my case the install died 3 times (probably because I was using my ▐▌
█ computer while it installed). This is what to do if this happens- ▐▌
█ otherwise ignore: ▐▌
█ -When the installer stated 11 minutes remaining a Messagebox appeared ▐▌
█ stating 'The CPU has been disabled by the guest operating system. You will▐▌
█ need to power off or reset the virtual machine at this point.' ▐▌
█ -Press OK. ▐▌
█ -Select the 'Mac OS X' tab in VMware and select 'Shutdown Guest' if its ▐▌
█ still hanging. ▐▌
█ -Redo the steps 3-5 above in 'BOOT-UP INTO MAC INSTALLER' (to use ▐▌
█ darwin.iso to boot up into, then switch to the Mac DVD/image file). ▐▌
█ -Once I hit the F8 key it went straight to the gray Apple logo, then ▐▌
█ prompted me to select language. ▐▌
█ ▐▌
█ 2. After the install has completed press Restart, or let it auto Restart ▐▌
█ in 20 seconds. ▐▌
 █ You'll then be presented with a log on the screen. ▐▌
 █ ▐▌
█ 3. Shut down your Mac; right click on VMware's Mac tab, select 'Shut Down ▐▌
█ Guest'. ▐▌
█ BTW you'll need to power off your Mac each time in this method. ▐▌
█ ▐▌
█ 4. For it to boot up each time it needs the darwin.iso. ▐▌
█ Redo the load darwin.iso steps from above: ▐▌
█ Select 'Edit virtual machine settings' on the left pane. ▐▌
█ Select 'CD/DVD' drive, select 'Use ISO image file' and browse to your ▐▌
█ Darwin_Snow.iso ▐▌
█ Select 'Connected'. Press OK. ▐▌
█ Select on the left pane 'Power on this virtual machine'. ▐▌
█ ▐▌
█ 5. You'll then see the Darwin loading screen, followed by the gray Apple ▐▌
█ logo screen, followed by an all gray screen with the Mac Welcome prompt. ▐▌
█ ▐▌
█ During boot-up, VMware at its bottom screen might prompt you to install ▐▌
█ the VMware tools (once only)- ignore that, we will do it later, lets just ▐▌
█ get it booted up. ▐▌
█ ▐▌
█ This could take you many attempts (it took me 7 attempts, others have said ▐▌
█ 15, crazy). ▐▌
█ If you get stuck in the 'circle of death' (gray screen with cursor in ▐▌
█ circle motion) for more than 3-5 minutes, or a 'kernel panic' error or ▐▌
█ stuck on its wallpaper screen with nothing loaded; 'Restart Guest from ▐▌
█ VMware's Mac tab*. ▐▌
█ Promise if you made it this far, it will boot-up and finally give you the ▐▌
█ Mac welcome screen :) ▐▌
█ *Make sure that the darwin.iso is selected and that 'Connected' is checked ▐▌
█ (click on VMWare's DVD icon, on the right bottom window, select Settings). ▐▌
█ ▐▌
█ Once you do have it booted up properly, from here on out it has never ▐▌
█ taken me more than 2 reboots to get it started. ▐▌
█ ▐▌
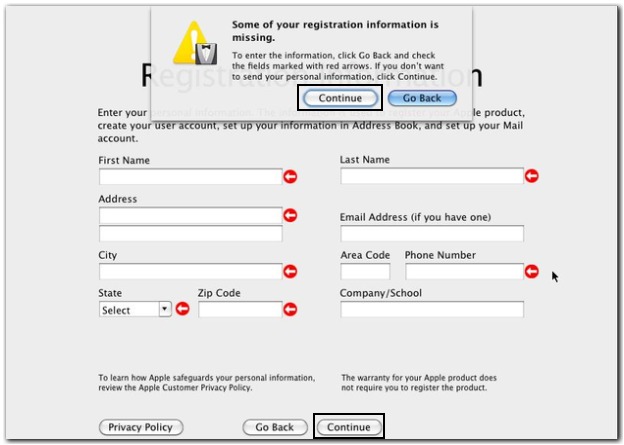
█ 6. Welcome screen- you will be prompted to 'Register', select your ▐▌
█ country, press Continue all the way until (the 'Registration Information' ▐▌
█ window will give you another prompt that you left the info blank, press ▐▌
█ continue on that window as well)
█ ▐▌
█ 3. Shut down your Mac; right click on VMware's Mac tab, select 'Shut Down ▐▌
█ Guest'. ▐▌
█ BTW you'll need to power off your Mac each time in this method. ▐▌
█ ▐▌
█ 4. For it to boot up each time it needs the darwin.iso. ▐▌
█ Redo the load darwin.iso steps from above: ▐▌
█ Select 'Edit virtual machine settings' on the left pane. ▐▌
█ Select 'CD/DVD' drive, select 'Use ISO image file' and browse to your ▐▌
█ Darwin_Snow.iso ▐▌
█ Select 'Connected'. Press OK. ▐▌
█ Select on the left pane 'Power on this virtual machine'. ▐▌
█ ▐▌
█ 5. You'll then see the Darwin loading screen, followed by the gray Apple ▐▌
█ logo screen, followed by an all gray screen with the Mac Welcome prompt. ▐▌
█ ▐▌
█ During boot-up, VMware at its bottom screen might prompt you to install ▐▌
█ the VMware tools (once only)- ignore that, we will do it later, lets just ▐▌
█ get it booted up. ▐▌
█ ▐▌
█ This could take you many attempts (it took me 7 attempts, others have said ▐▌
█ 15, crazy). ▐▌
█ If you get stuck in the 'circle of death' (gray screen with cursor in ▐▌
█ circle motion) for more than 3-5 minutes, or a 'kernel panic' error or ▐▌
█ stuck on its wallpaper screen with nothing loaded; 'Restart Guest from ▐▌
█ VMware's Mac tab*. ▐▌
█ Promise if you made it this far, it will boot-up and finally give you the ▐▌
█ Mac welcome screen :) ▐▌
█ *Make sure that the darwin.iso is selected and that 'Connected' is checked ▐▌
█ (click on VMWare's DVD icon, on the right bottom window, select Settings). ▐▌
█ ▐▌
█ Once you do have it booted up properly, from here on out it has never ▐▌
█ taken me more than 2 reboots to get it started. ▐▌
█ ▐▌
█ 6. Welcome screen- you will be prompted to 'Register', select your ▐▌
█ country, press Continue all the way until (the 'Registration Information' ▐▌
█ window will give you another prompt that you left the info blank, press ▐▌
█ continue on that window as well)
 █ Then you are prompted to 'Create Your Account'. Fill in this information. ▐▌
█ You'll be asked to create information for: ▐▌
█ Full Name: ▐▌
█ Account Name: ▐▌
█ *Password: ▐▌
█ Hint: (can not be the same as your password). ▐▌
█ *Memorize your password as you will need it often. ▐▌
█ Press Continue. ▐▌
█ Then you are prompted to 'Create Your Account'. Fill in this information. ▐▌
█ You'll be asked to create information for: ▐▌
█ Full Name: ▐▌
█ Account Name: ▐▌
█ *Password: ▐▌
█ Hint: (can not be the same as your password). ▐▌
█ *Memorize your password as you will need it often. ▐▌
█ Press Continue. ▐▌
 █ Next, select your Time Zone, Press Continue, Press Done. ▐▌
█ ▐▌
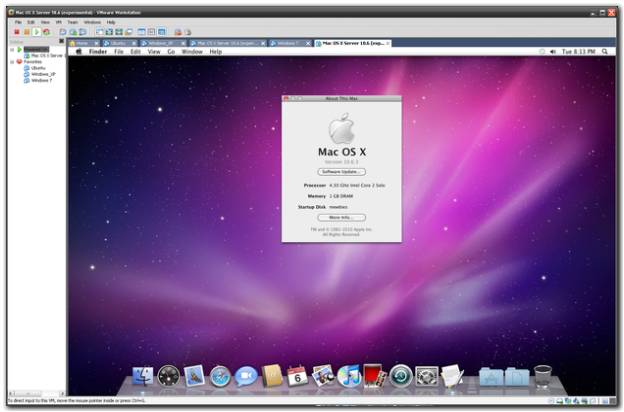
█ 7. Your Mac will now finish loading :) ▐▌
█ You can remove your Mac DVD/unmount ISO now. ▐▌
█ ▐▌
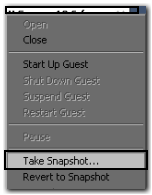
█ 8. Before making any major changes or upgrades take a snapshot!: ▐▌
█ Right click on VMware's Mac OS tab, select 'Take Snapshot'. ▐▌
█ Next, select your Time Zone, Press Continue, Press Done. ▐▌
█ ▐▌
█ 7. Your Mac will now finish loading :) ▐▌
█ You can remove your Mac DVD/unmount ISO now. ▐▌
█ ▐▌
█ 8. Before making any major changes or upgrades take a snapshot!: ▐▌
█ Right click on VMware's Mac OS tab, select 'Take Snapshot'. ▐▌
 █ This way if any changes you make disables Mac from operating correctly you ▐▌
█ can right click on VMware's Mac OS tab, select 'Snapshot Manager', select ▐▌
█ the snapshot, select the button 'Go To' to return to any snapshot you have ▐▌
█ taken. Love this feature! :) ▐▌
█ Make this a habit before making changes to the OS, (not right now). ▐▌
█ This way if any changes you make disables Mac from operating correctly you ▐▌
█ can right click on VMware's Mac OS tab, select 'Snapshot Manager', select ▐▌
█ the snapshot, select the button 'Go To' to return to any snapshot you have ▐▌
█ taken. Love this feature! :) ▐▌
█ Make this a habit before making changes to the OS, (not right now). ▐▌
 █ ▐▌
█ //---------------------------------------------------------------------- ▐▌
█ ▐▌
█ TWEAKING: ▐▌
█ ▐▌
█ VMWARE TOOLS: ▐▌
█ ````````````` ▐▌
█ One of the best features is the 'VMware Tools'. It enables you to ▐▌
█ drag and drop directories/files from your host machine to your guest ▐▌
█ (virtual) machine. Unfortunately though in a Mac virtual machine, as far ▐▌
█ as I know, this feature still does not work, period. But you will be able ▐▌
█ to copy/paste text from your host-guest-host. ▐▌
█ ▐▌
█ 1. Click on VMware's DVD icon (bottom right of window), select Settings. ▐▌
█ Load your darwin.iso; 'Use ISO image file', check 'Connected', press OK. ▐▌
█ ▐▌
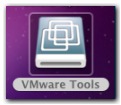
█ 2. You should now see on your desktop 'VMware Tools' icon on the top ▐▌
█ right. ▐▌
█ ▐▌
█ //---------------------------------------------------------------------- ▐▌
█ ▐▌
█ TWEAKING: ▐▌
█ ▐▌
█ VMWARE TOOLS: ▐▌
█ ````````````` ▐▌
█ One of the best features is the 'VMware Tools'. It enables you to ▐▌
█ drag and drop directories/files from your host machine to your guest ▐▌
█ (virtual) machine. Unfortunately though in a Mac virtual machine, as far ▐▌
█ as I know, this feature still does not work, period. But you will be able ▐▌
█ to copy/paste text from your host-guest-host. ▐▌
█ ▐▌
█ 1. Click on VMware's DVD icon (bottom right of window), select Settings. ▐▌
█ Load your darwin.iso; 'Use ISO image file', check 'Connected', press OK. ▐▌
█ ▐▌
█ 2. You should now see on your desktop 'VMware Tools' icon on the top ▐▌
█ right. ▐▌
 █ Double click it. On the Install window, double click on 'Install VMware ▐▌
█ Tools'. ▐▌
█ Select Continue, Continue. ▐▌
█ When it gets to 'Select a Destination' click on the hard drive icon ▐▌
█ 'MacOSX' (or whatever you named your partition). ▐▌
█ Select Continue, Install- be ready with your Mac password, after select ▐▌
█ Continue Installation. ▐▌
█ ('Vmware Tools' will be installed in root ▐▌
█ /MacOSX (your partition name)/Library/Application Support/VMware Tools) ▐▌
█ ▐▌
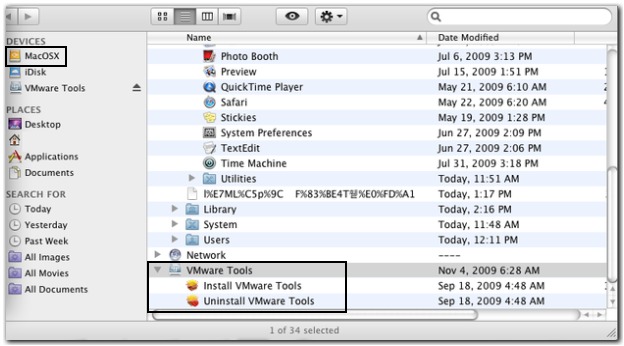
█ If it's not showing, on Mac's top menu select Go/Computer/MacOSX (or ▐▌
█ whatever you named your partition) select the arrow to expand the tree, ▐▌
█ scroll to the bottom of the list- VMware Tools, click on it. ▐▌
█ Double click it. On the Install window, double click on 'Install VMware ▐▌
█ Tools'. ▐▌
█ Select Continue, Continue. ▐▌
█ When it gets to 'Select a Destination' click on the hard drive icon ▐▌
█ 'MacOSX' (or whatever you named your partition). ▐▌
█ Select Continue, Install- be ready with your Mac password, after select ▐▌
█ Continue Installation. ▐▌
█ ('Vmware Tools' will be installed in root ▐▌
█ /MacOSX (your partition name)/Library/Application Support/VMware Tools) ▐▌
█ ▐▌
█ If it's not showing, on Mac's top menu select Go/Computer/MacOSX (or ▐▌
█ whatever you named your partition) select the arrow to expand the tree, ▐▌
█ scroll to the bottom of the list- VMware Tools, click on it. ▐▌
 █ After you must reboot - (mine had a very fast reboot ever) Reboot your ▐▌
█ Mac- Select on the top right bar the Apple logo/Restart. ▐▌
█ You'll then be presented with a screen to hold down the Power button; ▐▌
█ restart via VMware's Mac tab 'Restart Guest'. ▐▌
█ ▐▌
█ 3. So lets try if copy/paste text between host & guest works now: ▐▌
█ In your Mac open TextEdit: 'Applications' directory icon bottom ▐▌
█ dock/TextEdit. ▐▌
█ After you must reboot - (mine had a very fast reboot ever) Reboot your ▐▌
█ Mac- Select on the top right bar the Apple logo/Restart. ▐▌
█ You'll then be presented with a screen to hold down the Power button; ▐▌
█ restart via VMware's Mac tab 'Restart Guest'. ▐▌
█ ▐▌
█ 3. So lets try if copy/paste text between host & guest works now: ▐▌
█ In your Mac open TextEdit: 'Applications' directory icon bottom ▐▌
█ dock/TextEdit. ▐▌
 █ Copy some text in your host machine (your Windows OS) to your clipboard, ▐▌
█ then try to paste (Keyboard- Start key +v, or right click, Paste) it to ▐▌
█ the TextEdit document. ▐▌
█ Try it the other way around copying a different section of your pasted ▐▌
█ text (copy from Mac to Win). ▐▌
█ Sweet yeah :) ▐▌
█ ▐▌
█ 4. Close TextEdit- red circle, then bottom dock, right click on it, select ▐▌
█ Quit. ▐▌
█ Take snapshot2. ▐▌
█ ▐▌
█ //---------------------------------------------------------------------- ▐▌
█ ▐▌
█ SCREEN RESOLUTION: ▐▌
█ `````````````````` ▐▌
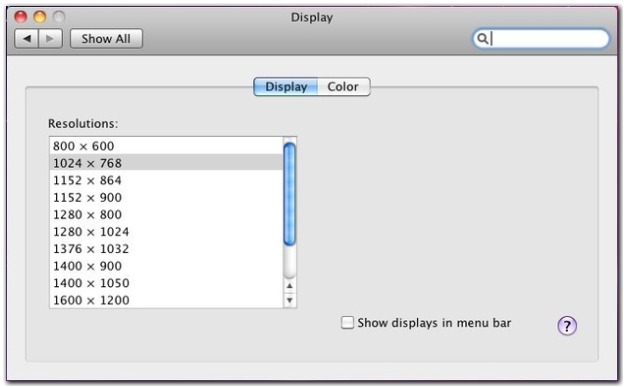
█ 1. Much written about this, but I had no trouble: ▐▌
█ Dock click on 'System Preferences'(gears icon). ▐▌
█ Under Hardware select Displays ▐▌
█ There is a full list of screen resolutions to select from. ▐▌
█ I selected 1400x900, which immediately changed resolution to it. ▐▌
█ Once you are satisfied with your resolution; close it. ▐▌
█ Copy some text in your host machine (your Windows OS) to your clipboard, ▐▌
█ then try to paste (Keyboard- Start key +v, or right click, Paste) it to ▐▌
█ the TextEdit document. ▐▌
█ Try it the other way around copying a different section of your pasted ▐▌
█ text (copy from Mac to Win). ▐▌
█ Sweet yeah :) ▐▌
█ ▐▌
█ 4. Close TextEdit- red circle, then bottom dock, right click on it, select ▐▌
█ Quit. ▐▌
█ Take snapshot2. ▐▌
█ ▐▌
█ //---------------------------------------------------------------------- ▐▌
█ ▐▌
█ SCREEN RESOLUTION: ▐▌
█ `````````````````` ▐▌
█ 1. Much written about this, but I had no trouble: ▐▌
█ Dock click on 'System Preferences'(gears icon). ▐▌
█ Under Hardware select Displays ▐▌
█ There is a full list of screen resolutions to select from. ▐▌
█ I selected 1400x900, which immediately changed resolution to it. ▐▌
█ Once you are satisfied with your resolution; close it. ▐▌
 █ ▐▌
█ If you can not select a size then do these steps found HERE: ▐▌
█ 1. Go to the 'Applications' (icon on dock) select TextEdit. ▐▌
█ 2. Open the file: ▐▌
█ /Library/Preferences/SystemConfiguration/com.apple.Boot.plist ▐▌
█ 3. Add these two lines after the '<string></string>' (Tiger ▐▌
█ '<string>Yes</string>'): ▐▌
█ <key>Graphics Mode</key> ▐▌
█ <string>1400x900x32</string> ▐▌
█ ▐▌
█ Replace '1400x900' with the resolution you want. ▐▌
█ ▐▌
█ 4. Then, in go to File >> Save As.. ▐▌
█ -Save the file as com.apple.Boot.plist to your Desktop (make sure the ▐▌
█ .plist extension is there!) ▐▌
█ -Navigate to /Library/Preferences/SystemConfiguration/ directory ▐▌
█ -Drag your com.apple.Boot.plist file on the Desktop into the directory ▐▌
█ -Messagebox click Authenticate and Replace and enter your password ▐▌
█ ▐▌
█ Here is an example of what the Snow Leopard com.Apple.boot.plist file ▐▌
█ looks after the changes: ▐▌
█ <?xml version="1.0" encoding="UTF-8"?> ▐▌
█ <!DOCTYPE plist PUBLIC "-//Apple Computer//DTD PLIST 1.0//EN" "http:// ▐▌
█ www.apple.com/DTDs/PropertyList-1.0.dtd"> ▐▌
█ <plist version="1.0"> ▐▌
█ <dict> ▐▌
█ <key>kernel</key> ▐▌
█ <string>mach_kernel</string> ▐▌
█ <key>Kernel Flags</key> ▐▌
█ <string></string> ▐▌
█ <key>Graphics Mode</key> ▐▌
█ <string>1400x900x32</string> ▐▌
█ </dict> ▐▌
█ </plist> ▐▌
█ ▐▌
█ 5. Now view your Display settings. ▐▌
█ Re-boot the Mac if you still can not select your resolution. ▐▌
█ ▐▌
█ //---------------------------------------------------------------------- ▐▌
█ ▐▌
█ NETWORK /INTERNET CONNECTION: ▐▌
█ ````````````````````````````` ▐▌
█ 1. Test if your internet connection is working (open Apple's browser ▐▌
█ Safari; compass icon on the dock), if it is; skip, if not: ▐▌
█ ▐▌
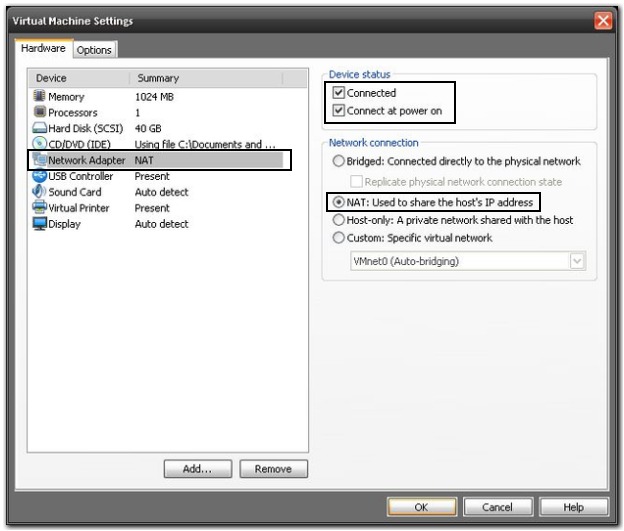
█ 2. VMware's bottom bar Network Adapter icon, right click, Settings ▐▌
█ ▐▌
█ If you can not select a size then do these steps found HERE: ▐▌
█ 1. Go to the 'Applications' (icon on dock) select TextEdit. ▐▌
█ 2. Open the file: ▐▌
█ /Library/Preferences/SystemConfiguration/com.apple.Boot.plist ▐▌
█ 3. Add these two lines after the '<string></string>' (Tiger ▐▌
█ '<string>Yes</string>'): ▐▌
█ <key>Graphics Mode</key> ▐▌
█ <string>1400x900x32</string> ▐▌
█ ▐▌
█ Replace '1400x900' with the resolution you want. ▐▌
█ ▐▌
█ 4. Then, in go to File >> Save As.. ▐▌
█ -Save the file as com.apple.Boot.plist to your Desktop (make sure the ▐▌
█ .plist extension is there!) ▐▌
█ -Navigate to /Library/Preferences/SystemConfiguration/ directory ▐▌
█ -Drag your com.apple.Boot.plist file on the Desktop into the directory ▐▌
█ -Messagebox click Authenticate and Replace and enter your password ▐▌
█ ▐▌
█ Here is an example of what the Snow Leopard com.Apple.boot.plist file ▐▌
█ looks after the changes: ▐▌
█ <?xml version="1.0" encoding="UTF-8"?> ▐▌
█ <!DOCTYPE plist PUBLIC "-//Apple Computer//DTD PLIST 1.0//EN" "http:// ▐▌
█ www.apple.com/DTDs/PropertyList-1.0.dtd"> ▐▌
█ <plist version="1.0"> ▐▌
█ <dict> ▐▌
█ <key>kernel</key> ▐▌
█ <string>mach_kernel</string> ▐▌
█ <key>Kernel Flags</key> ▐▌
█ <string></string> ▐▌
█ <key>Graphics Mode</key> ▐▌
█ <string>1400x900x32</string> ▐▌
█ </dict> ▐▌
█ </plist> ▐▌
█ ▐▌
█ 5. Now view your Display settings. ▐▌
█ Re-boot the Mac if you still can not select your resolution. ▐▌
█ ▐▌
█ //---------------------------------------------------------------------- ▐▌
█ ▐▌
█ NETWORK /INTERNET CONNECTION: ▐▌
█ ````````````````````````````` ▐▌
█ 1. Test if your internet connection is working (open Apple's browser ▐▌
█ Safari; compass icon on the dock), if it is; skip, if not: ▐▌
█ ▐▌
█ 2. VMware's bottom bar Network Adapter icon, right click, Settings ▐▌
 █ Select 'NAT: Used to share...', be sure 'Connected at power on' is ▐▌
█ selected, press OK (this can also be accessed in 'Edit virtual machine ▐▌
█ settings'). ▐▌
█ Select 'NAT: Used to share...', be sure 'Connected at power on' is ▐▌
█ selected, press OK (this can also be accessed in 'Edit virtual machine ▐▌
█ settings'). ▐▌
 █ ▐▌
█ 3. Re-test your internet connection as above. ▐▌
█ You can close Safari now. ▐▌
█ ▐▌
█ If that didn't work for you'll have to search within the hackintosh ▐▌
█ communities what could work for your own internet settings as this is user ▐▌
█ based. Most state 'bridged' settings, but that didn't work for me. ▐▌
█ ▐▌
█ //---------------------------------------------------------------------- ▐▌
█ ▐▌
█ NETWORK / SHARE FOLDERS: ▐▌
█ ```````````````````````` ▐▌
█ Three methods, all worked for me - 'Window's shared folders' (A), ▐▌
█ 'My Networks Places' (B) and 'VM Shared Folders' (C). ▐▌
█ ▐▌
█ A. WINDOWS SHARED FOLDERS: ▐▌
█ 1. In Windows turn on your Guest Account if it isn't: ▐▌
█ Select Control Panel/ User Accounts/Click Guest/Turn On the Guest Account. ▐▌
█ ▐▌
█ 2. In Windows right click on the directory you want to share, select ▐▌
█ properties, select the Sharing tab, check 'Share this folder on the ▐▌
█ network', check 'Allow network users to change my files' if you want write ▐▌
█ access. Click Apply and OK. ▐▌
█ ▐▌
█ 3. In Mac go to Go/Network. ▐▌
█ You should see your Window's Network listed. Double click on on it. ▐▌
█ You'll now see your shared directory/ies from Windows. ▐▌
█ Click on it. ▐▌
█ If you can access it; great, done. If not- ▐▌
█ ▐▌
█ 3. Re-test your internet connection as above. ▐▌
█ You can close Safari now. ▐▌
█ ▐▌
█ If that didn't work for you'll have to search within the hackintosh ▐▌
█ communities what could work for your own internet settings as this is user ▐▌
█ based. Most state 'bridged' settings, but that didn't work for me. ▐▌
█ ▐▌
█ //---------------------------------------------------------------------- ▐▌
█ ▐▌
█ NETWORK / SHARE FOLDERS: ▐▌
█ ```````````````````````` ▐▌
█ Three methods, all worked for me - 'Window's shared folders' (A), ▐▌
█ 'My Networks Places' (B) and 'VM Shared Folders' (C). ▐▌
█ ▐▌
█ A. WINDOWS SHARED FOLDERS: ▐▌
█ 1. In Windows turn on your Guest Account if it isn't: ▐▌
█ Select Control Panel/ User Accounts/Click Guest/Turn On the Guest Account. ▐▌
█ ▐▌
█ 2. In Windows right click on the directory you want to share, select ▐▌
█ properties, select the Sharing tab, check 'Share this folder on the ▐▌
█ network', check 'Allow network users to change my files' if you want write ▐▌
█ access. Click Apply and OK. ▐▌
█ ▐▌
█ 3. In Mac go to Go/Network. ▐▌
█ You should see your Window's Network listed. Double click on on it. ▐▌
█ You'll now see your shared directory/ies from Windows. ▐▌
█ Click on it. ▐▌
█ If you can access it; great, done. If not- ▐▌
 █ ▐▌
█ 4. If you get a Messagebox stating 'The operation can not be completed ▐▌
█ because the original item for "* (your shared folder) can't be found', you ▐▌
█ need to do this registry fix in your Windows, stated HERE. ▐▌
█ A. To open your registry click your Start button/Run/type in: regedit ▐▌
█ then click OK. ▐▌
█ B. Back up your registry before making any changes: Click on 'My ▐▌
█ Computer' on the left pane top of the list. On the menu select ▐▌
█ File/Export/ and browse to a location to save your backup, wait for it to ▐▌
█ finish. (You can restore it by File/import if you messed up your ▐▌
█ registry). ▐▌
█ C. Navigate to the following key*: ▐▌
█ HKEY_LOCAL_MACHINE\System\CurrentControlSet\Services\LanmanServer\Parameters
█ ▐▌
█ 4. If you get a Messagebox stating 'The operation can not be completed ▐▌
█ because the original item for "* (your shared folder) can't be found', you ▐▌
█ need to do this registry fix in your Windows, stated HERE. ▐▌
█ A. To open your registry click your Start button/Run/type in: regedit ▐▌
█ then click OK. ▐▌
█ B. Back up your registry before making any changes: Click on 'My ▐▌
█ Computer' on the left pane top of the list. On the menu select ▐▌
█ File/Export/ and browse to a location to save your backup, wait for it to ▐▌
█ finish. (You can restore it by File/import if you messed up your ▐▌
█ registry). ▐▌
█ C. Navigate to the following key*: ▐▌
█ HKEY_LOCAL_MACHINE\System\CurrentControlSet\Services\LanmanServer\Parameters
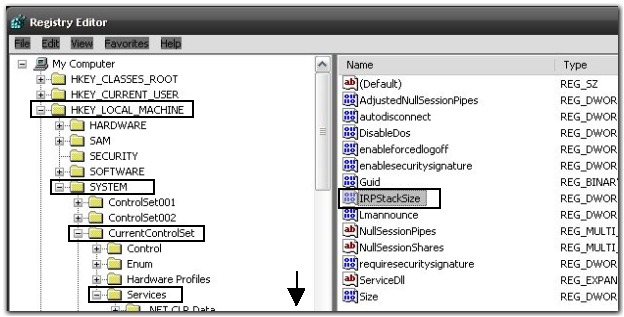 █ D. In the right pane, double-click 'IRPStackSize'. ▐▌
█ *NOTE: If the IRPStackSize value does not already exist, use the ▐▌
█ following procedure to create it: ▐▌
█ 1. In the Parameters folder of the registry, right-click in ▐▌
█ the right pane, on an empty area. ▐▌
█ 2. Point to New, and then click 'DWord Value'. ▐▌
█ 3. Type IRPStackSize ▐▌
█ IMPORTANT: Type "IRPStackSize" exactly as it is displayed ▐▌
█ because the value name is case-sensitive. ▐▌
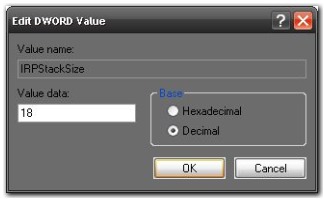
█ E. Right click on IRPStackSize, select Modify. Change the Base ▐▌
█ to decimal. ▐▌
█ F. In the Value Data box, type a value that is larger than the value ▐▌
█ that is listed- I put 18- the default value is 15. It is ▐▌
█ recommended that you increase the value by 3. Therefore, if the ▐▌
█ previous value was 11, type 14, and then click OK. ▐▌
█ D. In the right pane, double-click 'IRPStackSize'. ▐▌
█ *NOTE: If the IRPStackSize value does not already exist, use the ▐▌
█ following procedure to create it: ▐▌
█ 1. In the Parameters folder of the registry, right-click in ▐▌
█ the right pane, on an empty area. ▐▌
█ 2. Point to New, and then click 'DWord Value'. ▐▌
█ 3. Type IRPStackSize ▐▌
█ IMPORTANT: Type "IRPStackSize" exactly as it is displayed ▐▌
█ because the value name is case-sensitive. ▐▌
█ E. Right click on IRPStackSize, select Modify. Change the Base ▐▌
█ to decimal. ▐▌
█ F. In the Value Data box, type a value that is larger than the value ▐▌
█ that is listed- I put 18- the default value is 15. It is ▐▌
█ recommended that you increase the value by 3. Therefore, if the ▐▌
█ previous value was 11, type 14, and then click OK. ▐▌
 █ G. Close the Registry Editor. ▐▌
█ H. You'll need to reboot your Windows before this will take affect ▐▌
█ (Shutdown your Mac first). ▐▌
█ ▐▌
█ 5. After you have rebooted and powered back on your Mac, try to access ▐▌
█ your shared folder again; it should work. ▐▌
█ ▐▌
█ ▐▌
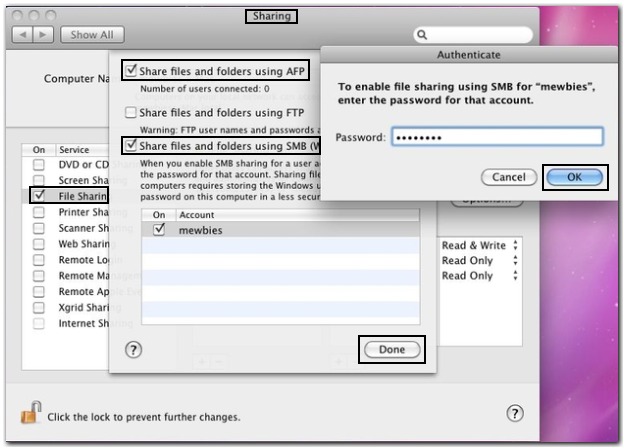
█ B. MY NETWORK PLACES: ▐▌
█ 1. In Windows turn on your Guest Account if it isn't: ▐▌
█ Select Control Panel/ User Accounts/Click Guest/Turn On the Guest Account. ▐▌
█ ▐▌
█ 2. In Mac select System Preferences (dock gears icon)/Sharing/ ▐▌
█ On left pane check 'File Sharing' then press the Options button. ▐▌
█ Check 'Share files and folders using SBM (Windows)'. ▐▌
█ Check 'On' next to your account name, enter your pass, then press OK & ▐▌
█ press Done. ▐▌
█ G. Close the Registry Editor. ▐▌
█ H. You'll need to reboot your Windows before this will take affect ▐▌
█ (Shutdown your Mac first). ▐▌
█ ▐▌
█ 5. After you have rebooted and powered back on your Mac, try to access ▐▌
█ your shared folder again; it should work. ▐▌
█ ▐▌
█ ▐▌
█ B. MY NETWORK PLACES: ▐▌
█ 1. In Windows turn on your Guest Account if it isn't: ▐▌
█ Select Control Panel/ User Accounts/Click Guest/Turn On the Guest Account. ▐▌
█ ▐▌
█ 2. In Mac select System Preferences (dock gears icon)/Sharing/ ▐▌
█ On left pane check 'File Sharing' then press the Options button. ▐▌
█ Check 'Share files and folders using SBM (Windows)'. ▐▌
█ Check 'On' next to your account name, enter your pass, then press OK & ▐▌
█ press Done. ▐▌
 █ ▐▌
█ Under Shared Folders will the default directory to share (username's ▐▌
█ Public Folder). Add more if you like by selecting the + button. ▐▌
█ ▐▌
█ Under Users change the permissions you want to have from your Window's box ▐▌
█ I selected Everyone/Read & Write. ▐▌
█ ▐▌
█ (Side note- at the top it states 'Other users can access shared ..., at ▐▌
█ afp://... or username/Mac.' I didn't set this up, but it's something you ▐▌
█ might want to play with later, also your apache page and http:// and your ▐▌
█ ftp://) ▐▌
█ ▐▌
█ Close your Mac Sharing window. ▐▌
█ ▐▌
█ 3. Now view in your Windows 'My Network Places' and you should see ▐▌
█ 'username's Public Folder on username's Mac (Usernames-mac)'. ▐▌
█ ▐▌
█ You can't open Drop Box (unless you change perms on that directory too), ▐▌
█ but you can paste into it. ▐▌
█ You can open Public Folder, so this is the folder I use to exchange files. ▐▌
█ Location on the Mac is /username/Public/Drop Box ▐▌
█ ▐▌
█ You should now be able to share files in the shared folder and/or via the ▐▌
█ 'My Network Places'. ▐▌
█ ▐▌
█ 4. While we are there; copy over the files that you need for the rest of ▐▌
█ the steps (from prerequisites steps); ▐▌
█ EnsoniqAudioPCI_1.0.2_for_SnowLeopard.mpkg.tar.gz and the Mac Updates. ▐▌
█ Also copy over a sound file (like an .mp3) to test our sound step next, ▐▌
█ and a .mov file to test the video drivers. ▐▌
█ ▐▌
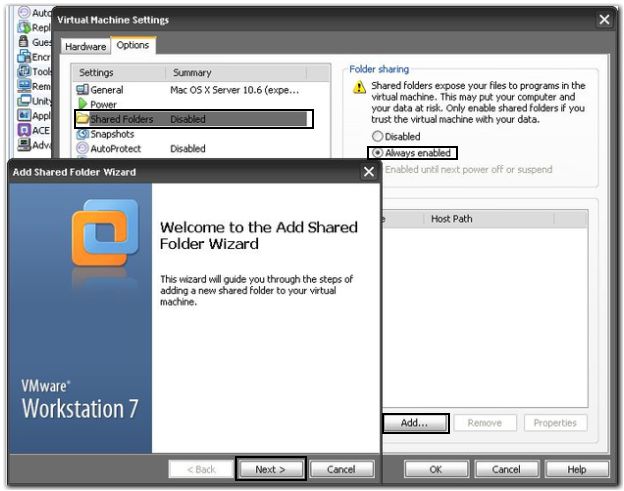
█ C. VM SHARED FOLDERS: ▐▌
█ Thanks to init101 for pointing out that you can create shared directories ▐▌
█ easily in VM settings: VM's top menu -VM->Settings->Options->Shared ▐▌
█ Folders. Click Always enabled, click the Add button, then Next.
█ ▐▌
█ Under Shared Folders will the default directory to share (username's ▐▌
█ Public Folder). Add more if you like by selecting the + button. ▐▌
█ ▐▌
█ Under Users change the permissions you want to have from your Window's box ▐▌
█ I selected Everyone/Read & Write. ▐▌
█ ▐▌
█ (Side note- at the top it states 'Other users can access shared ..., at ▐▌
█ afp://... or username/Mac.' I didn't set this up, but it's something you ▐▌
█ might want to play with later, also your apache page and http:// and your ▐▌
█ ftp://) ▐▌
█ ▐▌
█ Close your Mac Sharing window. ▐▌
█ ▐▌
█ 3. Now view in your Windows 'My Network Places' and you should see ▐▌
█ 'username's Public Folder on username's Mac (Usernames-mac)'. ▐▌
█ ▐▌
█ You can't open Drop Box (unless you change perms on that directory too), ▐▌
█ but you can paste into it. ▐▌
█ You can open Public Folder, so this is the folder I use to exchange files. ▐▌
█ Location on the Mac is /username/Public/Drop Box ▐▌
█ ▐▌
█ You should now be able to share files in the shared folder and/or via the ▐▌
█ 'My Network Places'. ▐▌
█ ▐▌
█ 4. While we are there; copy over the files that you need for the rest of ▐▌
█ the steps (from prerequisites steps); ▐▌
█ EnsoniqAudioPCI_1.0.2_for_SnowLeopard.mpkg.tar.gz and the Mac Updates. ▐▌
█ Also copy over a sound file (like an .mp3) to test our sound step next, ▐▌
█ and a .mov file to test the video drivers. ▐▌
█ ▐▌
█ C. VM SHARED FOLDERS: ▐▌
█ Thanks to init101 for pointing out that you can create shared directories ▐▌
█ easily in VM settings: VM's top menu -VM->Settings->Options->Shared ▐▌
█ Folders. Click Always enabled, click the Add button, then Next.
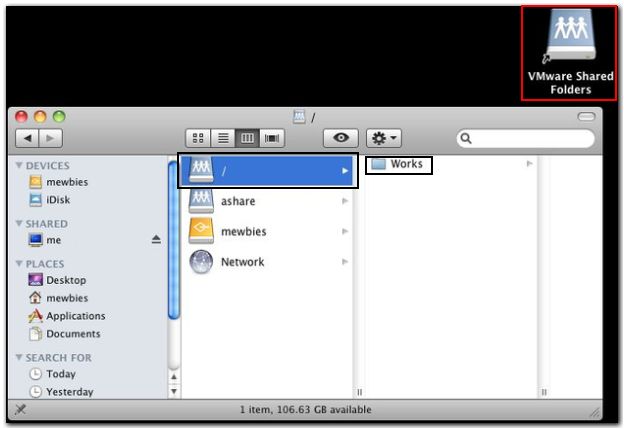
 █ Click the Browse button to select a directory you want to share. ▐▌
█ Next->Finish. Click on Add again if you want to add another shared folder. ▐▌
█ When you are finished click OK. Mac's top menu select Go->Computer. You ▐▌
█ should now see a new hard disk icon with '/' as its name, click on it and ▐▌
█ there is your VM shared directory/ies. You should also have on your ▐▌
█ desktop 'VM Shared Folders' shortcut. If it isn't working correctly ▐▌
█ re-boot. ▐▌
█ Click the Browse button to select a directory you want to share. ▐▌
█ Next->Finish. Click on Add again if you want to add another shared folder. ▐▌
█ When you are finished click OK. Mac's top menu select Go->Computer. You ▐▌
█ should now see a new hard disk icon with '/' as its name, click on it and ▐▌
█ there is your VM shared directory/ies. You should also have on your ▐▌
█ desktop 'VM Shared Folders' shortcut. If it isn't working correctly ▐▌
█ re-boot. ▐▌
 █ ▐▌
█ //---------------------------------------------------------------------- ▐▌
█ ▐▌
█ SOUND: ▐▌
█ `````` ▐▌
█ 1. Take snapshot3 ▐▌
█ ▐▌
█ 2. Your sound will not work at this point. ▐▌
█ Extract ( double-click on the file) the files from ▐▌
█ 'EnsoniqAudioPCI_1.0.2_for_SnowLeopard.mpkg.tar.gz'. ▐▌
█ ▐▌
█ 3. Double click on EnsoniqAudioPCI.mpkg to install it ▐▌
█ Press Continue, select both drivers 'AppleAC97Audio' and 'EnsoniqAudioPCI' ▐▌
█ Continue/Install/enter your password/Continue ▐▌
█ It will prompt you for a reboot- but it will work already- test it if you ▐▌
█ can't wait before you press the Restart button :D . ▐▌
█ Reboot. ▐▌
█ ▐▌
█ 4. Test your sound file; double click on it. ▐▌
█ iTunes will prompt you to make changes, No to all. ▐▌
█ Then it might prompt you to update to a newer version- if you want to- ▐▌
█ take a snapshot3a first. ▐▌
█ Close iTunes (right click on its icon in dock, select Quit). ▐▌
█ ▐▌
█ //---------------------------------------------------------------------- ▐▌
█ ▐▌
█ VIDEO: ▐▌
█ `````` ▐▌
█ 1. Double click on your .mov file. ▐▌
█ This will launch Quick Time. Press the play button. It should work, ▐▌
█ nothing more to do. ▐▌
█ ▐▌
█ //---------------------------------------------------------------------- ▐▌
█ ▐▌
█ PRINTER: ▐▌
█ ```````` ▐▌
█ 1. In Windows; press Start button, select Setttings/Printers and Faxes/ ▐▌
█ Right click on your Printer, select Properties/Sharing tab. ▐▌
█ Select Share this printer, give it a name if it doesn't by default. ▐▌
█ ▐▌
█ 2. In Mac open TextEdit-Applications. The top bar of the document ▐▌
█ select File/Print/ Then in 'Printer:' scroll window select 'Add Printer' ▐▌
█ ▐▌
█ //---------------------------------------------------------------------- ▐▌
█ ▐▌
█ SOUND: ▐▌
█ `````` ▐▌
█ 1. Take snapshot3 ▐▌
█ ▐▌
█ 2. Your sound will not work at this point. ▐▌
█ Extract ( double-click on the file) the files from ▐▌
█ 'EnsoniqAudioPCI_1.0.2_for_SnowLeopard.mpkg.tar.gz'. ▐▌
█ ▐▌
█ 3. Double click on EnsoniqAudioPCI.mpkg to install it ▐▌
█ Press Continue, select both drivers 'AppleAC97Audio' and 'EnsoniqAudioPCI' ▐▌
█ Continue/Install/enter your password/Continue ▐▌
█ It will prompt you for a reboot- but it will work already- test it if you ▐▌
█ can't wait before you press the Restart button :D . ▐▌
█ Reboot. ▐▌
█ ▐▌
█ 4. Test your sound file; double click on it. ▐▌
█ iTunes will prompt you to make changes, No to all. ▐▌
█ Then it might prompt you to update to a newer version- if you want to- ▐▌
█ take a snapshot3a first. ▐▌
█ Close iTunes (right click on its icon in dock, select Quit). ▐▌
█ ▐▌
█ //---------------------------------------------------------------------- ▐▌
█ ▐▌
█ VIDEO: ▐▌
█ `````` ▐▌
█ 1. Double click on your .mov file. ▐▌
█ This will launch Quick Time. Press the play button. It should work, ▐▌
█ nothing more to do. ▐▌
█ ▐▌
█ //---------------------------------------------------------------------- ▐▌
█ ▐▌
█ PRINTER: ▐▌
█ ```````` ▐▌
█ 1. In Windows; press Start button, select Setttings/Printers and Faxes/ ▐▌
█ Right click on your Printer, select Properties/Sharing tab. ▐▌
█ Select Share this printer, give it a name if it doesn't by default. ▐▌
█ ▐▌
█ 2. In Mac open TextEdit-Applications. The top bar of the document ▐▌
█ select File/Print/ Then in 'Printer:' scroll window select 'Add Printer' ▐▌
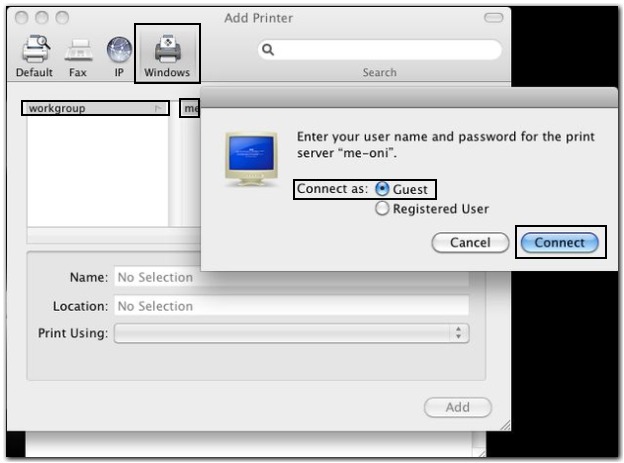
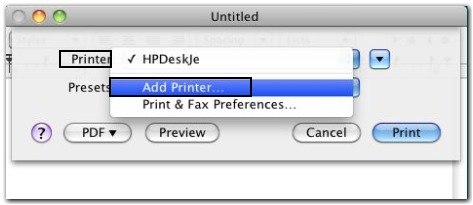 █ Top of this window select the 'Windows' button. ▐▌
█ Click workgroup/your network name/ ▐▌
█ You'll then be prompted to enter a pass for your Window's account, or ▐▌
█ select Guest, then Connect button. ▐▌
█ Top of this window select the 'Windows' button. ▐▌
█ Click workgroup/your network name/ ▐▌
█ You'll then be prompted to enter a pass for your Window's account, or ▐▌
█ select Guest, then Connect button. ▐▌
 █ You should now see your printer listed with the share name you gave it in ▐▌
█ step 1. ▐▌
█ If it's not listed enter in the search bar the name of your printer. ▐▌
█ ▐▌
█ 3. Click on your shared printer then select 'Select Printer Software'. ▐▌
█ From the list select the correct driver for your printer, Press OK. Then ▐▌
█ press Add. ▐▌
█ ▐▌
█ 4. Press the Print button. It will prompt you to login, use guest. ▐▌
█ A printer icon will appear on your bottom dock, and your printer shortly ▐▌
█ will begin to print :) ▐▌
█ ▐▌
█ //---------------------------------------------------------------------- ▐▌
█ ▐▌
█ UPDATE MAC OS: ▐▌
█ `````````````` ▐▌
█ 1. TAKE A SNAPSHOT (4) BEFORE PROCEEDING. ▐▌
█ Both methods below worked for me ▐▌
█ ▐▌
█ 2. Keep a copy of the update/s in your Windows box (host) so that if you ▐▌
█ need to restore, you won't have to download the file/s again. ▐▌
█ ▐▌
█ 3. If your dock magnification stopped working after the updates you can ▐▌
█ fix this by System Preferences/Personal/Dock/ check Magnification. Though ▐▌
█ you can skip fixing as it takes up system resources. ▐▌
█ ▐▌
█ METHOD 1; Mac OS X v10.6.3 Combo Update: ▐▌
█ 1. Install Mac OS X v10.6.3 Combo Update; Do not use Apple's Updater. ▐▌
█ Manually update. ▐▌
█ -Restart ▐▌
█ -Test that all still works- mouse, sound, network, etc. If all works, ▐▌
█ great! ▐▌
█ -Clean up- remove files you don't want in your Mac, empty trash, etc. ▐▌
█ -Take snapshot4upd3 ▐▌
█ -Skip Method 2 below. ▐▌
█ You should now see your printer listed with the share name you gave it in ▐▌
█ step 1. ▐▌
█ If it's not listed enter in the search bar the name of your printer. ▐▌
█ ▐▌
█ 3. Click on your shared printer then select 'Select Printer Software'. ▐▌
█ From the list select the correct driver for your printer, Press OK. Then ▐▌
█ press Add. ▐▌
█ ▐▌
█ 4. Press the Print button. It will prompt you to login, use guest. ▐▌
█ A printer icon will appear on your bottom dock, and your printer shortly ▐▌
█ will begin to print :) ▐▌
█ ▐▌
█ //---------------------------------------------------------------------- ▐▌
█ ▐▌
█ UPDATE MAC OS: ▐▌
█ `````````````` ▐▌
█ 1. TAKE A SNAPSHOT (4) BEFORE PROCEEDING. ▐▌
█ Both methods below worked for me ▐▌
█ ▐▌
█ 2. Keep a copy of the update/s in your Windows box (host) so that if you ▐▌
█ need to restore, you won't have to download the file/s again. ▐▌
█ ▐▌
█ 3. If your dock magnification stopped working after the updates you can ▐▌
█ fix this by System Preferences/Personal/Dock/ check Magnification. Though ▐▌
█ you can skip fixing as it takes up system resources. ▐▌
█ ▐▌
█ METHOD 1; Mac OS X v10.6.3 Combo Update: ▐▌
█ 1. Install Mac OS X v10.6.3 Combo Update; Do not use Apple's Updater. ▐▌
█ Manually update. ▐▌
█ -Restart ▐▌
█ -Test that all still works- mouse, sound, network, etc. If all works, ▐▌
█ great! ▐▌
█ -Clean up- remove files you don't want in your Mac, empty trash, etc. ▐▌
█ -Take snapshot4upd3 ▐▌
█ -Skip Method 2 below. ▐▌
 █ ▐▌
█ ▐▌
█ METHOD 2; Mac OS X v10.6.1, .2, & .3 Updates: ▐▌
█ -If your Mac isn't functioning properly now after the Combo update; OS ▐▌
█ doesn't respond to mouse, etc, try this: ▐▌
█ ▐▌
█ 1. Restore snapshot4 (no updates) ▐▌
█ ▐▌
█ 2. Do not use Apple's Updater or any Combo updates. Manually update. ▐▌
█ -Install Mac OS X v10.6.1 Update (if it crashes 'unrecoverable error', ▐▌
█ just restart and do again) ▐▌
█ -Restart ▐▌
█ -Take snapshot4upd1 ▐▌
█ -Install Mac OS X v10.6.2 Update ▐▌
█ -Do NOT restart (this update is the update that causes many ppl's OS to ▐▌
█ stop responding to the mouse, reinstalling VMware tools before restart ▐▌
█ will not fix the problem either) ▐▌
█ -Install Mac OS X v10.6.3 Update ▐▌
█ -Restart ▐▌
█ -Test that all still works- mouse, sound, network, etc. If all works, ▐▌
█ great! ▐▌
█ -Clean up- remove files you don't want, empty trash, etc. ▐▌
█ -Take snapshot4upd3 ▐▌
█ ▐▌
█ //---------------------------------------------------------------------- ▐▌
█ ▐▌
█ FINISHED: ▐▌
█ ````````` ▐▌
█ Once you have everything working as you like it, before you install any ▐▌
█ other software, take a final snapshot; snapshot5final. ▐▌
█ You can delete your *previous snapshots if you are sure all is working. ▐▌
█ *You should leave the first snapshot though, just in case :D ▐▌
█ ▐▌
█ //---------------------------------------------------------------------- ▐▌
█ ▐▌
█ SPEED UP OS TIPS: ▐▌
█ ````````````````` ▐▌
█ 1. Go to System/Library/Extensions and delete AppleTPMACPI.kext if it ▐▌
█ exists. ▐▌
█ I didn't have this file. ▐▌
█ ▐▌
█ 2. Disable Dock Magnification - System Preferences/Personal/Dock/ ▐▌
█ un-check Magnification ▐▌
█ ▐▌
█ //---------------------------------------------------------------------- ▐▌
█ ▐▌
█ KERNEL ERROR FIX: ▐▌
█ ````````````````` ▐▌
█ I did not need to do this but here is the information taken from HERE. ▐▌
█ "you need to get a kernel and edit a file to stop the dmg error and the ▐▌
█ kernel panic, get this file": ▐▌
█ http://xnu-dev.googlecode.com/files/voodoo2_alpha3_intel.zip ▐▌
█ get it in your mac environment on the root then open the console and put ▐▌
█ this in: ▐▌
█ sudo pico /Library/Preferences/SystemConfiguration/com.apple.Boot.plist ▐▌
█ Make it look like this ▐▌
█ <key>Kernel</key> ▐▌
█ <string>hd(0,2)/mach_kernel.voodoo.alpha3</string> ▐▌
█ <key>Kernel Flags</key> ▐▌
█ <string>rd=disk0s2</string> ▐▌
█ now your dmg files will open and you can even run pwnage tool ▐▌
█ ▐▌
█ //---------------------------------------------------------------------- ▐▌
█ ▐▌
█ PROBLEMS WITH RESOLUTION, SOUND, MOUSE: ▐▌
█ ``````````````````````````````````````` ▐▌
█ I have tried these steps before. For myself I did not notice any ▐▌
█ improvements/changes (I was still hoping I could get drag/drop files to ▐▌
█ work; no such luck). ▐▌
█ I have read though it did help other people with resolution, sound, better ▐▌
█ mouse action, shared folders, etc. ▐▌
█ If you have a similar problem it just might work for you: ▐▌
█ ▐▌
█ 1. Download VMWare Fusion Demo (this is for Macs) (you won't install it, ▐▌
█ but extract a single file from it) HERE (its apx 175MB) OR I have ▐▌
█ extracted the darwin.iso already from version 3.0.2.23708 and put it HERE ▐▌
█ for you. ▐▌
█ SHA-160: FEAE156F6C878B337F9018C6A33BF256E1A71163 ▐▌
█ MD5: 67bcd5c32573b98dac61b010e2538caf ▐▌
█ ▐▌
█ 2. If you have the demo, extract 'darwin.iso' from the .dmg file located ▐▌
█ here: \Install VMware Fusion.app\Contents\Resources\Install VMware ▐▌
█ Fusion.mpkg\Contents\Packages\com.vmware.fusion.tools.darwin.pkg ▐▌
█ ▐▌
█ 3. In Mac mount the darwin.iso, as you did earlier, and install it, you'll ▐▌
█ be prompted for your password and after you'll need to reboot. ▐▌
█ ▐▌
█ //---------------------------------------------------------------------- ▐▌
█ ▐▌
█ MISC MAC USAGE TIPS FOR MAC-MEWBIES: ▐▌
█ ```````````````````````````````````` ▐▌
█ 1. To paste text in Mac press on your keyboard the Start key +v (key with ▐▌
█ the windows logo that brings up your start menu in Windows) ▐▌
█ Keyboard short cuts HERE. ▐▌
█ ▐▌
█ 2. To rename a folder: Select it then hit your enter key. ▐▌
█ ▐▌
█ 3. To gain root in a terminal (Applications/Utilities/Terminal) session ▐▌
█ enter: ▐▌
█ sudo -s ▐▌
█ ▐▌
█ 4. If you have a file that should be executable but shows as a document, ▐▌
█ it's most likely because its permissions aren't set (or the file is ▐▌
█ corrupted). ▐▌
█ One of the causes of this can be that the file itself (not the packages ▐▌
█ dmg/zip/rar/tar etc) passed through a Windows environment first (when you ▐▌
█ transfer files from your Windows to your Mac) the permissions will be ▐▌
█ lost. So when transfer files from your Windows to your Mac, keep them in ▐▌
█ the .dmg/zip/etc package before transfer them. ▐▌
█ ▐▌
█ A. To fix this, double click on the file. It will open a terminal session. ▐▌
█ If it does not then open a terminal session. ▐▌
█ B. Change to the directory that contains the file, example: ▐▌
█ cd Public/mystuff/ ▐▌
█ ▐▌
█ Now to change the file into an executable you need to chmod it 755, most ▐▌
█ likely with root. So login in with root: ▐▌
█ sudo -s ▐▌
█ your.password.here..hit.enter.key ▐▌
█ chmod 755 'your file name here' ▐▌
█ ▐▌
█ Now view your file and notice that it is now an executable and showing its ▐▌
█ icon. ▐▌
█ Exit root, then exit your terminal by typing in: ▐▌
█ exit ▐▌
█ exit ▐▌
█ ▐▌
█ 5. To install software on Mac it's so easy- Click on the software's ▐▌
█ package/icon. You'll then be prompted to drag the software's ICON into the ▐▌
█ Application's directory (located on the dock, if it didn't present you ▐▌
█ with it). ▐▌
█ ▐▌
█ //---------------------------------------------------------------------- ▐▌
█ ▐▌
█ RECOMMENDED MAC SOFT: ▐▌
█ ````````````````````` ▐▌
█ I would love to populate this list with freeware that is equal or superior ▐▌
█ to the expensive Mac softwares. If you have tested any that are, please ▐▌
█ post details for us :D. ▐▌
█ ▐▌
█ Tip- take a snapshot before you start trying out softwares. ▐▌
█ This way once you are finished trying out varieties, you can revert back ▐▌
█ to your snapshot without leaving a mess behind. ▐▌
█ Then install the ones you want to continue testing - take another ▐▌
█ snapshot. ▐▌
█ ▐▌
█ 1. FIREWALL recommendation from a friend 'Little Snitch': Mac's firewall ▐▌
█ only allows you to configure the blocking of incoming traffic while ▐▌
█ everything else is allowed to go out. If you don't like the idea of your ▐▌
█ data being sent out try Little Snitch, HERE. They offer only a measly '3 ▐▌
█ hour' trial :/ and it is expensive to buy, EU 29.95. I do love it and it ▐▌
█ is a good idea since many of the Mac softwares love to send out your data ▐▌
█ without you having any knowledge of it. ▐▌
█ ▐▌
█ You need to re-boot after installing it; took me 2 tries to boot back up. ▐▌
█ Its own UIAgent also wants to call out, so block that as well if you want ▐▌
█ total control: ▐▌
█ Press New/then drop down arrow next to 'All Applications'/Choose ▐▌
█ Application/ browse to here:MacHD/Library/Little Snitch/ and select ▐▌
█ 'Little Snitch UIAgent'/choose/ Top scroll window 'Allow connections' ▐▌
█ change to 'Deny connections'/OK ▐▌
█ ▐▌
█ 2. TEXT EDITOR I've been searching for an equal of Notepad++ (another ▐▌
█ can't-do-without software, freeware, found HERE for Windows) for the Mac. ▐▌
█ The best I have found so far, they all offer a demo trial, is: ▐▌
█ TextMate found HERE, $54 ▐▌
█ comes with shell cmd (mate -h), multi tabs only in a 'Project Window' ▐▌
█ which you can save to reopen all the same files, can drag/drop into window ▐▌
█ . ▐▌
█ BBEdit found HERE, $125! ▐▌
█ multiple tabs, can drag/drop into window ▐▌
█ . ▐▌
█ Taco HTML Edit, found HERE, 24.95 ▐▌
█ ▐▌
█ 3. FINDER Mac's Finder on steroids has to be 'Path Finder' found HERE, 30 ▐▌
█ day trial. ▐▌
█ If you are having problems using a USB drive try this: ▐▌
█ Start Path Finder, right-click your USB's icon, select 'Get Info' ▐▌
█ Uncheck 'Alias bit'. Now try your USB drive again in Mac's Finder to be ▐▌
█ sure it works without being dependent on Path Finder. ▐▌
█ ▐▌
█ 4. PACKING/UNPACKING MULTIPLE FILES (and more): Has to be Stuffit 117MB, ▐▌
█ found HERE, they offer a 30 day trial, $80 ▐▌
█ ▐▌
█ For just 'unpacking' multiple files they offer Stuffit Expander *Free 25MB,▐▌
█ found HERE. ▐▌
█ *You need to sign up for the download with a working e-mail to receive the ▐▌
█ link; one that can read 'HTML!' (or you won't see the link), and agree to ▐▌
█ receiving their spam, who knows what else. And each time you use it, it ▐▌
█ sends out information. Whats up Mac devs?! ▐▌
█ Or you could skip the e-mail crap, use their direct link for English only: ▐▌
█ http://my.smithmicro.com/downloads/files/expander_installer_en_116.dmg ▐▌
█ or for en, fr, de, jp: ▐▌
█ http://my.smithmicro.com/downloads/files/expander_installer_multi_116.dmg ▐▌
█ Which you'll find on their page: ▐▌
█ http://my.smithmicro.com/downloads/trials/expander_mac.html ▐▌
█ . ▐▌
█ Winrar HERE, 30 day trial, I love Winrar, but for Mac it is only the ▐▌
█ command line version ▐▌
█ ▐▌
█ 5. BROWSER Mozilla Firefox browser for Mac found HERE, finally a great ▐▌
█ freeware! :p ▐▌
█ Tip- After you install it, drag it out of the Applications folder to your ▐▌
█ dock for easy access. ▐▌
█ ▐▌
█ 6. DIVX AVI Play a variety of .avi, DivX encoded files (without converting ▐▌
█ them). These all work in a Mac machine, but not all work in a Mac Virtual ▐▌
█ Machine for myself at least. ▐▌
█ A. Perian-Quick Time component, free, open source HERE. ▐▌
█ http://perian.cachefly.net/Perian_1.2.1.dmg ▐▌
█ My results: Works like a charm! :) ▐▌
█ B. VLC media player for Mac OS X, freeware, well supported, windows ▐▌
█ version is one of my fav players) HERE. ▐▌
█ Select for your download '32 bits Package for Intel-based Macs (19.1MB)' ▐▌
█ My results: Played sound only, no picture of my .avi ▐▌
█ C. 3ivx D4 CODEC HERE ▐▌
█ My results: my .avi still would not open in Quick Time. ▐▌
█ D. DivX for Mac CODEC HERE. ▐▌
█ If you use Windows to download it, it will give you the Windows installer ▐▌
█ .exe. ▐▌
█ Here is the direct link to the Mac download: ▐▌
█ http://download.divx.com/divx/mac/DivXInstaller.dmg ▐▌
█ *Note: DivX contacts home throughout and after the install like crazy. ▐▌
█ My results: my .avi crashes the DiVx Player, and still would not open in ▐▌
█ Quick Time. ▐▌
█ ▐▌
█ //---------------------------------------------------------------------- ▐▌
█ ▐▌
█ If you find mistakes, have suggestions, and or questions please post at ▐▌
█ mewbies forum HERE - thank you. ▐▌
█ ▐▌
█ Last update on 21 Jul '10 ▐▌
█ ▐▌
█▌ █▌
█▌ - mewbies.com - █▌
█▌ █▌
██▄▄▄▄▄▄▄▄▄▄▄▄▄▄▄▄▄▄▄▄▄▄▄▄▄▄▄▄▄▄▄▄▄▄▄▄▄▄▄▄▄▄▄▄▄▄▄▄▄▄▄▄▄▄▄▄▄▄▄▄▄▄▄▄▄▄▄▄▄██
█ ▐▌
█ ▐▌
█ METHOD 2; Mac OS X v10.6.1, .2, & .3 Updates: ▐▌
█ -If your Mac isn't functioning properly now after the Combo update; OS ▐▌
█ doesn't respond to mouse, etc, try this: ▐▌
█ ▐▌
█ 1. Restore snapshot4 (no updates) ▐▌
█ ▐▌
█ 2. Do not use Apple's Updater or any Combo updates. Manually update. ▐▌
█ -Install Mac OS X v10.6.1 Update (if it crashes 'unrecoverable error', ▐▌
█ just restart and do again) ▐▌
█ -Restart ▐▌
█ -Take snapshot4upd1 ▐▌
█ -Install Mac OS X v10.6.2 Update ▐▌
█ -Do NOT restart (this update is the update that causes many ppl's OS to ▐▌
█ stop responding to the mouse, reinstalling VMware tools before restart ▐▌
█ will not fix the problem either) ▐▌
█ -Install Mac OS X v10.6.3 Update ▐▌
█ -Restart ▐▌
█ -Test that all still works- mouse, sound, network, etc. If all works, ▐▌
█ great! ▐▌
█ -Clean up- remove files you don't want, empty trash, etc. ▐▌
█ -Take snapshot4upd3 ▐▌
█ ▐▌
█ //---------------------------------------------------------------------- ▐▌
█ ▐▌
█ FINISHED: ▐▌
█ ````````` ▐▌
█ Once you have everything working as you like it, before you install any ▐▌
█ other software, take a final snapshot; snapshot5final. ▐▌
█ You can delete your *previous snapshots if you are sure all is working. ▐▌
█ *You should leave the first snapshot though, just in case :D ▐▌
█ ▐▌
█ //---------------------------------------------------------------------- ▐▌
█ ▐▌
█ SPEED UP OS TIPS: ▐▌
█ ````````````````` ▐▌
█ 1. Go to System/Library/Extensions and delete AppleTPMACPI.kext if it ▐▌
█ exists. ▐▌
█ I didn't have this file. ▐▌
█ ▐▌
█ 2. Disable Dock Magnification - System Preferences/Personal/Dock/ ▐▌
█ un-check Magnification ▐▌
█ ▐▌
█ //---------------------------------------------------------------------- ▐▌
█ ▐▌
█ KERNEL ERROR FIX: ▐▌
█ ````````````````` ▐▌
█ I did not need to do this but here is the information taken from HERE. ▐▌
█ "you need to get a kernel and edit a file to stop the dmg error and the ▐▌
█ kernel panic, get this file": ▐▌
█ http://xnu-dev.googlecode.com/files/voodoo2_alpha3_intel.zip ▐▌
█ get it in your mac environment on the root then open the console and put ▐▌
█ this in: ▐▌
█ sudo pico /Library/Preferences/SystemConfiguration/com.apple.Boot.plist ▐▌
█ Make it look like this ▐▌
█ <key>Kernel</key> ▐▌
█ <string>hd(0,2)/mach_kernel.voodoo.alpha3</string> ▐▌
█ <key>Kernel Flags</key> ▐▌
█ <string>rd=disk0s2</string> ▐▌
█ now your dmg files will open and you can even run pwnage tool ▐▌
█ ▐▌
█ //---------------------------------------------------------------------- ▐▌
█ ▐▌
█ PROBLEMS WITH RESOLUTION, SOUND, MOUSE: ▐▌
█ ``````````````````````````````````````` ▐▌
█ I have tried these steps before. For myself I did not notice any ▐▌
█ improvements/changes (I was still hoping I could get drag/drop files to ▐▌
█ work; no such luck). ▐▌
█ I have read though it did help other people with resolution, sound, better ▐▌
█ mouse action, shared folders, etc. ▐▌
█ If you have a similar problem it just might work for you: ▐▌
█ ▐▌
█ 1. Download VMWare Fusion Demo (this is for Macs) (you won't install it, ▐▌
█ but extract a single file from it) HERE (its apx 175MB) OR I have ▐▌
█ extracted the darwin.iso already from version 3.0.2.23708 and put it HERE ▐▌
█ for you. ▐▌
█ SHA-160: FEAE156F6C878B337F9018C6A33BF256E1A71163 ▐▌
█ MD5: 67bcd5c32573b98dac61b010e2538caf ▐▌
█ ▐▌
█ 2. If you have the demo, extract 'darwin.iso' from the .dmg file located ▐▌
█ here: \Install VMware Fusion.app\Contents\Resources\Install VMware ▐▌
█ Fusion.mpkg\Contents\Packages\com.vmware.fusion.tools.darwin.pkg ▐▌
█ ▐▌
█ 3. In Mac mount the darwin.iso, as you did earlier, and install it, you'll ▐▌
█ be prompted for your password and after you'll need to reboot. ▐▌
█ ▐▌
█ //---------------------------------------------------------------------- ▐▌
█ ▐▌
█ MISC MAC USAGE TIPS FOR MAC-MEWBIES: ▐▌
█ ```````````````````````````````````` ▐▌
█ 1. To paste text in Mac press on your keyboard the Start key +v (key with ▐▌
█ the windows logo that brings up your start menu in Windows) ▐▌
█ Keyboard short cuts HERE. ▐▌
█ ▐▌
█ 2. To rename a folder: Select it then hit your enter key. ▐▌
█ ▐▌
█ 3. To gain root in a terminal (Applications/Utilities/Terminal) session ▐▌
█ enter: ▐▌
█ sudo -s ▐▌
█ ▐▌
█ 4. If you have a file that should be executable but shows as a document, ▐▌
█ it's most likely because its permissions aren't set (or the file is ▐▌
█ corrupted). ▐▌
█ One of the causes of this can be that the file itself (not the packages ▐▌
█ dmg/zip/rar/tar etc) passed through a Windows environment first (when you ▐▌
█ transfer files from your Windows to your Mac) the permissions will be ▐▌
█ lost. So when transfer files from your Windows to your Mac, keep them in ▐▌
█ the .dmg/zip/etc package before transfer them. ▐▌
█ ▐▌
█ A. To fix this, double click on the file. It will open a terminal session. ▐▌
█ If it does not then open a terminal session. ▐▌
█ B. Change to the directory that contains the file, example: ▐▌
█ cd Public/mystuff/ ▐▌
█ ▐▌
█ Now to change the file into an executable you need to chmod it 755, most ▐▌
█ likely with root. So login in with root: ▐▌
█ sudo -s ▐▌
█ your.password.here..hit.enter.key ▐▌
█ chmod 755 'your file name here' ▐▌
█ ▐▌
█ Now view your file and notice that it is now an executable and showing its ▐▌
█ icon. ▐▌
█ Exit root, then exit your terminal by typing in: ▐▌
█ exit ▐▌
█ exit ▐▌
█ ▐▌
█ 5. To install software on Mac it's so easy- Click on the software's ▐▌
█ package/icon. You'll then be prompted to drag the software's ICON into the ▐▌
█ Application's directory (located on the dock, if it didn't present you ▐▌
█ with it). ▐▌
█ ▐▌
█ //---------------------------------------------------------------------- ▐▌
█ ▐▌
█ RECOMMENDED MAC SOFT: ▐▌
█ ````````````````````` ▐▌
█ I would love to populate this list with freeware that is equal or superior ▐▌
█ to the expensive Mac softwares. If you have tested any that are, please ▐▌
█ post details for us :D. ▐▌
█ ▐▌
█ Tip- take a snapshot before you start trying out softwares. ▐▌
█ This way once you are finished trying out varieties, you can revert back ▐▌
█ to your snapshot without leaving a mess behind. ▐▌
█ Then install the ones you want to continue testing - take another ▐▌
█ snapshot. ▐▌
█ ▐▌
█ 1. FIREWALL recommendation from a friend 'Little Snitch': Mac's firewall ▐▌
█ only allows you to configure the blocking of incoming traffic while ▐▌
█ everything else is allowed to go out. If you don't like the idea of your ▐▌
█ data being sent out try Little Snitch, HERE. They offer only a measly '3 ▐▌
█ hour' trial :/ and it is expensive to buy, EU 29.95. I do love it and it ▐▌
█ is a good idea since many of the Mac softwares love to send out your data ▐▌
█ without you having any knowledge of it. ▐▌
█ ▐▌
█ You need to re-boot after installing it; took me 2 tries to boot back up. ▐▌
█ Its own UIAgent also wants to call out, so block that as well if you want ▐▌
█ total control: ▐▌
█ Press New/then drop down arrow next to 'All Applications'/Choose ▐▌
█ Application/ browse to here:MacHD/Library/Little Snitch/ and select ▐▌
█ 'Little Snitch UIAgent'/choose/ Top scroll window 'Allow connections' ▐▌
█ change to 'Deny connections'/OK ▐▌
█ ▐▌
█ 2. TEXT EDITOR I've been searching for an equal of Notepad++ (another ▐▌
█ can't-do-without software, freeware, found HERE for Windows) for the Mac. ▐▌
█ The best I have found so far, they all offer a demo trial, is: ▐▌
█ TextMate found HERE, $54 ▐▌
█ comes with shell cmd (mate -h), multi tabs only in a 'Project Window' ▐▌
█ which you can save to reopen all the same files, can drag/drop into window ▐▌
█ . ▐▌
█ BBEdit found HERE, $125! ▐▌
█ multiple tabs, can drag/drop into window ▐▌
█ . ▐▌
█ Taco HTML Edit, found HERE, 24.95 ▐▌
█ ▐▌
█ 3. FINDER Mac's Finder on steroids has to be 'Path Finder' found HERE, 30 ▐▌
█ day trial. ▐▌
█ If you are having problems using a USB drive try this: ▐▌
█ Start Path Finder, right-click your USB's icon, select 'Get Info' ▐▌
█ Uncheck 'Alias bit'. Now try your USB drive again in Mac's Finder to be ▐▌
█ sure it works without being dependent on Path Finder. ▐▌
█ ▐▌
█ 4. PACKING/UNPACKING MULTIPLE FILES (and more): Has to be Stuffit 117MB, ▐▌
█ found HERE, they offer a 30 day trial, $80 ▐▌
█ ▐▌
█ For just 'unpacking' multiple files they offer Stuffit Expander *Free 25MB,▐▌
█ found HERE. ▐▌
█ *You need to sign up for the download with a working e-mail to receive the ▐▌
█ link; one that can read 'HTML!' (or you won't see the link), and agree to ▐▌
█ receiving their spam, who knows what else. And each time you use it, it ▐▌
█ sends out information. Whats up Mac devs?! ▐▌
█ Or you could skip the e-mail crap, use their direct link for English only: ▐▌
█ http://my.smithmicro.com/downloads/files/expander_installer_en_116.dmg ▐▌
█ or for en, fr, de, jp: ▐▌
█ http://my.smithmicro.com/downloads/files/expander_installer_multi_116.dmg ▐▌
█ Which you'll find on their page: ▐▌
█ http://my.smithmicro.com/downloads/trials/expander_mac.html ▐▌
█ . ▐▌
█ Winrar HERE, 30 day trial, I love Winrar, but for Mac it is only the ▐▌
█ command line version ▐▌
█ ▐▌
█ 5. BROWSER Mozilla Firefox browser for Mac found HERE, finally a great ▐▌
█ freeware! :p ▐▌
█ Tip- After you install it, drag it out of the Applications folder to your ▐▌
█ dock for easy access. ▐▌
█ ▐▌
█ 6. DIVX AVI Play a variety of .avi, DivX encoded files (without converting ▐▌
█ them). These all work in a Mac machine, but not all work in a Mac Virtual ▐▌
█ Machine for myself at least. ▐▌
█ A. Perian-Quick Time component, free, open source HERE. ▐▌
█ http://perian.cachefly.net/Perian_1.2.1.dmg ▐▌
█ My results: Works like a charm! :) ▐▌
█ B. VLC media player for Mac OS X, freeware, well supported, windows ▐▌
█ version is one of my fav players) HERE. ▐▌
█ Select for your download '32 bits Package for Intel-based Macs (19.1MB)' ▐▌
█ My results: Played sound only, no picture of my .avi ▐▌
█ C. 3ivx D4 CODEC HERE ▐▌
█ My results: my .avi still would not open in Quick Time. ▐▌
█ D. DivX for Mac CODEC HERE. ▐▌
█ If you use Windows to download it, it will give you the Windows installer ▐▌
█ .exe. ▐▌
█ Here is the direct link to the Mac download: ▐▌
█ http://download.divx.com/divx/mac/DivXInstaller.dmg ▐▌
█ *Note: DivX contacts home throughout and after the install like crazy. ▐▌
█ My results: my .avi crashes the DiVx Player, and still would not open in ▐▌
█ Quick Time. ▐▌
█ ▐▌
█ //---------------------------------------------------------------------- ▐▌
█ ▐▌
█ If you find mistakes, have suggestions, and or questions please post at ▐▌
█ mewbies forum HERE - thank you. ▐▌
█ ▐▌
█ Last update on 21 Jul '10 ▐▌
█ ▐▌
█▌ █▌
█▌ - mewbies.com - █▌
█▌ █▌
██▄▄▄▄▄▄▄▄▄▄▄▄▄▄▄▄▄▄▄▄▄▄▄▄▄▄▄▄▄▄▄▄▄▄▄▄▄▄▄▄▄▄▄▄▄▄▄▄▄▄▄▄▄▄▄▄▄▄▄▄▄▄▄▄▄▄▄▄▄██